Showing posts with label Cheese. Show all posts

Monday, December 15, 2025

MONDAY RECIPE POST - BEEF, NOODLE AND CHEESE CASSEROLE

You can brown the casserole a little more for a more golden appearance. We usually make it in the colder months.

This is another recipe I have long forgotten where it came from. All I know is we give it a 10 out of 10 every time we make it.


1 pound ground beef

1 small yellow onion, diced

2 cloves garlic, minced

1 teaspoon salt

1/2 teaspoon black pepper

1 teaspoon Italian seasoning

1 can (15 ounces) tomato sauce

1 can (14.5 ounces) diced tomatoes, drained

8 ounces egg noodles (we used the butterfly kind)

1/2 cup sour cream

1/2 cup cottage cheese

2 cups shredded cheddar cheese (divided)


Preheat your oven to 350 degrees Fahrenheit (175 degrees Celcius). Lightly grease an 8 x 13 inch baking dish.

Cook the noodles in salted boiling water according to package directions. Drain and set aside.

Brown the beef in a large skillet over medium heat and cook until beef is browned and onions are soft.

Drain excess grease.

Add the garlic, salt, pepper, Italian Seasoning, tomato sauce, diced tomatoes, mixing gently until well combined. 

Let simmer for 5 to 7 minutes. 

Assemble the casserole: 

Combine the sour cream and cottage cheese in a separate medium bowl. 

Put half the noodles into the bottom of the prepared baking dish.

Spread all of the cream cheese mixture evenly over the noodles.

Add the remaining half of the noodles on top of the cream cheese.

Pour all the meat sauce over the noodles.

Put all the grated cheese on top of the meat sauce.

Cover the casserole with foil and bake 20 minutes. Then remove the foil and bake for an additional 10 to 15 minutes, or until the cheese is melted, slightly golden and bubbly. 

Let it rest for 5 to 10 minutes before serving. A little chopped parsley sprinkled over the top would add a little more color but I forgot this step.


Notes I jotted down.

You can use Rotini or penne pasta (or in our case the butterfly pasta) instead of the egg noodles. Directions/timing might differ a little. Try not to overcook.

You can pre-prepare. Assemble the casserole and cover tightly. Refrigerate up to 24 hours before baking.

Freezer friendly.  You can wrap the unbaked casserole in foil and freeze, or make two, one to eat that night and one to freeze for later. You can freeze portions up to 3 months in an airtight container. Thaw overnight and reheat in the oven or a microwave until warmed through.

I prefer the oven for reheating, but microwave works if you want to put food on the table in a hurry for anyone who is super-hungry.

Refrigerate leftovers in an airtight container for up to 4 days.

We added a veggie salad and a crusty roll.


Tuesday, December 2, 2025

MY USUAL MONDAY MORNING RECIPE POST ON TUESDAY - CHEDDAR CORN CHOWDER - 10 TO 12 SERVINGS

Soup weather and we love soups. I found this one at a favorite, Ina Garten at the Barefoot Contessa website, original link for the recipe is here.

Cheddar Corn Chowder - 10 to 12 servings

8 ounces bacon, chopped

1/4 cup good olive oil

6 cups chopped yellow onions (4 large onions)

4 tablespoons unsalted butter

1/2 cup all-purpose flour

2 teaspoons kosher salt

1 teaspoon freshly ground pepper

1/2 teaspoon ground turmeric

12 cups chicken stock, preferably homemade

6 cups medium-diced white boiling potatoes, unpeeled (2 pounds)

10 cups corn kernels, fresh (10 ears) or frozen (3 pounds)

2 cups half-and-half

1/2 pound sharp white Cheddar cheese, grated


In a large stockpot on medium-high heat, cook the bacon and olive oil until the bacon is crisp, about five minutes.

Remove the bacon with a slotted spoon and reserve. 

Reduce the heat to medium and add the onions and butter to the fat. Cook for 10 minutes or until the onions are translucent.

Stir in the flour, salt, pepper and turmeric. Cook for three minutes. 

Add the chicken stock and potatoes, bring to a boil and simmer, uncovered, for 15 minutes, or until the potatoes are tender.

If using fresh corn, cut the kernels off the cobs and blanch the kernels for 3 minutes in boiling, salted water. Drain (if you are using frozen corn you can skip the above step.)

If using frozen corn, add it to the soup, then add the half-and-half and Cheddar cheese.

Cook for 5 more minutes until the cheese is melted.

Season to taste with salt and pepper.

Serve hot with a garnish of bacon.


Our verdict was that this was an excellent soup. In the photo above, I went overboard on the bacon but it still tasted great. I left bacon off the second night and liked it just as much, maybe even a little more.

 I have never added turmeric to anything but keep 
hearing good things about it and now have a few recipes where it is used, mostly in beverages at the moment. 

People add it to soups for both its flavor and its health benefits. It is said that it provides a warm, earthy and slightly peppery taste, and a vibrant golden color. Additionally, it is prized for its anti-inflammatory and antioxidant properties, with its active compound of curcumin being enhanced when combined with black pepper. Anyway, it had a pleasant flavor I've never tasted before, hard for me to describe as it was in the background, but I wouldn't hesitate to use it again.

I thought maybe next time I would reduce the amount of whole corn kernels and add an extra can of cream-style instead. This is just for our personal preference.

We served it with a crusty roll which was very good. 

We have lots and lots of leftovers so I won't be cooking for the next few days. Our main meal is set but we may end up freezing a few portions for another day.

We didn't make any changes as we had everything on the list of the ingredients. 
I wanted to show you what it looked like before the pepper. I added a good sprinkling as there are times I feel like it and other times not. Apparently, freshly ground black pepper activates the good properties in the turmeric. I have to read more on the subject.

The full address for this soup is below, just in case you prefer to copy and paste rather than click on the link at the beginning.

https://barefootcontessa.com/recipes/cheddar-corn-chowder


Thanks for dropping by and I hope 
your day is a great one.

Bon appétit!


Monday, October 7, 2024

MONDAY MORNING RECIPE POST - CHEESE AND LEEK AND HERB BREAD

Every now and again I browse through Instagram for recipes. I was looking for something light. This doesn't exactly fit that category. However, it did fit perfectly with the cheesy vegetable corn chowder we made to go with it, an old favorite you can find here. It was a perfect pairing. If you would like to look at this lady’s video, it's a short one and you can find it here. I tried my best with equivalent measurements as the original came in grams. I have added the ounces and cups at the bottom of the recipe. However, scales these days have both measurements and it makes life easy when trying recipes from overseas, as I found out today. 


Cheese and Leek 'Herb Bread'

Feeds 4 to 6

500g self-raising flour 
1 teaspoon baking powder
1 teaspoon dried parsley
2 leeks, finely chopped
110g butter 
175g grated cheddar cheese 
200ml water 
A little milk for brushing over the top
Salt and pepper, measurements aren't given

Heat the oven to 200C (or 400 deg. F). 

Place the finely chopped leek in a pan with a drizzle of oil. Fry for five minutes until soft.

Place the flour in a large mixing bowl. Stir in the baking powder, dried parsley (you can use oregano or mixed herbs if you prefer) and salt and pepper.

Add the butter and quickly mix in. I cut it into small pieces first.

Mix in the grated cheddar and leeks until thoroughly blended.

Add the water. Use your hands to mix it together until you have a smooth-ish dough.  Place the dough on a large greased or lined baking tray (I used parchment paper on my tray). Press dough down until you have a thick circle roughly 20cm across (that works out to almost 8 inches). Brush the top of the loaf with a little milk. 
Bake in the oven for 30 minutes until cooked through. If the top is cooking too quickly, just cover it with foil for the last few minutes of baking.

Leave to cool before cutting into wedges but when it is still a little warm. 

Serve and enjoy!

U.S. Measurements:
4 cups of self-rising flour
1 teaspoon baking powder
1 teaspoon dried parsley
2 leeks, finely chopped
1 stick butter
7/8 of a cup of grated cheddar cheese or 6 ozs
5/6 cup or 6-3/4 fl. ozs. water
A little milk for brushing over the top.
Salt and Pepper (no measurement given for these - I barely used a sprinkle)

I was very pleased with how this turned out and we both gave it a ten out of ten.  The video host Amy said it looks like a really big scone when done. This is what I thought. I have cooked scones in a round like this, but cut into sections before baking, spreading about two inches away from each other. 

Those scones I mentioned I put sliced green onions in them, and bits of ham along with the cheese. They look almost identical to these. You can take a look at that recipe here.

You can use other favorite herbs if you prefer.

I have cut the rest into small slices and put them in a freezer proof container for several other meals. If they are anything like the scones, they will be great when thawed out and reheated.

This would also be a great breakfast on the go.

Added note: Almost forgot, these leeks have a lot of grit/dirt between the leaves. I rinsed through them as best I could. When they were chopped, I gave them three or four rinses, changing the water each time. Then I blotted them well and let them dry out before sautéing in the frying pan. 

Thanks for looking and 
I hope your day is a great one. 


Monday, January 8, 2024

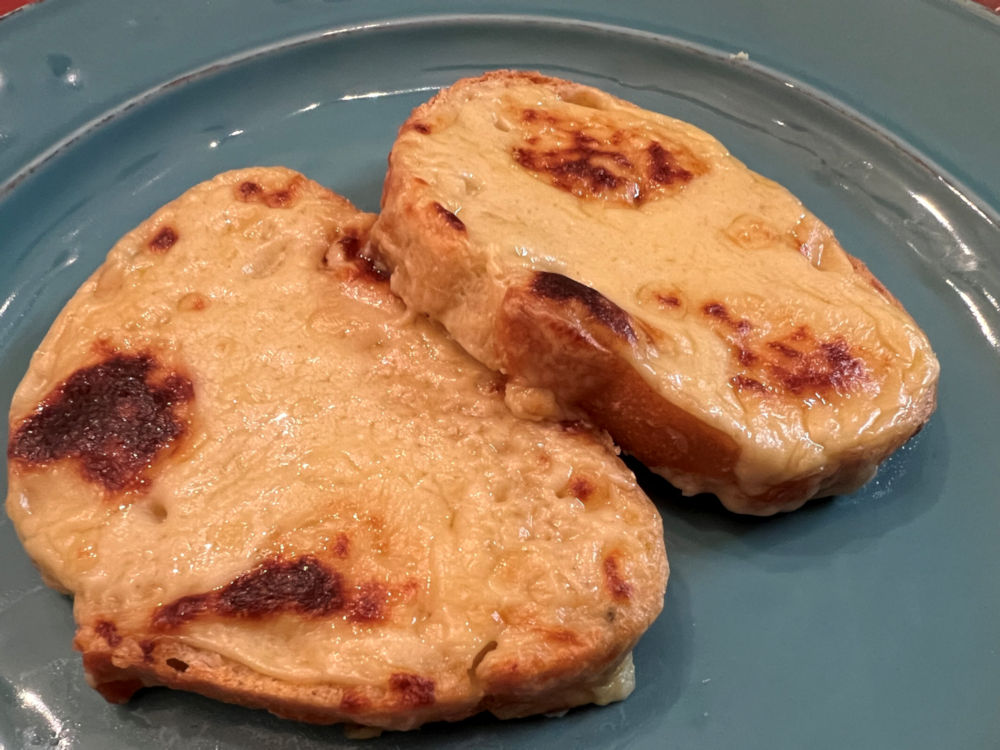
MONDAY MORNING RECIPE - WELSH RAREBIT


There are times when we want something simple and don't want to spend a lot of time in the kitchen.  On days such as these we fix cheese on toast and tomato soup. Gregg had been talking about his Mother's Welsh rarebit that she used to give them when they were kids. It was a nice memory for him and as we had never made it before, we went a bit beyond our simple cheese on toast. I found a Welsh Rarebit recipe on YouTube which you can find here. The host goes by the name of The Backyard Chef. He has a lot of interesting dishes I would like to try, and I can certainly recommend this recipe. I recommend viewing this video in case I have missed out any steps.

Welsh Rarebit

2 tablespoons unsalted butter
2 tablespoons all-purpose flour
1 teaspoon mustard powder or 1 tablespoon regular English mustard
1/2 teaspoon cayenne pepper (optional) - the chef uses paprika
1/2 teaspoon Worcestershire sauce
1/2 cup to start with of dark beer, like a stout or porter, as much as you like.
2/3 cup heavy cream
1-1/2 cups grated cheddar cheese
4 slices of thick bread, toasted
Salt and freshly ground pepper to taste. 

Melt the butter in a pan on medium heat. When it is melted add the all-purpose flour, and blend using a whisk. Cook for two or three minutes to cook the flour. Very important step in my opinion as the taste of raw flour will spoil the dish.

Next add the cayenne pepper (or paprika) if using, the Worcestershire sauce, and half cup of the beer of your choice. He says you can add as much as you like.  Also add the heavy cream and stir until the mixture becomes thickened. Keep an eye on the heat, raise temperature a little if you have to, but keep whisking constantly. Very easy to burn so if it feels like it is sticking on the bottom of the pan, lower heat and carefully lift pan off and to the side of the element if you need to. Once the sauce has thickened you can turn off the heat and it should be hot enough to blend in the cheddar cheese. 

Once the cheese is totally blended, pour equal amounts of cheese mixture over your toasted bread which have been previously placed on a baking sheet. I lined mine with a piece of parchment paper. Sprinkle with salt and freshly ground pepper to taste.

Put under broiler in the oven until it is nicely browned.  This only takes a few minutes and once again watch it carefully because it can burn quickly.

We didn't serve it with soup this time and just had as is. It made a very nice light supper. It also would go great with a simple green salad and a bowl of your favorite soup. Gregg added a side of sauerkraut with his. Although it is very good for us, having several health benefits which you can read about here, I am not a fan of sauerkraut and gave it a miss.  


Our changes were that we didn't have any beer so put in a little extra milk (we didn't use cream but had 2% in the fridge and it worked fine). 

I used salted butter instead of unsalted.

The mustard we use is one I grew up with. I have included it below.  

(The additions of Worcestershire Sauce and Coleman’s Mustard gave it a lovely flavor.)


This was one of those impulse dishes where we didn't go to the store and used everything on hand. We also didn't want to add the cayenne or paprika. We will probably make it again with the original ingredients as we are curious how it would differ. To us this tasted great!


The Chef gives a history of this dish.  I always enjoy that and so I have added it below. 

"The history of Welsh Rarebit, formerly known as Welsh Rabbit, is both interesting and somewhat humorous. This traditional Welsh dish is a savory sauce of melted cheese, typically mixed with other ingredients like ale, mustard, and Worcestershire sauce, served hot over toasted bread.

The dish first appeared in 18th-century Britain. One of the earliest mentions was in 1725 in a book called "The Art of Cookery" by Hannah Glasse.

The term "Welsh Rabbit" was originally used, and it's believed to be a playful, derogatory term coined by the English. The implication was that due to poverty or simplicity in their diet, the Welsh used cheese as a substitute for the more expensive meats like rabbit. Over time, the name evolved to "Welsh Rarebit," though the reasons for this change are unclear. It's possible that the change was made to avoid confusion, or it may have been a way to make the name sound more refined.

While the dish has its roots in Welsh culture, it became popular across Great Britain. It was often enjoyed as a supper dish in public houses (pubs) and a common feature in home cooking.

Traditional Welsh Rarebit includes Welsh cheese, like Cheddar or Caerphilly, melted into a sauce with ale or beer, mustard, and sometimes Worcestershire sauce or paprika. This mixture is poured over toasted bread and sometimes grilled until bubbly and brown. Over time, many recipe variations have developed, including additions like tomatoes or bacon. 

Welsh Rarebit has become more than just a simple dish; it symbolizes Welsh identity and pride. It's often served in Welsh-themed meals and on St. David’s Day, the National Day of Wales."


A memory: when years ago I worked in a small British tearoom, two ladies walked in.  As soon as I overheard one of the ladies speak, I told her she was the first person from Wales I had met since moving to America. She looked at me in surprise as she had lived here longer than I had, and said that I was the first person to ever identify her as Welsh. She was delighted! I told her that my grandmother on my father's side had the name of Jones, and I had always thought I had a bit of the Welsh. She studied me for a minute and said, "Yes, I can see a bit of the Welsh in you." I was in turn delighted as considered it a great compliment. I was invited to sit down for a while and as the tearoom was very quiet, I indulged myself in a bit of rest time and great conversation. This really was too good an opportunity to miss. We had a lovely time chatting, they eventually left and I got back to work. Sadly they were only in the area a short time and on vacation. Years later when Gregg got into our ancestry, he found that some of my roots did originate from Wales, and I went back to the conversation I had with this lady.  It is a very nice memory.


Monday, February 13, 2023

MONDAY RECIPE POST - CRUSTLESS QUICHE WITH BROCCOLI AND CAULIFLOWER - SERVES 6

 I didn't take a proper plated photo for this one, having forgotten before we sat down to eat, and already having finished our meal.  I have Gregg to thank for taking this.  The recipe came from a food blog called Clean and Delicious hosted by Dani, and you can get the original recipe here.  We gave it a 10 out of 10, an excellent quiche.

Described as "healthy, easy, loaded with veggies and high in protein."  Tasty and low in calories at 219 calories per slice.  From prep to table, 55 minutes.


Crustless Quiche with Broccoli and Cauliflower 

Servings: 6


2-1/2 to 3 cups broccoli florets (8 ounces)

2-1/2 to 3 cups cauliflower florets (8 ounces)

1/2 tsp sea salt

1/2 tsp garlic powder

1/4 tsp black pepper

6 eggs 

6 egg whites

1/2 cup 2% Greek yogurt

1/4 cup scallions chopped

1 cup shredded cheddar cheese


Preheat oven to 350 F and grease a 9-inch pie plate with cooking spray, butter, or coconut oil. Set aside. 

Bring a couple inches of water in a small-medium sized pot and bring to a boil. 

Place a steamer basket in the pot and add the broccoli and cauliflower florets and steam for six minutes or until tender but not mushy.

Transfer the chopped broccoli and cauliflower to a medium bowl and season with salt, garlic powder and black pepper. Gently toss so the veggies are coated with the spices.

Combine the eggs, egg whites and Greek yogurt in a separate large bowl and whisk until well combined.

Add the seasoned vegetables to the prepared pie plate. 

Sprinkle the scallions and shredded cheese over top. 

Pour the egg mixture over the cheese making sure all the veggies and cheese are covered with the egg mixture.

Cook for 45 minutes or until set and the top is lightly browned. Let rest for a while until you can eat comfortably.  Serve and enjoy!


I have included a few of Dani's Notes:


The quiche can be served hot, cold, or at room temperature for a healthy breakfast, lunch or dinner.  

It is low in carbs and loaded in protein, tasty, filling and nutritious.  And healthy as this recipe is super nutritious.  It is packed with veggies and protein for tons of vitamins and minerals. The perfect way to start a day! 

It can be made ahead and kept in the fridge for up to 5 days.

Greek yogurt gives this meal a boost of protein, and also add richness and a lovely tang.

Cheddar cheese was used but other cheese varieties would work as well, and you could use your favorite.

It’s important to steam the vegetables before adding them to the quiche. If they cook in the egg mixture, they’ll leach water and make the quiche watery and soggy.

If you have time, skip the bagged pre-shredded cheese from the grocery store. The store-bought shredded cheese is often coated in anti-caking agents and preservatives and will not melt smoothly.

For best results, we recommend chopping the broccoli and cauliflower into small bite-sized pieces. The vegetables will be better dispersed through the quiche and it will be easier to eat.

You can use any fresh herbs you have on hand to garnish your quiche. We used green onions (scallions), but other options include basil, parsley, chives or dill.

Store leftovers in an airtight container in the fridge for up to 4 to 5 days. You can eat the leftovers cold or reheat them.

Make this quiche a day ahead of time, store it in the fridge (covered with a lid or plastic wrap), and then bake it just before you’re ready to eat!

Reheat in the microwave or oven until heated through. If you’re heating it in the oven, you can also cover it with aluminum foil to retain the moisture.

To freeze: Let it completely cool, then transfer individual slices to freezer-safe bags or containers for up to 3 months. You can also freeze the entire quiche at once if you have a large enough freezer-safe bag or container.

To reheat frozen: Either let the slices thaw in the refrigerator before reheating them in the microwave, or you can simply place them straight into the microwave and heat them for about 1 minute. To reheat an entire frozen quiche, place it back in the oven at 350 degrees F for 30-35 minutes or until warm in the middle.

A quiche usually contains cream or milk. However, you will notice that my recipe subs Greek yogurt for the cream to add more protein while still creating a rich creamy texture!


What did Gregg and I think of this recipe?  Excellent!  Gregg and I have different tastes in some foods, as do most people.  He is not a big fan of broccoli, but I cut into even smaller pieces, cauliflower also for them to cook uniformly.  With the other ingredients he had no problem, and still gave it a 10 out of 10.  He enjoyed it enough to have seconds.  

The only reason I mention this not liking broccoli, is that if you have someone in the family who might feel the same way, it would be a good meal for them to try.  We all know how healthy broccoli is but not everyone enjoys it.

I didn't use the 6 egg whites as I only had a certain number of eggs before going to the store, and I seem to not have much of a planning stage these days. I use what I have in the fridge or the pantry.  Instead of the 6 egg whites I used 2 extra whole eggs instead, for a total of 8 eggs.  This was more than enough for us.  One of the commentors at the original recipe didn't want to use egg whites, so Dani replied that one whole egg equals 2 egg whites.

I was pleasantly surprised using the Greek yogurt instead of the cream.  It gave it a lovely flavor.

I pre-cooked the veggies but don't have a steamer, so I put them in a pot of water, brought them to a boil and continued for six minutes.  I drained them thoroughly before proceeding.  They still had a bit of a bite when I finished cooking the quiche, which was just how we like it.

That's about all I can think of.  If I remember anything else I will add it later.  If you have any questions, I'd be happy to answer them in the comment section.


Monday, January 30, 2023

MONDAY RECIPE POST - PARMESAN ROASTED POTATOES - SERVES 6


Today's recipe comes from Spoon Fork Bacon, hosted by Terri and Jenny.  It looks like they used it as an appetizer, but I made mine a side dish and it was very yummy.  You can find the original recipe at this link.

Crispy Parmesan Potatoes

Serves: 6

Calories per serving: 176 


1/3 cup pre-grated Parmesan cheese (see in notes)

1 teaspoon garlic powder

1/2 teaspoon smoked paprika

1/4 teaspoon black pepper

2 tablespoons melted, salted butter divided

2 pounds baby potatoes halved lengthwise

salt optional


Optional garnish and serving suggestion:


2 tablespoons thinly sliced chives

2/3 cup sour cream


Preheat oven to 400˚F.

In a small bowl stir together cheese, garlic powder, paprika, and black pepper.

Brush 1 tablespoon melted butter into the bottom of a glass 10”x14” baking dish.

Sprinkle cheese mixture evenly over brushed butter, in the baking dish.

Press cut-side of potatoes into the cheese mixture (trying not to move the potatoes once they are set down).

Carefully brush tops of potatoes with remaining butter and season with salt if you want(but I found that the extra salt isn’t needed due to the salt in the butter and cheese).

Roast potatoes for 28-32 minutes or until tops have wrinkled and potatoes are just fork tender.

Remove from oven and break apart any Parmesan crisp pieces connecting the potatoes together.

Transfer potatoes to a platter and top with chives. Serve with sour cream for dipping if you want!


Notes:

Pre-grated Parmesan cheese that you find in the refrigerated section of the grocery store. Do not freshly grate the Parmesan for this recipe. The pre-grated Parmesan melts and sticks to the potatoes the best and creates the best cheese blanket, which is just what you want!  (Denise's note: I grated my Parmesan using a microplaner similar to this one. I would be interested in using the pregrated product to see the difference, but I was very happy with the way mine turned out.)

Press the potatoes into the Parmesan mixture, don’t move them around. This will ensure a full and even coating of the Parmesan is crusted onto the potatoes.

It’s important to use potatoes similar in size for this dish to ensure even roasting.

Variations:

Add some herbs and/or other spices to the Parmesan mixture. we like adding cumin for a smoky kick or rosemary and thyme for an earthy flavor!

Add a teaspoon of honey to the remaining butter mixture for a sweet touch.

Serve the potatoes with ketchup, ranch, bbq sauce, or honey mustard instead of sour cream for dipping.

Reheating instructions

The potatoes really taste the best when they’re eaten fresh from the oven, but if you have leftovers, you can reheat them in the oven. 

To reheat the potatoes:

Preheat oven to 350˚F. Place Parmesan potatoes in a baking dish, cut-side down and cover baking dish tightly with foil. Roast for 10 minutes until heated through. Uncover and flip potatoes so they’re cut-side up. Lightly sprinkle with a little more Parmesan, salt and pepper. Continue to roast for an additional 5 minutes. Remove from heat and enjoy!


We both found this recipe delicious!  I served them on the side with a rib-eye steak (we don’t buy huge steaks but they are big enough to portion into thirds.  We each have a small portion, leaving the remaining third to be sliced thinly and made into sandwiches the next day.  It is a good way of controlling portions).  My other side was slices of sautéed tomatoes.

Thanks for looking, have a great day and...


Monday, June 20, 2022

MONDAY RECIPE POST - BREAKFAST TOMATOES FILLED WITH EGGS AND CHEESE, PLUS

Our recipe is thanks to Gregg who saw it online.  I don't have a link but if you know of one with this recipe, please let me know and I will add it later.  We basically winged it from memory and had nothing written down.  A nice short one!


Per person you need:

1 tomato
2 eggs
Salt and Pepper to taste
Grated Cheddar Cheese (amount to your own taste)
Chopped Cilantro (amount to your own taste)
Chopped onion (amount to your own taste)
2 teaspoons of flour
Avocado or Olive Oil for cooking the tomatoes (or you can use cooking spray)

To a small mixing bowl add the eggs with salt and pepper to taste, and whisk.  Next add the Cheddar cheese, chopped cilantro, chopped onion and the flour.  Whisk until well combined.

Wash and dry the tomato.  Slice into 1/4-inch to 1/2-inch slices.  It really depends on how big your tomatoes are.

If you don't have a cutter to fit, use the top edge of a small glass to cut out the center of each tomato slice.  The size of the glass depends on how big your tomatoes are.  I used a narrow orange juice glass.  Go carefully as we don't want to press down too hard, safety first.  

On a chopping board, dice the tomato centers and put into the mixing bowl with all the other ingredients.  Mix until well combined

Heat a frying pan with your choice of oil on medium high heat.  When it is hot, carefully place your tomato slices into the pan.  Next get a small ladle and use to pour the amount needed to fill the inside of the tomato.  You certainly don't need much.

Cook long enough, a few minutes, to start setting the egg mixture.  If you find it getting too brown, turn the heat down a tad.

This is the tricky part.  Carefully turn the slices over and cook the other side until nicely browned and the egg is set.


Another ten out of ten and enjoyed very much.  I doubled up on the ingredients for the two of us, and it would be easy to add more servings.

The flour was a surprise addition as I never would have thought of using it before.  It gave it a little more body.

A mixed green salad went very nicely as a side, and a tablespoon of Branston's Chutney on the plate next to the tomatoes.  We also thought salsa might be nice, and maybe guacamole.

I have since tried this mixture served up as an omelet, not bothering with it as a filling for the sliced tomatoes.  It has a wonderful taste with everything added.  However, it is worth making the stuffed tomatoes as it really is a fun dish.

If you don't like Cilantro you can choose another herb, or not.

A sprinkle of chives as a garnish would make it look pretty also.

    That's it for today’s recipe.  
    Have a great week!


Monday, January 31, 2022

MONDAY RECIPE POST - OVEN-ROASTED PORK LOIN WITH HERBS

We have made a couple of old favorites this week, Chicken and Dumplings and Cheesy Cheddar Chowder.  If you click on their names, I have provided a link to each recipe.  There were leftovers and we ate each dish for two or three days.  Therefore, I didn't make a new recipe for today, but found an old menu to share from my old blog.  


Oven-Roasted Pork Loin with Herbs


I found this recipe at "Best Recipe Box" in October 2013. Unfortunately, when I did a search for the link I used originally, there wasn’t one.  I found the blog but not the recipe.  There were other pork recipes available but not this one, unless I missed it somehow.


Oven Roast Pork Loin Roast with Herbs - serves 4 to 6

Times may vary depending on your oven temperatures. A meat thermometer put in the thickest part of the meat should reach 145 degrees F.  Your roast should be done but the suggestion was not to go past 145 as the roast will start to get rather dry.

2 pounds pork loin roast
2 tablespoons vegetable oil
3 cloves garlic, minced
1 teaspoon yellow mustard
2 tablespoons Worcestershire sauce
6 tablespoons unsalted butter
1 tablespoon dried herb mix (basil, oregano and/or thyme)
Kosher or sea salt, to taste
Fresh cracked black pepper, to taste

3 medium to large potatoes, peeled, cut into large pieces


Preheat oven to 350 degrees.

(Add potatoes to a saucepan, lightly salt and bring water to a boil.  Par-boil for at least 10 minutes.  Drain and surround the pork roast with the potatoes.  Add them the last hour of cooking and turn half-way.  Baste with the pan juices at the same time as you baste the meat. They had a lovely flavor.)

Rinse and pat dry pork loin and then season with salt and pepper.

Heat a large oven-safe skillet on medium-high heat.

Add oil and heat for about 1 minute.

Sear the pork loin on all sides until a crust forms, about 1 minute per side.

Remove pork loin from the pan and set aside.

In the same hot pan add the butter, garlic, Worcestershire sauce and mustard.

Stir and cook the sauce until the butter is completely melted, then remove from heat.

Coat the pork loin with your mixture of dried herbs by patting all over the pork roast.  

Place the pork back into the skillet (along with the potatoes) and spoon sauce over the pork loin and the potatoes.

Cover with foil and transfer to the oven for 30 minutes.  

Remove the foil, spoon some more sauce over pork and potatoes, turning the potatoes at the same time so that they are well coated.  Cook for about another 30 minutes, or until the internal temperature of pork reaches 145 degrees.

Remove from the oven and cover with foil to keep warm.  Let rest for about 15 minutes.

Slice thin and serve hot.

We enjoyed this very much and there were leftovers.  The next night we had it again.  There were a few potatoes left over also but we sauteed them in the morning and had them as part of our breakfast.  To replace them for our evening meal I made cauliflower cheese, which I served with the peas, also left over, and the pork roast. 

To me, Cauliflower Cheese is very much a nostalgia food from childhood. I have my own recipe but am always looking to trying something new. I found the recipe at Smitten Kitchen.  Fortunately the link still works and you can see the original recipe here.  It was very close to my Mother's recipe and my dear other half enjoyed it very much also.

Cauliflower Cheese - makes 4 side dishes

1 medium head (about 2 to 2-1/4 pounds) cauliflower
4 tablespoons unsalted butter
4 tablespoons all-purpose flour
2 teaspoons mustard powder
Salt to taste
Freshly ground pepper
2 cups milk (I used low-fat and this dish still tasted very creamy)
1-1/4 cup, plus 2 tablespoons extra sharp, grated cheddar cheese
Parsley for garnish, chopped

Heat the oven to 400 degrees F.

Trim the cauliflower and remove the core. Cut into 1 to 2 inch florets.

Steam in a saucepan for about ten minutes, or par-boil six to seven minutes until firm but tender.

Drain thoroughly to get rid of as much moister off the cauliflower as possible. Put it into the casserole that you are using to put in the oven and set aside. The casserole should be a 2-quart oven-proof baking dish.

Meanwhile in a medium saucepan melt the butter over medium-high heat.

Add the flour and whisk to combine; cook for 1 minute while stirring. You want to get rid of that uncooked flour taste.

Add mustard powder and a pinch of black pepper, stir to combine.

Drizzle milk in a little at a time, whisking gently to get rid of any lumps. Keep adding a little at a time and repeat whisking until all the milk is in the pan and the sauce is smooth.  

Season with salt and bring mixture to the point where you can see a bubble or two on the surface, but don't bring to a rolling boil.  Keep stirring so as not to burn the bottom of the sauce.  If it seems to be sticking at the bottom of the pan, turn it down a little and keep stirring. The mixture should be thickening by now.

Stir in 1-1/4 cups of cheese, a handful at a time. Wait for the cheese to melt before you add the next handful.  It won't take long.

Taste carefully and adjust seasonings if necessary.

Spoon the sauce over the cauliflower and sprinkle with the remaining 2 tablespoons cheese.

Bake for about 30 minutes or until there is a nice golden brown on top of your Cauliflower Cheese.  I sometimes turn the broiler on for the last couple of minutes, but watch it very carefully so that it doesn't burn.


What did we think of this menu?  Delicious!  Both the Pork roast and the Cauliflower Cheese recipes will be used again.  My thanks to Best Recipe Box and to Smitten Kitten for two great dishes.  

I used sage and thyme for my herb mix for the roast.

I also line the roasting pan with heavy foil.  This makes clean up a snap.

The second night was just as delicious as the first.

The Cauliflower Cheese and the peas were a perfect accompaniment to the roast and we didn't miss the potatoes.

We have yet more leftovers, enough pork for sandwiches for lunch and the Cauliflower Cheese will make a nice light supper.


Thanks for looking, enjoy your day and...