Showing posts with label YouTube. Show all posts

Monday, December 29, 2025

MONDAY MORNING RECIPE POST - CHICKEN NOODLE SOUP

I don't have anything new for you this week. We have been eating leftovers from our Christmas Dinner. I made a batch of this soup that we could eat over a few days while getting ready for the 25th. You can find the recipe at this link. Our son gave us a box of noodles to try, Girelle pasta, which is one of his and our daughter-in-law's favorites at the moment.

Girelle refers to two distinct types of Italian pasta: a short, corkscrew-shaped dry pasta, and the type we used for this latest version of chicken noodle soup, and a stuffed, rolled fresh pasta.

Short-cut Girelle (Vesuvio) is a dried, commercial pasta shape, specifically a short, semi-hollow corkscrew, often referred to as Vesuvio. The shape is said to be inspired by the famous Mt. Vesuvius volcano in the Campania region of Italy where it originates. Its curly spring shape is excellent for catching and scooping up hearty sauces and chunky ingredients, or in a soup such as this one. It can be found in Italian food specialty retailers such as DeLallo (their website can be found here if interested) or, in our case, son bought it from a nearby Wegmans Supermarket. It may be sold in other supermarkets also, but I haven’t explored that yet.


The stuffed fresh Girella (Rolled) is a handmade fresh pasta preparation, where sheets of pasta are rolled tightly with a filling to create a spiral effect. It resembles a long, uncut roll of tortellini or a variation of rotolo. The rolled pasta is typically sliced into individual servings after cooking or baking. It is often served with a complimentary sauce, such as a rich tomato sauce, Cacio e Pepe sauce, or a simple butter emulsion. Common fillings inlcude ricotta and spinach, ricotta and parmesan, or more unique combinations like mushrooms and goat cheese, or ricotta and 'nduja', a spicy spreadable sausage. It can be boiled like a large, long ravioli spiral and then plated with sauce, or baked in the oven with ingredients like béchamel and mozzarella for a golden crust. 


We took a quick trip around the neighborhood last night on our way home. I thought I would share an 8 second video and a couple of photos to close off today’s post.


A photo of Santa about to make his way back to the North Pole. He is the biggest Santa I have seen and was almost as tall as the house. Hopefully there were no high winds expected but he looked safely tethered.


Several others were pointing him in the right direction, fortified by a glass of Eggnog perhaps.


Thanks for looking, have a great week and...


Thursday, August 8, 2024

THE GRAY CATBIRD

 A few weeks ago, I was enjoying a Gray Catbird visiting the feeder. It was the only one enjoying the seed and came back several days in a row. Smaller and slimmer than an American robin, they measure 8 to 9 inches (20 to 23 centimeters) long.


"It is a medium-sized songbird and is commonly found across the eastern United states and the Midwest. A frequent visitor to backyards, catbirds are often heard before they are seen”, so I was very happy it decided to show itself so that I could take some relatively decent photos of it. I read “they are feisty about defending their territory, or even the occasional bird feeder, from intruders.” I saw none of this in the short time I had it in my sights, there were no other birds around at the time. Perhaps they were staying well away? Who knows!

Here are a few more facts about them: "Gray Catbirds belong to the family Mimidae, an assortment of songbirds known for their mimicry, including mockingbirds, thrashers and tremblers. Like other mimids, Gray Catbirds exhibit impressive vocal prowess, with males able to rattle off an array of phrases featuring chirps, squeaks, whistles, whines and even gurgles. When singing, performances can last more than 10 minutes and incorporate songs from other birds species, tree frog calls and even manmade and mechanical sounds."


"From March to late April, Gray Catbirds begin migrating from Mexico, Central America and the southern United States to their northern U.S. breeding grounds and up into Canada. Summer migrants start returning south in late August”.(perhaps that is what this one was doing?) “While most birds are migratory, year-round catbird populations can be found along the Atlantic seaboard from southern Massachusetts to northern Florida and over to the Gulf States."


"Catbirds are omnivores but they especially love fruit, often targeting commercial crops of blackberries, cherries, grapes and strawberries. Their habit of pecking more fruit than they eat, however, can make them unpopular with gardeners. In spring and summer, orange halves and jelly are a good way to attract catbirds - and maybe an oriole - to your yard or balcony. Of course, you can also plant native plants like elderberry and serviceberry."


"Catbirds' bodies are a uniform soft gray, with black caps and rust-red feathers under their relatively long tails. They often perch with a lowered tail and appear hunchbacked."


There is a YouTube at this link where you can hear its bird calls. And that's about all I have about my little visitor. It's all quiet out in the garden, and will be until I start filling up the bird feeders in the Fall. 

Thanks for stopping by 
and I hope your week is going great.


Sunday, July 7, 2024

HAPPY SUNDAY EVERYONE

 Here is a small preview of part of a walk we took around Meadowlark Gardens recently. I will be sharing photos over the next week.

The video only lasts for 26 seconds. We finish off with Gregg waving at the end. The photo below was taken in the same area.


Thanks for looking and I 

hope your Sunday is a great one.


Monday, January 8, 2024

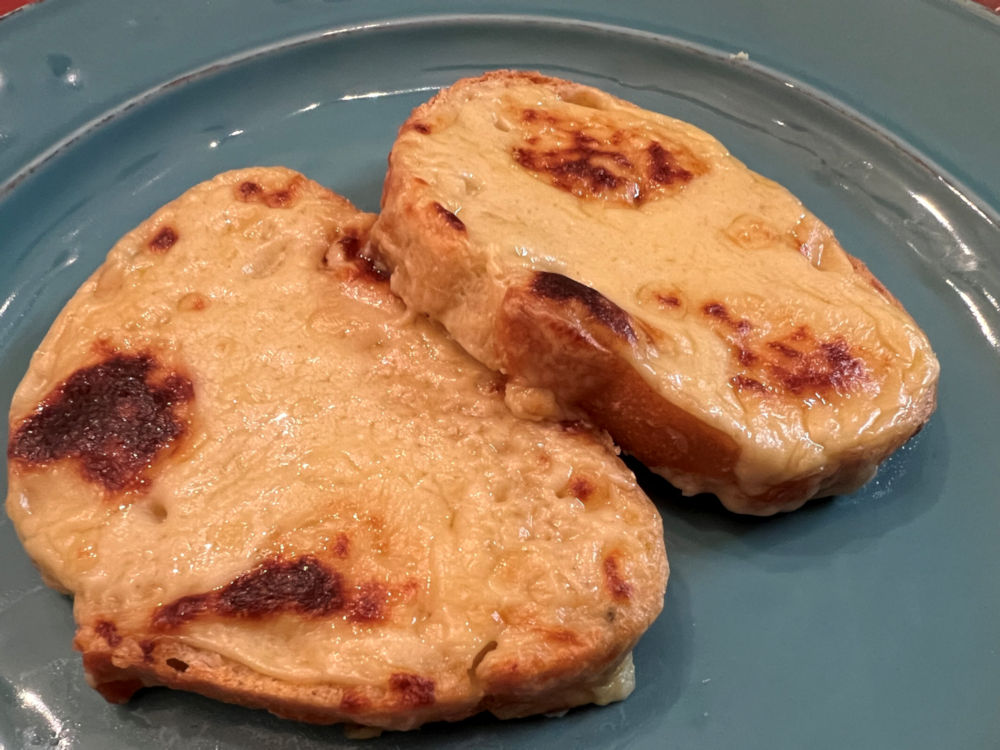
MONDAY MORNING RECIPE - WELSH RAREBIT


There are times when we want something simple and don't want to spend a lot of time in the kitchen.  On days such as these we fix cheese on toast and tomato soup. Gregg had been talking about his Mother's Welsh rarebit that she used to give them when they were kids. It was a nice memory for him and as we had never made it before, we went a bit beyond our simple cheese on toast. I found a Welsh Rarebit recipe on YouTube which you can find here. The host goes by the name of The Backyard Chef. He has a lot of interesting dishes I would like to try, and I can certainly recommend this recipe. I recommend viewing this video in case I have missed out any steps.

Welsh Rarebit

2 tablespoons unsalted butter
2 tablespoons all-purpose flour
1 teaspoon mustard powder or 1 tablespoon regular English mustard
1/2 teaspoon cayenne pepper (optional) - the chef uses paprika
1/2 teaspoon Worcestershire sauce
1/2 cup to start with of dark beer, like a stout or porter, as much as you like.
2/3 cup heavy cream
1-1/2 cups grated cheddar cheese
4 slices of thick bread, toasted
Salt and freshly ground pepper to taste. 

Melt the butter in a pan on medium heat. When it is melted add the all-purpose flour, and blend using a whisk. Cook for two or three minutes to cook the flour. Very important step in my opinion as the taste of raw flour will spoil the dish.

Next add the cayenne pepper (or paprika) if using, the Worcestershire sauce, and half cup of the beer of your choice. He says you can add as much as you like.  Also add the heavy cream and stir until the mixture becomes thickened. Keep an eye on the heat, raise temperature a little if you have to, but keep whisking constantly. Very easy to burn so if it feels like it is sticking on the bottom of the pan, lower heat and carefully lift pan off and to the side of the element if you need to. Once the sauce has thickened you can turn off the heat and it should be hot enough to blend in the cheddar cheese. 

Once the cheese is totally blended, pour equal amounts of cheese mixture over your toasted bread which have been previously placed on a baking sheet. I lined mine with a piece of parchment paper. Sprinkle with salt and freshly ground pepper to taste.

Put under broiler in the oven until it is nicely browned.  This only takes a few minutes and once again watch it carefully because it can burn quickly.

We didn't serve it with soup this time and just had as is. It made a very nice light supper. It also would go great with a simple green salad and a bowl of your favorite soup. Gregg added a side of sauerkraut with his. Although it is very good for us, having several health benefits which you can read about here, I am not a fan of sauerkraut and gave it a miss.  


Our changes were that we didn't have any beer so put in a little extra milk (we didn't use cream but had 2% in the fridge and it worked fine). 

I used salted butter instead of unsalted.

The mustard we use is one I grew up with. I have included it below.  

(The additions of Worcestershire Sauce and Coleman’s Mustard gave it a lovely flavor.)


This was one of those impulse dishes where we didn't go to the store and used everything on hand. We also didn't want to add the cayenne or paprika. We will probably make it again with the original ingredients as we are curious how it would differ. To us this tasted great!


The Chef gives a history of this dish.  I always enjoy that and so I have added it below. 

"The history of Welsh Rarebit, formerly known as Welsh Rabbit, is both interesting and somewhat humorous. This traditional Welsh dish is a savory sauce of melted cheese, typically mixed with other ingredients like ale, mustard, and Worcestershire sauce, served hot over toasted bread.

The dish first appeared in 18th-century Britain. One of the earliest mentions was in 1725 in a book called "The Art of Cookery" by Hannah Glasse.

The term "Welsh Rabbit" was originally used, and it's believed to be a playful, derogatory term coined by the English. The implication was that due to poverty or simplicity in their diet, the Welsh used cheese as a substitute for the more expensive meats like rabbit. Over time, the name evolved to "Welsh Rarebit," though the reasons for this change are unclear. It's possible that the change was made to avoid confusion, or it may have been a way to make the name sound more refined.

While the dish has its roots in Welsh culture, it became popular across Great Britain. It was often enjoyed as a supper dish in public houses (pubs) and a common feature in home cooking.

Traditional Welsh Rarebit includes Welsh cheese, like Cheddar or Caerphilly, melted into a sauce with ale or beer, mustard, and sometimes Worcestershire sauce or paprika. This mixture is poured over toasted bread and sometimes grilled until bubbly and brown. Over time, many recipe variations have developed, including additions like tomatoes or bacon. 

Welsh Rarebit has become more than just a simple dish; it symbolizes Welsh identity and pride. It's often served in Welsh-themed meals and on St. David’s Day, the National Day of Wales."


A memory: when years ago I worked in a small British tearoom, two ladies walked in.  As soon as I overheard one of the ladies speak, I told her she was the first person from Wales I had met since moving to America. She looked at me in surprise as she had lived here longer than I had, and said that I was the first person to ever identify her as Welsh. She was delighted! I told her that my grandmother on my father's side had the name of Jones, and I had always thought I had a bit of the Welsh. She studied me for a minute and said, "Yes, I can see a bit of the Welsh in you." I was in turn delighted as considered it a great compliment. I was invited to sit down for a while and as the tearoom was very quiet, I indulged myself in a bit of rest time and great conversation. This really was too good an opportunity to miss. We had a lovely time chatting, they eventually left and I got back to work. Sadly they were only in the area a short time and on vacation. Years later when Gregg got into our ancestry, he found that some of my roots did originate from Wales, and I went back to the conversation I had with this lady.  It is a very nice memory.


Monday, July 24, 2023

MONDAY RECIPE POST - EGG FRIED RICE


This is another YouTube recipe hosted by Sisi Jemima.  The link to this Egg Fried Rice is here.  We did quite a lot of stopping-and-starting while making it, especially as we were doing this for the first time, to get her guideline.  We gave it a ten out of ten by the way.  Our kitchen is relatively small so I usually sit at the kitchen table and Gregg is at the stove top doing the cooking.  I have a cutting board with me and will share in the preparing stage of cutting up veggies, also done at the kitchen table, while giving step-by-step instructions to Gregg as I listen to the video.  I push pause a few times and rewind if I miss anything, so it was a slower process than it normally is.  

Sisi has a recipe blog and this is her website.  I couldn't find this particular recipe but I may have overlooked it.

Some of the ingredients are metric.  I have put what I thought the amount would be for what we used.   For any food I didn’t use I marked in red lettering.  We didn't stick to the exact measurements as we wanted leftovers the next day.  You just use what you think you might want for each serving or if you like leftovers yourself, make extra.


 Sisi Jemima’s Egg Fried Rice Recipe 


Vegetable oil for sautéing (we used avocado spray)

100 gm diced pork 

100 gm diced chicken (we used whatever leftover meat  there was on an already cooked rotisserie chicken from our local supermarket)

1/2 cup diced and cooked prawns (or for us, a 10 oz. packet of firecracker shrimp - Wegmans brand - see below)

3 eggs, slightly whisked

4 cups cooked rice (here we used 2 packets of Trader Joe's already cooked frozen Jasmine Rice.)

1 cup diced carrots 

1 cup green peas

3 cloves garlic, minced (we used 3 Dorot cubes - see below)

1/2 cup chopped onions

Handful of spring green onions

3 tablespoons dark soy sauce

2 tablespoons light soy sauce (low sodium if you have it)

1/2 tablespoon sesame oil (I will use a tablespoon next time as we enjoy the taste)

The nice thing about stir fry is that you can use any of the vegetables in your fridge.  You can also leave out the protein to go vegetarian.


Prepare and measure ingredients so you have them right next to you when you begin cooking. 


In separate bowls add the dark soy sauce to your chicken and marinate for 30 minutes.  Next, do the same with the pork.  Set aside.  (we didn't follow this part as we were using the cooked leftover rotisserie chicken and already cooked shrimp.  We also did not use pork this time).  

Add oil to a wok or frying pan.

When oil is heated add the eggs.  Scramble the eggs.  I like the way Sis Jemima did hers.  She describes them as scrambled but still a bit chunky.  Take them out and set aside.  

Add the marinated pork to the pan and cook for 6 to 7 minutes, until pork is brown on all sides.  Transfer into a bowl and set aside.

Put the pan back on the stove top.  Next a tablespoon of vegetable oil goes in and when that is heated, add the chicken.   Season with salt and pepper being careful about how much salt you use.  Cook chicken until brown on all sides.  This should take about 6 minutes. 

Transfer the marinated pork back into the pan and combine with the chicken.  

Add and combine the onion and minced garlic.  Cook for about three to four minutes.

Add and combine the carrots and peas for another two minutes.

Add the rice and scrambled eggs.  Mix in well.

Add the dark soy sauce, light soy sauce and sesame oil, black pepper and spring onions.  Combine thoroughly and add more soy sauce if you think it is needed.

Now add the cooked prawns which goes in last.  You just need to cook about a minute, long enough to heat the prawns through.

Sis Jemima's tip about the rice: she doesn't like using Jasmine and substituted Basmati rice.  If you are using Jasmine rice you need to cook it the day before and refrigerate until needed.  If you use Basmati you can cook it as normal before you make your recipe.

I highly recommend watching her video before you start, just in case I have left anything out, and because we made our own version.  She has great tips. You can cut and paste the following address which will take you straight to the video.

https://youtu.be/Ql8h49eP-gA


Our shortcuts on this recipe were:

Pre-cooked rotisserie chicken which we bought from the supermarket the day before for that night’s dinner, and diced and used what was left for this meal.

Firecracker Shrimp from the frozen section at Wegman’s (their own brand).  

These we cooked to the directions on the box, and added to the stir fry at the same time as our cooked chicken. This only takes a few minutes to heat through.  The shrimp were small and we left them whole.  You can also use already cooked steamed shrimp that we occasionally buy from the seafood section of any of our local supermarkets.  It usually comes with a container of cocktail sauce and we eat it as an appetizer.  We have added them to other dishes too.

We will use mushrooms next time.

Instead of fresh minced garlic cloves, we used 3 cubes of Dorot crushed garlic which we store in the freezer.  The cubes are tiny and they thaw quickly in the pan. 


We also used 2 packets of Trader Joe's already cooked Jasmine Frozen Rice.


I realize you might not have these brands in your area, but there will probably be an equivalent if you want to make your own shortcuts.  Sometimes, depending on how you feel, the less fuss the better.

We didn't marinate the pork or chicken as shown in the video (didn't have any pork).  This meal was done on impulse as we wanted something relatively fast to put together.  Next time we will follow everything to the letter after a shopping session.   

Because we didn't need to marinate the meat, the liquids were added to the ingredients in the pan almost to the end of cooking time, and gently mixed so that all was combined.  Then we put in the cooked chicken and firecracker shrimp, again gently mixed to combine. We cooked it a minute or two which seemed long enough to heat through.  It worked out well for us.  My advice though is to add a little liquid at a time and taste test as you go along.

This is Gregg's meal the second night.  He sautéed cubes of steak and added them to the pan of leftovers for two or three minutes.  They were still hot and there was no need to reheat.


If you have any questions, leave them in the comment section and I will be happy to answer them.  I feel like I am all over the place with this recipe but next time it should go more smoothly, and we sure did enjoy it.


Tuesday, May 30, 2023

MY NORMAL MONDAY RECIPE POST PUBLISHED ON TUESDAY THIS WEEK - EASY BANANA BREAD

We had over-ripe bananas in the fruit bowl so I decided to make this recipe today.  I found it at YouTube and the video host goes by the name of Baked Like A Pro.  You can find the link here.


Banana Bread

Ingredients are also provided in metric at the video site, if you live anywhere other than the States.

2 cups all-purpose flour
1 cup granulated sugar
1/2 cup melted butter, salted or unsalted
1-1/2 teaspoons baking soda
1/2 teaspoon salt
1 teaspoon vanilla extract
3 large ripe bananas
2 large eggs, slightly beaten
1/2 teaspoon cinnamon
1 cup chopped walnuts (mine were in halves and I just left them that way)

Preheat oven to 350 degrees F.  

Pre-grease your loaf pan.

In a medium-sized bowl, mash your bananas thoroughly with a fork, or you can use a potato masher as was done in the video.  This recipe is very easy and is mixed by hand, not an electric mixer.

Add the melted butter, vanilla extract and beaten eggs.  Mix thoroughly after each addition. 

Next you will be mixing in the flour.  The batter will seem a bit thick at this point but it gets less so after adding all the ingredients.

The sugar goes in next and then the salt, baking powder and cinnamon.  Mix in after each addition.  

Lastly fold in the cup of walnuts, remembering to save a few halves for the top of the batter before putting into the oven.

Put the batter into your pre-greased loaf pan.  The one used in the video was 8 x 5 - 4 x 5 - 2 x 5.  Top with the walnut halves.

Put in the pre-heated 350 degree F. oven for 50 minutes.

Test to see if it is done by using a toothpick in the center.  If it comes out dry it should be done.  If batter is stuck to the toothpick then you need to put it in again until it is cooked all the way through.  Mine took longer than the recipe states.  

I had to put it back in the oven for 15 minutes longer (my oven runs on the cooler side, even though I preheated it to 355 deg. F. 


I thought it came out a bit too dark, but my dear other half liked it this way and he is very honest in his assessments.  He has had several slices since I cooked it and likes it cold with a pat of butter.  Next time I will try to adjust to get it to how I think it should be, maybe use two smaller pans.  It tasted great and that's the main thing.

I made this recipe before we came down with the virus.  Thank you to each of you who left get-well messages.  They were very comforting and much appreciated.  I will be slow on catching up with you all but hope to do that this coming week.


Thanks for visiting and I hope your day is a great one.


Tuesday, November 1, 2022

MONDAY RECIPE POST ON A TUESDAY, DUE TO HALLOWEEN LAST NIGHT - AN OMELET OF SORTS, MIXED WITH OATS


My recipe today came from a YouTuber called "Recipes Arabe".  It was described as such: "This recipe will relieve fatigue and make you as strong as a horse."  Though I was still fatigued and felt as strong as a flea (not a morning person), I gave it a 10 out of 10.  It was delicious and very satisfying.  I will be making it again.  

The ingredients below are for one person.  Easy to double up though.  One is enough for two if you serve it with a side of fruit, or a couple of rashers of bacon and toast, or any favorite sides.  
As always, I recommend going to the original on YouTube. That omelet looks nothing like mine, and I want you to get a clearer picture of what it should look like.  You can find it here.


Ingredients used by Recipes Arabe:

4 tablespoons oat flakes.

3 eggs.

Salt

Black pepper.

50 ml of milk.

2 Tomatoes.

Olive oil.

Mozzarella (optional)


Ingredients I used:


1/4 cup of Old-Fashioned Oats

2 Eggs

Salt and Pepper to taste

1/4 cup Greek Yogurt

1-1/2 ozs. Cheddar Cheese

1/2 cup chopped Yellow Onion

1/4 cup Deli Ham, diced

3 slices Beefsteak Tomatoes

2 teaspoons of olive oil (I used Avocado cooking spray)

Siracha (optional)


You can change these ingredients around to suit your own taste.

This is how I made mine but again, I recommend looking at the video to see if you prefer doing it their way.

I measured out all the ingredients and had them ready to go.

Beat the eggs until well mixed.

Add salt and pepper to taste. 

Add yogurt, mix well.

Add the old-fashioned oats - or whatever oats you decide to use - to the eggs.  Mix them until the oats are well coated, and dunk them under the eggy liquid. This will soften them up some before you start cooking.

To the egg mixture I added the cheese and ham, mixing well.

Set aside while you heat the frying pan.  I used an 8-inch but could probably have done with a bigger pan.  It did keep the shape nice and round though.

Add oil (or cooking spray) and start frying your onions for two or three minutes until softened.

I started off on medium-high heat and adjusted down when I needed to.

Place the three slices of tomato in the pan on top of the onion, or slide onto the surface if you can get in between.  Cook those for a couple of minutes.  Flip them and continue for another minute or two.

Pour in the egg mixture so that it covers everything (you can use an extra egg if you want more volume but I spread mine around).  

Put a cover on top of the frying pan, so that the top will have a chance to set.  This was for a few minutes - keep an eye on the bottom to prevent burning.

Remove the cover and if you can flip the omelet without it falling apart, great!  What I did was I placed a plate on top of the pan, which should overlap your frying pan.  Carefully turn the frying pan upside down while holding the plate underneath (my frying pan is relatively light).  Operative word is ‘carefully’ as it is all very hot, especially the frying pan. The omelet should fall onto the plate.  Next, slide omelet back into the frying pan from the plate.  What was on the top should now be on the bottom.

Cook until nicely browned underneath, two or three minutes.  Again, check as you don't want it to burn.

All you need to do now is when cooked, carefully slide your omelet from the frying pan onto a plate and enjoy.

You can put extra cheese on the top, and also drizzle Siracha.  If you don't like the heat, you can leave the hot sauce off.

A sprig of parsley would be a nice addition, or sprinkle chopped parsley all over the top. I didn’t have any on this occasion.

I have left the full address below so that you can cut and paste if you prefer not using the link above:

https://www.youtube.com/watch?v=kHVEudCM2gA

It looks like a pizza but it's eggy, it's an omelet. 

Did I notice any taste from the old-fashioned oatmeal?  Well, apart from the great taste of the omelet, not really but I was happy knowing it added extra, good-for-you fiber and other nutrients.  Because old-fashioned oatmeal contains the oat germ, it is rich in minerals, such as calcium, iron, phosphorus, potassium and zinc. The oat germ also provides many vitamins, including thiamin, riboflavin, niacin, folate and vitamin E.  Old-fashioned oatmeal also contains oat bran, a rich source of soluble fiber.  There is more good information at this link.   


I think that's about it but if I have left anything out that you find a puzzle, please let me know.  Always grateful for the help if I need anything corrected.


Thanks for stopping by,

have a great week and 

Bon Appétit!


Thursday, May 19, 2022

CAROLINA WREN

These photos are not as sharp as I would like but I made the most of it and decided I enjoyed the misty quality.  Its sweet song made me sit up and take notice.
"The earth has music for those who listen."
~William Shakespeare~

I found a great YouTube video of one singing.  You can see it here.  If the link doesn't work for you, the following can be cut and pasted into your web browser.

https://youtu.be/UfWac4yxshA