Showing posts with label Monday Morning Recipe. Show all posts

Monday, April 13, 2026

MONDAY MORNING RECIPE POST - ORZO SOUP

 A soup declared a 10 out of 10 by both of us. It turned chilly last week and I suggested a soup. It was delicious and I am glad we made it. We usually only use soups in cold weather, but this will be made all-year round, I'm thinking.

I found it at a food blog called The Clever Meal hosted by Katia. The original recipe can be found here

Katia's biography reads in part: 

"I'm the founder, recipe developer and photographer behind The Clever Meal. My goal is to create and share easy and inexpensive recipes with people all over the world. 

The Clever Meal stemmed from my love for simple meatless meals made with everyday ingredients. Not only are beans, pasta and veggies delicious, but cutting out the meat is also great for your health, wallet and the planet. I truly believe that delicious family meals are possible even if you're short on time and have a tight budget."

I highly recommend taking a look at Katia's recipes. We knew we were going to love this one, but didn't realize how much. There are other great recipes we are going to try here.


Orzo Soup
Serves 4 and approximately 203 calories per serving.  

1 tablespoon extra-virgin olive oil, plus more for drizzling
1 medium-sized onion, diced
1 large carrot, diced
1 large celery rib, diced
1 garlic clove, minced
1/2 teaspoon dried basil or dried thyme
2 teaspoons flour
4 cups (960 ml) low sodium vegetable broth, add a bit more for a thinner consistency if desired 
1-1/4 teaspoons salt, or to taste (if your broth is salty) 
1 cup (165 grams) orzo pasta
2 tablespoons fresh parsley, chopped


Add the olive oil, onion, carrot and celery to a large soup pot or Dutch Oven, and sauté over medium-high heat for about 5 minutes, or until softened.

Stir in the minced garlic, dried herb (basil or thyme), and the flour. Stir for about 1 minute until the garlic smells fragrant and the flour is combined with the veggies.

Pour in the broth, add the salt (if the broth is not salty), stir well, bring to a boil and reduce the heat to a simmer. Cover with a lid and cook for 5 minutes.  

Stir in the orzo pasta and cook for 10 minutes or following the directions on the package. Keep the lid off and stir frequently (10 minutes was enough for us).

Turn the heat off, stir in the parsley, taste and adjust the seasoning if needed. You might want to add a bit more broth or water if you prefer a thinner consistency.

Divide into bowls and top with a drizzle of extra virgin olive oil, a few cracks of black pepper and grated Parmesan cheese if you like. 

Serve with a favorite crusty bread or roll. 


I didn't have any vegetable broth in the pantry and used chicken broth instead. 

We used thyme as our herb.

We didn't drizzle any olive oil over the top but did add lots of cracked black pepper and sprinkled grated Parmesan at the table.


I always try to remember to share the full address of the recipe website, in case you prefer to copy and paste rather than use the link at the beginning. 

    https://theclevermeal.com/orzo-soup

    If you try it I sincerely hope you enjoy it as much as we did.


    Monday, June 2, 2025

    NO RECIPE TODAY BUT ANOTHER RESTAURANT

    I am having a case of déjà vu, feeling I have shared these photos before. After my mistake of sharing one set of photos on two different blog posts not so long ago, I am doubting myself. So, if by any chance you have in fact seen these already, just put it down to my foggy brain, which I seem to have had a lot of lately.


    We didn't do a new recipe this week and just stuck to simple foods, simple stir fries, sandwiches and ate what needed to be used up out of the veggie/fruit bowl, fridge, freezer or from the pantry. And more importantly it was one of those weeks where neither of us felt like fussing too long in the kitchen. There is a restaurant called First Watch that hubby suggested we try, and it was a good choice. A way of replacing my usual Monday morning recipe post, for lack of a recipe.
    The mural was on the back of the building. I couldn't get a full straight-on photo. It is in a busy intersection of a shopping parking lot and there were too many cars going back and forth. I couldn't stand in the middle of the road so I took what I could. The second photo was taken from the passenger side as we were driving by on our way to exiting the shopping area onto the main street.


    A view of the shops seen as we are at the entrance of the restaurant, looking to the left...


    and straight on.


    Hubby dropped me off at the door and went to park the car. I signed us in with the young lady at the desk, took a seat in the waiting area. 


    Gregg arrived and within five minutes we were being shown our table. We had the information board right above us.


    I had my own coffee pot and I was a happy camper. Gregg doesn't drink coffee, or tea for that matter. He said I had a big smile on my face when that was placed in front of me. True! It was good coffee. I used hazelnut creamer that I took out of the little pot of creamers on the table. I had two or three cups with my breakfast. At home I normally enjoy a single cup of black coffee in the morning.


    It's probably too hard to read the menu but this is what it looked like.  Feel free to enlarge the collage, or any of these photos for that matter. Top and back of the menu...


    and a separate one showing the spring menu. If you go to this link it will show you a clear look of their menu in pdf form. 


    Ours was the skillet hash plus an order of their million-dollar bacon which we shared.
    I liked this old rustic window on the wall...


    and the male Nothern Cardinal on another wall near the exit.


    We enjoyed this place very much and wouldn't mind going again sometime. They are open from 7.00 a.m. to 2.30 p.m.
    I realized later on doing a search of my blog, that we had been to another First Watch in another location back in 2019, and that post you can see here. It closed a few years ago. This place is newly opened and replaced another restaurant in this location. There are a few of you who may have seen our previous visit as I recognize a few blogging friends there, but it's been a while so you might enjoy it again.


    Monday, March 10, 2025

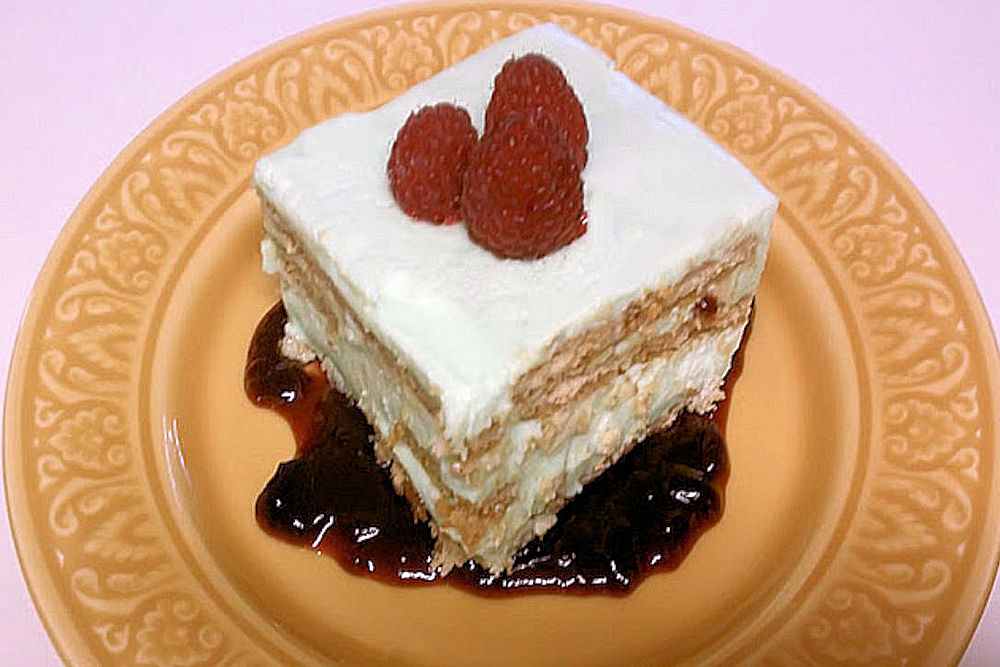
    MONDAY MORNING RECIPE POST - KEY LIME DESSERT WITH RASPBERRY SAUCE RECIPE

    Key Lime Dessert with Raspberry Sauce Recipe

    This is a recipe a friend gave me years ago and it is an excellent dessert. I have been looking through some of my old recipes to serve up for when our company arrives next month.


    Filling

    2 (3-oz.) pkg. lime flavor gelatin

    2 cups boiling water

    1 cup Key lime juice

    2 (14-oz.) cans sweetened condensed milk (not evaporated)

    1 pint (2 cups) whipping cream

    Crust

    45 graham cracker squares

    2 tablespoons Key lime juice

    2 tablespoons water

    Raspberry Sauce

    1 (18-oz.) jar (1 1/2 cups) seedless raspberry jam

    2 tablespoons water

    Garnish, if desired

    Fresh raspberries

    Grated lime peel or fresh mint leaves


    In very large bowl, combine gelatin and boiling water; stir 2 to 3 minutes or until dissolved. Add 1 cup lime juice and the sweetened condensed milk; beat with electric mixer on medium speed until smooth. Set aside.

    In medium bowl, beat whipping cream until stiff peaks form. Gently fold whipped cream into gelatin mixture just until combined.

    Grease 13x9-inch pan. Arrange 5 cracker squares down length of greased pan; repeat forming 2 additional rows and using a total of 15 cracker squares to cover bottom of pan. Set aside.

    In small bowl, combine 2 tablespoons lime juice and 2 tablespoons water. Brush juice mixture onto each cracker square in pan just until moistened. Carefully pour 3 1/3 cups filling over cracker crust; spread evenly. Repeat cracker and filling layers 2 times. Gently tap pan on hard surface and push down any crackers that are close to surface. Cover with foil; refrigerate at least 6 hours or overnight.

    Meanwhile, in medium microwave-safe bowl, mix jam and 2 tablespoons water. Microwave on Medium for about 30 seconds or until jam is melted, stirring twice. Cover; refrigerate until serving time.

    Cut dessert into squares. Spoon 1 tablespoon raspberry sauce onto each individual dessert plate. Place dessert squares on plates. Garnish with raspberries and lime peel. Store in refrigerator.


    No more notes on this recipe. I just remember it being very good at the time and everyone enjoyed it. I served it up at a potluck and there were no slices left.


    Monday, January 20, 2025

    RAMEN NOODLES WITH TOFU AND SPICY PEANUT SAUCE

    An old blog post that I am using. We haven't done any new recipes this week and have not, in actual fact, done this particular recipe in a while. All the narrative is from several years ago.

    I seem to have been cooking more and more Asian-style meals.   I make a lot of salads during the week, along with more plain meat and veggie dishes, but to mix things up a bit I'll start searching for interesting meals such as this one.  Gregg is always happy when I tell him what I have found as he loves anything like this.  You can look at the original recipe at "She Knows", in the recipe section here.  

    This recipe calls for those packets of Ramen Noodle Soup to be thrown away. They contain too much sodium that's so bad for you. 


    Ramen Noodles with Tofu and Spicy Peanut Sauce 
    Serves 4

    2 (3 ounce) packets of Ramen Noodles (any kind will work - you will be discarding the flavor packet)
    1/3 cup warm water
    1/3 cup smooth peanut butter
    1/4 cup reduced-sodium soy sauce
    2 tablespoons rice vinegar or red wine vinegar
    2 tablespoons sesame oil
    2 tablespoons honey
    2 teaspoons garlic-chili paste
    3 to 4 dashes hot sauce (I used Sriracha)
    1 tablespoon vegetable oil
    4 ounces firm tofu, sliced thin (the original recipe called for tempeh, but I couldn't find it at our local supermarket)
    2 garlic cloves, minced
    1/2 red bell pepper, seeds and membrane removed, sliced into thin pieces
    1/4 cup chopped peanuts for garnish
    2 green onions, white and green parts, thinly sliced for garnish

    For the sauce, combine the water and peanut butter in a small saucepan over medium heat.  whisk together to combine.

    Reduce the heat to low and add the soy sauce, vinegar, sesame oil, honey, garlic-chili paste and hot sauce.  Whisk until all the ingredients blend together into a smooth sauce.  Keep the pan on the lowest setting to keep warm.

    Add the vegetable oil to a large skillet over medium heat.  When hot, add the tofu and cook for a few minutes, turning over with a spatula so that each side will brown nicely.  

    Boil water in a saucepan and begin to cook the ramen noodles according to the package directions (this usually takes 3 minutes).

    Add the garlic and red sweet bell pepper to the tofu and cook, stirring, just until the ramen noodles have finished cooking.

    Drain the noodles and add them to a large bowl, along with the tofu, red pepper and garlic.  

    Pour some of the sauce over the tofu/noodle mixture, and toss to combine.  Add more sauce as needed.

    Serve in individual bowls and garnish with the chopped peanuts and green onion.

    ~~~~~

    What did we think of this dish?  Well for a start Gregg loved it.  He is great at trying different things but when I tell him I am going to cook a meatless dish, let alone serve him tofu, he is a little skeptical.  What made this dish was the sauce and if you are one of those people who isn't too fond of tofu, try this dish and see what you think.  

    I couldn't get any tempeh in my local grocery store (I read later it is available in health food stores in the refrigerator section), so I made do with firm tofu.  Tempeh is also made with soy beans but apparently it is a lot healthier than tofu, containing more protein and fiber.  It also adds a chewier consistency and like tofu, you can use it in other recipes by crumbling it up and adding it to soups, casseroles or pasta sauce I've also seen recipes where it is mixed in with smoothies, though I haven't tried that yet.

    It wasn't too hot or spicy which is fine with me.  I still felt a little heat at the back of the throat and on the tongue.  Gregg was surprised I had added any hot sauce at all.  I'm just super sensitive to that stuff, and I figured if he wants to add extra then the bottle is on the table.  However, he was enjoying it so much he didn't bother.

    Added note 1/20/25 at 1.39 p.m: two of our blogging friends mentioned tofu. It would be easy to substitute meat, for me thinking of cooked chicken or another preferred protein. My husband would be in this category. 

    I hope you like the sound of this, and thanks for looking. Have a great day!


    Monday, January 13, 2025

    MONDAY MORNING RECIPE - BEEF BARLEY SOUP

    I wanted a recipe that would make good use of the leftovers from our Christmas Day roast and thought of a beef and barley soup. This would take care of what was left of the rib roast.  The recipe called for homemade beef stock, so instead of putting our usual carton of beef broth on the shopping list, we found another recipe which I have added below this one.

    My thanks also to “Or whatever You Do”, hosted by Nicole Johnson, where I found the original recipe here.


    1/2 stick salted butter

    1 cup diced celery

    2 cups diced carrots

    1 cup diced onion

    1 clove of garlic, diced

    2 quarts homemade beef broth

    4 cups chopped prime rib

    1/2 cup dry red wine

    1/2 teaspoon dried thyme

    1 cup barley


    Place the butter in a large Dutch oven or soup on medium heat, melt the butter.

    Next add celery, carrots and onion. Cook for 5 to 6 minutes, until softened and start to brown.

    Add garlic and stir 30 seconds.

    Add the beef broth, prime rib, red wine, ground thyme and barley.

    Simmer over medium heat until the barley is tender. No actual time was given on the original recipe but we looked on the barley box and it said an hour.  

    Crusty bread and a green salad was suggested to serve with the soup.


    If you don’t have prime rib, there were substitutions such as ground beef, leftover steak, leftover pot roast or leftover brisket. Other tips and recipes can be found at the above link.


    Rib Roast Beef Stock recipe. 


    I forgot to copy the link but there are many out there with ones like this one.


    2lbs. leftover roasted rib bone

    1 cup red wine

    3 carrots, cut in half

    3 ribs celery, cut in half

    1 onion, cut in half

    2 cloves garlic, peeled

    2 bay leaves

    2 sprigs fresh thyme

    5 whole peppercorns

    1 tablespoon kosher salt 

    8 cups water


    Add rib bone to a preheated stockpot over medium heat. Sear the bone on all sides for a few minutes. Add wine, scraping up any of the browned bits from the bottom of the pan with a wooden spoon.  Next add the remaining ingredients into pot and bring to a slow boil over medium-high heat. Reduce heat to low and simmer, uncovered, for 3 hours, skimming off any scum that rises to the surface. Strain the ingredients, discarding the vegetables and rib bone. Allow the stock to completely cool, and chill overnight in the refrigerator. Skim the fat on the surface and discard. Use the stock immediately, or freeze for later use.


    Next time I will double the stock recipe as it only came out to about 2 quarts and 4 quarts is needed to give you enough broth for later servings. It was perfect on the first serving, but I found the pearl barley had absorbed a lot of the liquid and we ended up adding commercially bought broth from the pantry. That was fine but it diluted the original taste that we thought was absolutely perfect. The extra added broth will do and would be quite nice if you hadn’t tasted the homemade one first.  That original broth was by far the best.

    The full website address is below if you want to copy and paste instead of using the link. 

    https://www.orwhateveryoudo.com/2019/01/beef-barley-soup-with-prime-rib.html


    Thanks for visiting and have a great day.


    Monday, December 30, 2024

    MONDAY MORNING RECIPE 12-23-24


    Even though this is a recipe for lamb chops, we used it for pork chops instead, although I have left the ingredient list alone.  I came across the recipe at Living Lou hosted by Louisa. The marinade used was excellent and we knew it would be just as good using the pork chops we had just bought. I wanted something a little different, and found a recipe for the Greek-style marinade at Lou's food blog. 

    The internal temperature needed for the pork is 145 degrees, instead of 135 for the lamb. We cooked the pork five minutes on each side to get the desired degree of doneness. You can look at Lou's recipe link above to read all her tips for making this dish.


    Greek Lamb Chops - serves 4


    8 lamb rib chops

    ¼ cup olive oil

    ¼ cup lemon juice, plus extra for serving

    4 cloves garlic, minced

    1 teaspoon oregano

    1 teaspoon salt


    In a large glass bowl, whisk olive oil with lemon juice, garlic, oregano and salt. Add lamb chops and toss to coat. Cover and marinate in the fridge for 30 minutes to 6 hours.

    Pre-heat a cast iron skillet over medium-high heat. Add lamb chops, and cook for 2-3 minutes per side until browned and lamb reaches an internal temperature of 135F. Repeat with remaining lamb chops.


    Lou's suggestion to serve with these chops was a  traditional Greek salad, and also homemade tzatziki on the side. These would also be just as nice with the pork chop.

    Cooking the pork chops was a last-minute decision and all we were having that night was the last of the cheesy vegetable chowder we made. Gregg cooked the pork chops and we had a bowl of soup with it.

    Here is the full address for the recipe, and I have added it in case you would like to copy and paste instead of using the link at the beginning of this page:

    https://www.livinglou.com/greek-lamb-chops/


    Thanks for looking everyone 

    and I hope your day is a great one.


    Monday, December 23, 2024

    MONDAY MORNING RECIPE - YORKSHIRE PUDDING

    An addition to my Monday Morning Recipe. I added another Christmas Card today as I enjoy putting them together and hopefully it will bring you a smile. The ornament is one of mine, and the frame is from Pip, an app I have on my iPad

    On Christmas Day our special meal is a Standing Rib Roast with lots of gravy, roast potatoes and all the fixings.

    Whenever we make this, we always add a Yorkshire Pudding. It has become our tradition. With us having a turkey for Thanksgiving, years ago it was put to the vote if the family wanted it again so soon after. The general feeling was that they wanted a change and I asked if they would prefer this meal instead. The vote was most definitely. 

    I normally put the batter in one large pie dish, but I have had four-space Yorkshire Pudding pans for a long time and decided to make individual ones. 

    You've probably done these yourself, but I always followed what my mother did. In the States they look almost identical to popovers (I've never actually made them). These definitely looked as though they popped over all over the place!

    The last two times I made the pudding in the usual pie plate, they didn't turn out very well, so I felt it was time to give this recipe a test run before the 25th. I think my dear mother would have approved.  

    I found the original recipe at food.com here. To give you an idea of what the pan I used looks like, I added a link here. I'm not saying go buy it just for this recipe. I've seen people use muffin pans, or the one pie plate I have always used.  If I didn't already have this pan in my supplies, that's probably what I would have used. I just wanted to give you an idea of what I was talking about.


    Individual Yorkshire Puddings - serves 6 to 8

    8-16 Yorkshire Puddings


    1 cup beaten egg

    1 cup all-purpose flour 

    1cup milk

    1cup water

    Salt and Pepper

    1 - 2 tablespoons cooking oil or 1-2 tablespoons beef dripping


    Preheat your oven to 475F. 

    You can go to the website linked above, to see metric measurements and tips about making this recipe.

    Put a small amount of oil or beef dripping into each Yorkshire Pudding pan and set aside until your oven has preheated. 

    Put the pan with its drippings added into the pre-heated oven about 5 minutes. 

    Put flour, salt and pepper into a large mixing bowl. Give it a stir to mix in the seasonings.

    Make a well in the center and add the beaten eggs bit by bit, mixing as you go along.

    Add the water/milk mixture gradually and whisk between each addition.

    Keep whisking until all the liquids have been added. The batter may be lumpy - not a problem.

    Cover and leave to rest for up to 1 hour.

    Just before cooking, whisk thoroughly to break down any lumps (again, no problem if there are a few). This will make it a bit more airy.

    When you have taken the pre-heated pie pans out, carefully fill the pans with batter just under the fill line. You might have to wing it a little bit as the amount will be up to you, depending on how you like the look of it after cooking.

    The oil will be sizzling hot so please take care in not only filling the pan with the batter, but while placing them back into the oven. I have already put my pan onto a larger baking tray, for lifting in and out of the oven more easily.

    This should be done relatively quickly to keep the heat in the oven and in your pans but again, don't rush and go carefully.  

    Cook for about 20 minutes until well risen and golden brown. 

    Even if you are tempted to take a look, don't open the oven in the first 10-15 minutes, or they will sink!

    If you have two pans cooking at the same time, rotate them from top to bottom shelves after the 10-15 minutes so they cook evenly.

    Serve with Roast Beef and gravy!


    What did we think? I really enjoyed the smaller, individual Yorkshire puddings. They turned out on the crispy side. These first test ones aren't that pretty as seen in my first photo. 

    Gregg preferred it done in one pan and a little more dense/cake-like. 

    We cooked another batch a few days later and used my own stand-by glass 9" pie plate. It came out really well but again more crispy.

     My dear other half suggested using all milk next time. I am not making this a third time until Christmas Day so fingers crossed, this is it. That's not to say we didn't enjoy both versions, we just had different ideas on making it and the finished pudding.


    Two comments I took note of but there are many at the website. 
     
    "I have tested many recipes for Yorkshire, this by far has been the best. Did them in muffin tins (used bacon grease for tins) and they were superb. Really impressed my dinner guests. Thank you for such a great, easy and foolproof."
     
    and

    "My family love these when I fix a prime rib roast. However, they're great with any roast beef with lots of gravy. I put about 1/2 teaspoon of dried, crumbled parsley in the batter, and used bacon grease instead of beef fat as we always have bacon grease in a pot in the fridge." 


    Back to my notes: personally I wouldn't use bacon fat, only because I'm a traditionalist with this recipe and wonder if the bacon flavor would be overpowering. One day I will try it but for now I will stick to beef drippings.


    This was on the second try and done in the 9" glass pie plate. When I looked at it, I thought "Dutch Baby", or at least what I had seen them look like in photos. I have never actually made one. (There is a recipe for Dutch Babies here. Also, a recipe for Popovers can be found here.)


    This second try rose so high in the oven it almost touched the oven roof, and I actually let out a 'good grief' when I opened the oven door. It was still crisp (which I loved), but hubby asked for all milk and no water next time.

    I had read somewhere that a slice of Yorkshire topped with baked beans and a poached egg would go nicely. It may have been the notes in this recipe, I can't remember. Anyhow, we used leftover slices the next day.

    Gregg had his poached eggs on toast, along with baked beans and a slice of Yorkshire on the side. I topped my slice (no bread) with beans and a poached egg. Honestly, it was a nice change of pace, but there again, I wouldn't use Yorkshire Pudding with anything other than roast beef and gravy. I just prefer it that way. I'll stick with poached eggs only toast.

    My own father heated up his leftover slice and spread with strawberry jam. This was something given to him by his mother when he was a child.  Gregg tried this also and thought it was very good. I prefer mine savory.

    Last but not least, it is very important to give the pudding room to ‘grow’.  Set it in the middle of the oven.  And most definitely don’t use the top shelf. In days past, when making this recipe, I have always put it on the central rack on its own, after taking the roast out to rest. 

    Do not use more than the 2 tablespoons of beef fat either, for safety reasons. I heard recently of an oven fire and this is what I thought of when someone cooked this. My whole life since as far back as I can remember, there has never been a problem, but safety when cooking anything is paramount. 

    The following is the full recipe address:

    https://www.food.com/recipe/my-mums-easy-and-traditional-english-yorkshire-pudding-203349


    If you have any of your own tips for making Yorkshire Pudding, I would love to read them in the comment section. Have you made Popovers or Dutch Babies?


    Monday, October 21, 2024

    MONDAY MORNING RECIPE - SLOW-COOKER KALUA PORK


    A menu today.

    Slow-cooker Kalua Pork 
    White Rice
    Summer Garden Pasta Salad


    I found this menu at The Magical Slow Cooker which you can find here.  Sarah is its host and she has some delicious recipes on her blog so I will be going back a lot.  


    Slow Cooker Kalua Pig 

    To find the actual page for this recipe you can click on this link.

    3 lbs. pork butt roast
    1/4 teaspoon ground pink Himalayan sea salt
    1/4 teaspoon pepper
    2 tablespoons canola oil
    1 cup water
    2 teaspoons liquid Hickory Smoke

    Sprinkle the roast with the salt and pepper.  In a large skillet set to medium-high heat, heat up the oil and sear the roast on all sides.  Add to a 6-quart or larger slow cooker.

    Add the water and the liquid hickory smoke.

    Cover and cook on low for 12 hours, without opening the lid during the cooking time.

    Drain the juices from the slow cooker, reserving some if you want to serve the roast with them.

    Shred the pork in the slow cooker with two forms, discarding fat.

    Serve with rice and pasta salad.  Sarah also suggests using Sriracha hot sauce over the top.  


    Summer Garden Pasta Salad - serves 6

    You can find that actual recipe here at That's My Home.

    1-1/2 cups mayonnaise
    1/2 cup buttermilk
    2 tablespoons lemon juice
    1 tablespoon chopped dill weed
    1 cup diced celery
    3 Roma tomatoes, seeded and diced
    1 cup sliced snow peas
    1/2 cup diced red onion
    1 (15-oz.) can whole kernel corn
    1 pound box bow tie pasta, cooked according to package directions

    In a small bowl whisk the mayonnaise, buttermilk, lemon juice and dill weed until smooth.  Set aside.  

    Drain and rinse the cooked pasta in cold water, and drain again.

    Add the pasta to a large bowl.

    Add the chopped vegetables to the pasta bowl and pour over the dressing.

    Stir until the dressing thoroughly coats the vegetables and pasta and serve.


    What did we think of these two dishes?

    They both complimented each other beautifully and tasted great.  

    In the pasta salad I couldn't find any fresh dill at the supermarket so used 1 teaspoon of the dried.  

    One of us wanted rice, one of us wanted pasta, so we compromised and made both. I followed the directions on the rice package and made two servings. 

    I made the pork dish the day before the main meal, refrigerating and reheating. 

    There were leftovers for the next day also.