Showing posts with label Appetizers. Show all posts

Monday, January 1, 2024

HAPPY NEW YEAR AND MONDAY MORNING RECIPE POST - WALNUT AND BLUE CHEESE-STUFFED MUSHROOMS

Happy New Year Everyone!

May it be a joyous one for you all.

If you visit this link it will give you another wonderful version of Auld Lang Syne, which I mentioned yesterday.  


I am not one to make New Year's Resolutions, but these sound interesting.  

Which ones will you do? 

Are there any you would like to add?

1. Learn something new.

2. Tell people you love them.

3. Set healthy boundaries.

4. Get outside when you can.

5. Be truthful but not hurtful.

6. Read good books.

7. Sing in the shower.

8. Allow your feelings to breathe.

9. Be delighted by small things.

10. Take responsibility.

11. Practice seeing goodness.

12. Speak kindly to yourself.

13. Speak kindly to and of others, but know your worth.

14. Everyone works very hard so, let us give ourselves a little bit of the lazy.

15. Remember your dreams.

16. Take a walk in the woods, and enjoy the nature that surrounds us.

17. Swallow your pride.

18. Mend a few fences.

19. Stay compassionate and hopeful.

20. Have faith that there is always someone who loves you.


Here in the States it is traditional to fix Hoppin’ John on New Year’s Day.  You can see a recipe I made here

I also decided to go ahead with sharing a Monday recipe.  Today's came from 'Inspired by Charm', hosted by Michael. You can find the original recipe here.


Walnut and Blue Cheese-Stuffed Mushrooms:

Serves: 20

Calories per serving: approximately 55


24 large fresh mushrooms (other suggestions were white button mushrooms or cremini mushrooms)

1/2 cup seasoned breadcrumbs

1/3 cup Parmesan Cheese

1/3 cup sour cream

2 tablespoons chopped fresh flat leaf parsley

2 cloves garlic, minced

1/4 teaspoon black pepper

1/3 cup crumbled Blue Cheese (if you are not a fan of Blue Cheese you can use Feta or Goat Cheese)

1/4 cup chopped toasted walnuts

1-2 tablespoons olive oil  


Preheat oven to 425 degrees F. 

Clean the mushrooms and remove and discard the stems. Place the mushrooms stem side up on a baking sheet.

In a small bowl, combine the breadcrumbs, parmesan cheese, sour cream, parsley, garlic, black pepper, blue cheese, and toasted walnuts. 

To toast walnuts (this can be done earlier before you start the recipe) spread them in a single layer on a baking sheet and toast in a preheated oven at 350 degrees for 5 to 7 minutes, or until they become fragrant.  It doesn't take long for them to start burning so we need to keep an eye on them.

Spoon this mixture into the mushroom caps. Lightly brush with olive oil.

Bake for 17 to 20 minutes or until lightly brown on top and heated through. 

Garnish with a sprinkle of parsley.

We enjoyed this very much and didn't make any changes. If you have any leftovers, store them in an airtight container and use in two days. Reheat in the oven for best results.

These can be made in advance. Prepare them the day before up to the point of putting them in the oven. Store them in the refrigerator covered with plastic wrap. When you're ready to serve, bake as directed.

I have been adding the full web address link at the end of my recipe posts. This is in case you prefer to cut and paste rather than use the links above.

https://inspiredbycharm.com/walnut-and-blue-cheese-stuffed-mushrooms/


Thank you for stopping by, have a great week and have a great year!


Monday, August 15, 2022

MONDAY RECIPE POST - CAULIFLOWER APPETIZER WITH RANCH DRESSING

This recipe came from a friend so there is no link.  We enjoyed it very much. The cauliflower was cooked in an air-fryer but it can easily be roasted in the oven.  I didn't want to use the oven because of the hot summer weather, and decided on the air-fryer instead. 


Cauliflower Appetizer with Ranch Dressing.

½ cup all-purpose flour

½ cup cornstarch

½ teaspoon baking powder

¼ teaspoon kosher salt

¼ teaspoon paprika

1 cup club soda

1 small head cauliflower, cut into florets

1 cup of ranch dressing (the kind you get in a bottle at the supermarket)

1 tablespoon hot sauce (we used Sciracha)

Preheat air fryer to 350° for 15 minutes, and then use a little cooking spray on the bottom of the fryer basket.  Go carefully as everything will be very hot.

Whisk together flour, cornstarch, baking powder, salt and paprika in a bowl. Slowly whisk in club soda until combined. Do not overmix as you want some bubbles left.  This mixture will be thinner than a regular batter.

Dip the cauliflower florets into batter mixture, coat well but tap off any extra.

Add florets to the basket in one layer (you may have to work in batches). 

Cook (at 350ยบ) for 8 minutes and check to make sure things are not browning too much.  I think like our ovens, temperatures in these air-frayers may fluctuate.  

After 4 minutes of cooking time coat the pieces with more cooking spray.  

Repeat above with the remaining cauliflower if you have any left.  

Mix the 1 cup of ranch dressing and 1 tablespoon of Sriracha together with a spoon, until completely combined, and serve with the cauliflower at the table. (If you don’t like it spicy, you can always leave out the hot sauce and have the dressing without.  Still very good.)

This was a delicious appetizer.  You can add it to a green salad or a main course.  We served ours as a snack with raw vegetables (carrot and celery sticks).  I asked my dear other half if he preferred it this way or roasted in the oven, and he said he would be happy to have it either way.


Monday, May 2, 2022

MONDAY RECIPE POST - HOT CHEESY SPINACH-ARTICHOKE DIP

This is an old favorite of my Dear Other Half and I have made it many times since I found it several years ago. I got my recipe here at The Comfort of Cooking hosted by Georgia.   I have made it for company and all have enjoyed.

Hot Cheesy Spinach-Artichoke Dip
Serves 15 (makes 4-1/2 cups)

2 cups shredded Mozzarella-Parmesan Cheese blend (I couldn't find the combined packet of cheeses so I bought two separate packets and mixed them together myself when measuring out ingredients)
10 ounces frozen chopped spinach, thawed and drained
1 (14 ounce) can small artichoke hearts, drained and chopped
2 large cloves garlic, minced
1 (8 ounce) package reduced-fat or regular cream cheese
2/3 cup light sour cream or Greek yogurt
1/3 cup light mayonnaise
1/2 teaspoon kosher salt

Preheat oven to 400 degrees farenheit.

Measure out all your ingredients and have them within handy reach.

Prepare a casserole dish by giving a light coating on the inside with cooking spray.

In a large bowl with an electric mixer, blend 1-1/2 cups Mozzarella/Parmesan cheese mixture, spinach and artichoke hearts until well combined.

Blend garlic, cream cheese, sour cream, mayonnaise and salt into spinach mixture.

Pour into the prepared casserole dish and distribute evenly, leveling it off by lightly smoothing and flattening the top with the back of your spoon.

Top with the remaining half a cup of Mozzarella/Parmesan cheese mixture.

Bake for 25 to 30 minutes, or until cheese is golden and dip is bubbly.

Serve hot with crackers, toasted bread or pretzels.  


What did we think?  This is a great way to incorporate more veggies into your day.   

I have mentioned this before but our oven cooks at a lower temperature for most recipes.  After 30 minutes the top of the dip still didn't have a golden crust.  I put the broiler on and watched it carefully until I was satisfied.  This created the most delicious crust but if this is too much, broil until it suits your own preference.

I served it with oblong-shaped Focaccia rolls that I cut into inch-and-a-half cubes.  

I have seen large, crusty round loaves hollowed out which acts as the bowl.  I would like to try this next time. Presentation is real pretty. The bread that has been taken from the center of the loaf can be cut or torn into pieces and used to scoop up the dip.  

There are leftovers so we will be having it for the next couple of days. It goes well with tomato soup or a side salad.  

It heated up very nicely in the microwave, or you can put it back into the oven until heated through.  


Thanks for stopping by, enjoy your day and...


Monday, October 25, 2021

MONDAY RECIPE POST - HEALTHY GOAT CHEESE STUFFED DATES

I have had this in my collection for a very long time and have made it before.  People always seem to enjoy it, and so do we.  When I looked for the original recipe to give you a link, it had unfortunately been taken down.   Added note: After reading the comments, I know goat cheese is not for everyone's taste but perhaps cream cheese would be a good substitute.


Healthy Goat Cheese Stuffed Dates - 4 servings

Serving size: 6 dates - approximately 271 calories per serving.

If you are following a Weight Watcher's program they are 8 points per serving.


24 small pitted dates (use 4 per person)
4 ozs. soft goat cheese, softened for just a few seconds in the microwave (start with 10 seconds)
4 teaspoons honey
24 walnut pieces

Make a lengthwise slit in each date.  The ones I bought had the stone still in them but they were easy to remove.

Use a small teaspoon to fill with cheese.  Place a walnut on top and lightly press.  Drizzle with honey.  Serve immediately or refrigerate until ready to serve.

Remove from fridge 30 minutes before serving to allow the cheese to soften.


This made a lovely appetizer.

I made this recipe before 10.00 a.m., covered with foil and refrigerated.  I added the honey just before serving.  A glass of Meiomi Pinot Noir went very nicely with it.  I am no connoisseur and one might have a different opinion.  I only mention the wine because it has been my favorite red for several years. 

This appetizer is always well-received and we have always enjoyed it.  

I can't think of anything else other than to thank you for visiting, and to wish you all a happy week.


Monday, April 26, 2021

MONDAY RECIPE POST - CHEESY SPINACH AND ARTICHOKE PINWHEELS


My Dear Other Half was out of the house for an hour the other day, and I decided to surprise him with a new recipe for supper on his return. The recipe came from Damn Delicious hosted by Chungah. I have used her recipes before and they have always turned out great.  You can view the original here.  There are many great recipes on her food blog, and her photos always draw me in.  

I am starting off with one of my notes at the beginning of the post instead of leaving it until the end. I wanted to mention the cooking time in case you made it before reading my 'what did we think of this recipe' section below.  I also read many comments under the original recipe and several people had the same issue.  I found that 20-25 minutes wasn't long enough to cook the dough in the center of the dish.  The top got beautifully browned though.  I put it in for an extra 15 minutes and it turned out great.  Next time I will cover the top with aluminum foil the last 10 to 15 minutes cooking time (to stop that nice, golden crust from getting burned).  I am always aware that individual oven temperatures vary quite a lot, so I would advise you keep an eye on it towards the end and be your own judge.  This is only a guideline.

All that being said I was very happy with the way it turned out and we both enjoyed it a whole lot.  Yes, we will be making it again.  It was very yummy!


Cheesy Spinach and Artichoke Pinwheels

Serves: 8


1 (14-ounce) can artichoke hearts, drained and chopped

2 cups baby spinach, chopped

1 cup sour cream

1/3 cup mayonnaise

1/2 teaspoon garlic powder

1/4 teaspoon onion powder

Kosher salt and freshly ground black pepper, to taste

1 cup shredded mozzarella cheese

1/4 cup freshly grated Parmesan

2 (8-ounce) tubes crescent rolls

1 large egg, beaten

2 tablespoons chopped fresh parsley leaves


Preheat oven to 375 degrees F. 

Lightly oil a pie plate or coat with nonstick spray.

In a large bowl combine artichoke hearts, spinach, sour cream, mayonnaise, garlic powder and onion powder; season with salt and pepper, to taste.

Stir in mozzarella and Parmesan.

Unroll crescent rolls, pressing perforations to seal into approximately a 13×18-inch rectangle. (Denise's note: I actually kept the two pieces separate as they seemed easier to work with.  I could probably do with more practice in this technique.)

Top with artichoke mixture and spread out evenly to the edges.

Starting at the shortest side, roll up, pressing the edges to seal.

Cut in eighths. Place cut side down onto the prepared pie plate. Brush with egg.

Place into oven and bake until golden brown, about 20-25 minutes (or longer if needed).

Serve immediately, garnished with parsley, if desired.


What did we think of this recipe?  Very yummy!  It was hard not to eat the whole plate!  

I can't say I followed the number of pieces cut from each rolled crescent dough.  Mine were about an inch wide.  Also my pie plate is on the larger side and I managed to squeeze in all the 'rounds'.  

When I read the comments at the end of the original recipe, a couple of people suggested cooking them in individual muffin tins.  Seemed a good idea as I believe this is supposed to be an appetizer and they would go further.  (We cut pie shaped wedges as we had it for our main course). 

A commenter at the site also said this was like a spinach and artichoke dip in pastry.

Commenters also served theirs with tomato soup, which I thought would be a nice pairing.  I would love to hear any suggestions you might choose for yourself.

This is a vegetarian meal but someone who also lives under this roof suggested it would go very nicely with chicken added, cooked then shredded or diced.  

There are leftovers for for the next couple of days.  

This would be good served up for brunch.

Also if you prefer to make your own crescent rolls, there is a copycat recipe here.


Thank you for looking and enjoy your week.


Monday, August 10, 2020

MONDAY RECIPE POST - BAKED TOFU

We have started eating more meatless meals lately, and one of the items that always seems to be on our list is tofu.  I saw a recipe for Baked Tofu at Gimme Some Oven hosted by Ali.  

Thank you Ali, we enjoyed this version very much.  I recommend reading Ali's recipe and she tells you all about tofu.  Also I enjoyed looking at all the other recipes she has on her food blog.  

Baked Tofu

Ingredients

1 block of tofu, firm or extra firm
Olive Oil, or another oil you may prefer
Cornstarch
Suggested seasonings: garlic powder, sea salt and black pepper.  You can also use your favorite combination.

Our first step is to drain the tofu and press as much liquid out as possible.  The more dry the crispier it will be.  

Slice the block of tofu into two or three slabs (depending on your block of tofu each slab should be about 3/4 to 1-inch thick).  Then lay some paper towels or a clean tea towel on a flat surface (I used a cutting board).  Wrap the tofu in the paper towels/clean tea towel.  Place another cutting board on top, and stack a heavy-ish pot (or cans of food) that you can safely balance on the cutting board without them toppling.  The more weight you put on the tofu, the more liquid you will get out.  Leave this for at least 15 to 30 minutes.

Preheat oven to 400 deg. F.

When your tofu is drained, time to remove all the layers of paper towels/kitchen towel and what you have used to weight down the tofu.  Cut tofu into cubes, about 3/4 inch to an inch.  You can also cut them into more decorative shapes if preferred.  Ali says the shape will make a difference in the crispy-outside to soft-inside texture.  If you want even crispier bites of tofu, make these shapes a bit thinner.

Put tofu into a large mixing bowl.  Drizzle with olive oil (or your preferred oil).  Sprinkle evenly with cornstarch and seasonings.  Toss gently until the tofu is evenly coated.

Put tofu in a single layer (no overlapping) on a baking sheet lined with parchment paper. Put in the preheated 400 degree oven, and bake for 15 minutes.  At the end of the 15 minutes carefully remove baking sheet (don't forget those oven mitts), put on a safe surface and turn each piece over to the other side. Put sheet back into the oven and cook for another 15 minutes.

When done to your liking (see my notes below) carefully take tofu out of the oven.

Serve warm and enjoy.

My notes: I have been adding tofu to our regular shopping list for quite a while, trying several different variations of cooking style.  

Gregg said this way was by far his favorite, baked and cooked until really crispy.  I liked it but I think I would have taken it out of the oven at the time suggested.  The original recipe calls for 15 minutes on one side, turn over and cook for another 15 minutes.  I ended up cooking it for ten minutes longer than that, as I know Gregg likes things a little crispier than I do.  

He actually said this was the best tofu recipe he had ever had to his taste, and gave it a ten out of ten, and to please cook it this way from now on. 

Next time, however, I will take my portion out of the oven after the 30 minutes total time, and leave his in the ten minutes longer.  I am only adding this in case you and your other half have different likes about tofu as we do.  

We weren't very hungry that night, and just wanted a snack.  This made a very nice appetizer served with two dipping sauces, a small dish each of sweet chili sauce and blue cheese dressing, having our own choices.  

I am looking forward to trying this again with my adjustments.

Thank you for stopping by.  Stay safe, stay healthy have a great week.


Added note: I found another interesting blog here that shares more information about tofu.

Monday, June 29, 2020

MONDAY RECIPE POST - PICO DE GALLO (CLASSIC FRESH TOMATO SALSA)

On June 21st, Father's Day, our son and daughter-in-law came over to spend the afternoon with us.  We haven't been together much because of isolating, and this is only the second occasion we have seen them since this all began.  Very special for the four of us, still being sensible about being in our appropriate space, no hugs coming or going, but the time together was magic.  Knowing what others are going through we will never take our time together for granted.

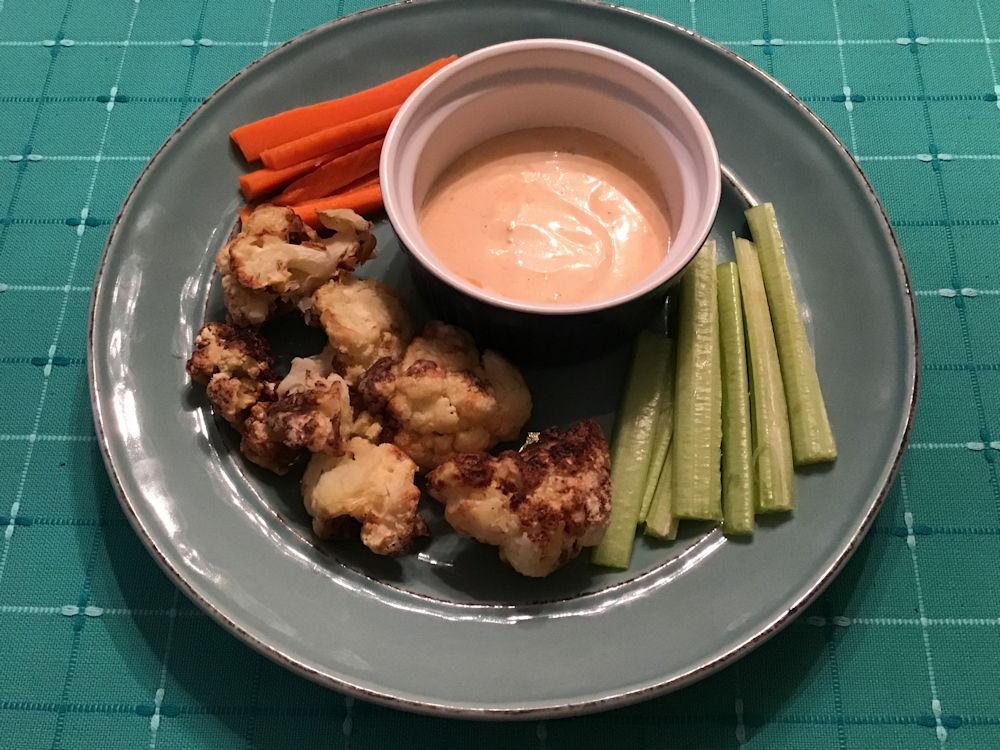
In between our regular favorite dishes that are tried and true, we also enjoy making ethnically diverse dishes.  This week we settled on Mexican cuisine, and though we have been to several restaurants over the years, in all the places we have lived, we haven't cooked much at home.  With practice we are getting more confidence and felt it was time to rectify that situation, especially as our son and daughter-in-law enjoy it as much as we do.  With them in mind I chose this week's recipe from The Spruce Eats which you can find here.  


I always recommend checking out the original (you can get there by clicking on the red lettering above).  There are tips shared, fun professional photos, and it is always useful to watch the video if provided.  The prep time is longer than most of our meals, definitely worth the finished result though.


Classic Fresh Pico de Gallo

Yield: 2 cups (6 to 8 servings)


3 tablespoons onion (finely chopped)
2 small cloves garlic (minced)
3 large ripe tomatoes (peeled, seeds removed, and chopped)
2 chili peppers (jalapeรฑo or serrano), chopped
2 to 3 tablespoons cilantro (chopped)
1 1/2 tablespoons lime juice, plus more to taste
Salt
Freshly ground black pepper


Prepare the ingredients.

Put the chopped onion and minced garlic in a strainer/sieve.  Pour 2 cups boiling water over them and let drain thoroughly.  Discard the water. Allow the chopped onion and garlic to fully cool.

Combine onions and garlic with chopped tomatoes, peppers, cilantro, and lime juice. Add salt and freshly ground black pepper to taste.

Refrigerate for at least 2 hours to blend the flavors.

The website's notes are as follows:

Serve as a dip or a condiment with Mexican-style dishes, and enjoy enjoy.

Tips:

Use hot or mild chile peppers in the salsa. Jalapeรฑo peppers, serrano, New Mexican, and Anaheim are good choices.

Take caution when chopping the peppers and be sure to wash your hands immediately following the cutting.

If you want a spicier salsa, keep some of the pepper seeds in the mixture.

If you prefer milder salsa, make sure all the pepper seeds and ribs are removed.

Plum tomatoes are an excellent choice for salsa. They are firmer and have fewer seeds, and they're easier to dice.

If you store this salsa in the refrigerator for a few days, the tomatoes will continue to release their juices. Simply drain the salsa prior to serving to keep it from having too much liquid.

Recipe Variations

If you're not a fan of cilantro, omit it or add fresh parsley.

For extra texture and color, add about a few tablespoons of drained and rinsed black beans and a few tablespoons of cooked corn kernels.

Our shopping trips have been curtailed somewhat, and when I had difficulty getting just one jalapeno pepper, I put a small can of chopped jalapeno peppers on our grocery list.  It was a great substitute.  Below you can see the one we bought, but there are several other brands available at local grocery stores.
As mentioned, the prep takes longer than usual but with the two of us we cut that by half.  Once all items were prepared, it was a breeze to put everything together.

We made it the day before our family meal.  That night we ate a small sampling and it was excellent.  We served it with lime flavored tortilla chips.  
Not everyone likes Cilantro and I would say if you feel strongly against it, try chopped parsley, or as suggested in the original recipe, leave it out altogether.   

We added the Cilantro and lime juice a little at a time, and taste tested after each addition. We ended up using all the Cilantro I cut up, and the 3 tablespoons of lime juice.  Entirely up to your own taste.

This appetizer was a big hit with everyone.

I will have other meals we shared in future posts.


(Provecho – The Mexican “Bon Appรฉtit”.   In Mexico it is customary to say “provecho” (proh-veh-choh) before starting a meal, or when you enter or leave the presence of someone who is eating.)
I never had the opportunity to try Mexican food before I came to the States almost 45 years ago.  The only restaurants in my town before leaving the UK, were either Indian or Chinese.  We enjoyed both but visits to them were rare, as it wasn't our way to eat out unless it was a special occasion, like a birthday.  

A memory from 40 years ago and one I may have shared before.  As new parents, hubs and I had not had much time or energy to enjoy a restaurant meal, and again didn't usually go out unless it was a special occasion.  However, one day we thought just once we would go out for no special reason, other than to get out of the house and enjoy a good meal.  As we were new in the area we didn't know anyone long enough to feel comfortable about leaving him.  So, we took our very young son with us.  It was the very first time we had attempted this.  If he got fussy we decided we would take turns to carry him outside, so as not to disturb any other patrons. 

At the time we were living in Long Beach, and we picked a restaurant at random.  I wish I could remember its name, but it might not even be there now.  The staff couldn't have been nicer.  We timed our visit and missed the busy lunch hour, but in a bit of a hurry we sat down and ordered, thinking we had better try and get in and out as fast as we could.  Just as our meal arrived our son woke up and started crying. Hubs got up to take him out but our waiter saw what was going on, walked over and asked permission to hold our son for a while, so that we could enjoy our meal.  Hubs placed our precious child in his arms.

He cradled him and started rocking him gently, and quietly sang him a Mexican lullaby while walking around the restaurant near us.  The warmth on his face as he looked down at our son was magical and I can still see him.  He had children of his own he assured us, his youngest not much older than our little guy who had already fallen asleep.  But this kind man still held him and rocked him as we talked with him, and we were able to finish the rest of our meal with ease.  I have never forgotten his kindness and never will.