Showing posts with label Thai Food. Show all posts

Monday, March 13, 2023

MONDAY RECIPE POST - THAI PEANUT RAMEN NOODLE SOUP

This is one of those recipes I don't remember where I got it originally.  It has been stored away in my folders for a long time and we finally made it on Thursday, February 9th, 2023. We enjoy Thai food very much and we were long overdue since the last time we made this type of recipe.  

The one thing I shouldn't have done, was bite down on the Thai Chili Pepper (at times I really should ignore my curiosity).  I have eaten Jalapenos without a problem and enjoyed them, but this smaller pepper was new to me and the hottest I have ever had.  I don't mind a little heat but found myself reaching for anything that would cool my mouth down.  So, my advice is enjoy the peppers but if you are not used to eating them, take them out before you serve up.  The soup itself is not too spicy hot and delicious!


Spicy Thai Ramen Noodle Soup


2 teaspoon avocado oil or olive oil

2-3 cloves garlic

1 teaspoon fresh ginger, grated

1 cup grated carrot

1 or 2 teaspoon green curry paste

4 cups vegetable broth

1 can (13 oz to 14 oz) full fat coconut milk

½ cup creamy peanut butter, brought to room temperature

2 tablespoons soy sauce

2 tablespoons Agave syrup - *see note on Agave below recipe

Juice of 2 limes 

plus

1 extra sectioned lime (for squeezing juice over finished soup at the table.)

1 packet Udon noodles

Shrimp (optional) already cooked - **see note below.  Use as many as each of you think you would eat

Sliced white onions, sautéed earlier for a few minutes in a frying pan.

Tofu would be a nice addition also.

Any favorite protein can be added.


We chose the following to put on the top of our soup:

Gregg sautéed the shrimp in a frying pan for a few minutes, only long enough to heat through, along with a few sliced onions.

Thai basil (we bought ours at a local Asian Supermarket not too far from us. We have a hard time getting Thai basil at our local supermarket.  If I couldn’t find Thai basil, I would be happy to substitute cilantro which we have often done).

Chopped Peanuts

Green onions, thinly sliced

Grated carrots

Lime sections

Or

Your own favorite toppings


On medium high heat add the avocado oil until hot.

Add prepared garlic and ginger, sauté for 1 or 2 minutes, reducing heat so as not to let the garlic burn.

Add curry paste mixing into the garlic and ginger, also the Thai chili, and sauté for another minute.

Add the vegetable broth and coconut milk.  Stir to combine thoroughly.  Reduce heat to a simmer.

Stir in peanut butter until thoroughly combined.  A whisk helps.  

Stir in the soy sauce, agave and lime juice.

Simmer on low for 5 minutes.  Taste and adjust seasonings; more soy if needed, more agave if needed, more lime juice if needed (we didn’t feel the need to add extras but everyone’s taste is different).

For the last few minutes of cooking add the grated carrots.

Before serving, add the noodles (we used Udon that we cooked to package directions just before putting into the soup.  This was done in a separate pot but you can add yours to the broth and just follow what the directions say on your noodle package.

Also add the cooked shrimp to heat through.  Won’t take long.

Serve immediately.  

I put small dishes on the table, one with sautéed sliced onions, another with the sliced green onions, chopped peanuts and sectioned limes.  I thought the lime added a lot to this soup, both in the cooking process and for squeezing the sections onto the soup at the table.

I gave our meal a 10 out of 10 and Gregg a 9 out of 10, which is still excellent.  However, he thought it was a bit bland, I did not because there are times when I prefer it this way, and I am not saying I found it entirely bland.  

* There is an interesting article on Agave Syrup at this link.  It gives substitutions, one which is Maple Syrup and we have used that before when we didn't have Agave.

** Adding shrimp. You don’t need to add any as it is delicious without.  However, Gregg picked up a small tray already cooked from the refrigerated counter at the supermarket (the kind you eat cold as an appetizer).  We have bought them often, used as many as we thought we could eat in our meal. Later that day we eat the rest using the small container of cocktail sauce for dipping, which is always included.  

You can also of course buy raw shrimp, peel and devein them, and sauté a few minutes until cooked through.  For those who are starting out and have never cooked them before, you can see how at this link.  

At the table I added lots of extra lime juice to my meal.  

Gregg thought he would like to add oyster sauce in the cooking process.  I thought it was fine without.  Gregg is more adventurous than I am, which is great because thanks to him I have had many adventures over the years, not only in travel but in the kitchen.


This is all a bit wordy but I add all these notes for my own benefit for next time.  Hopefully you will find them useful if you decide you would like to try the recipe.  If you have any questions let me know in the comment section.


Monday, December 28, 2020

MONDAY RECIPE POST - THAI -STYLE PEANUT DRESSING

Thai Peanut Dressing - Closet Cooking

As you may know by now if you have been following this blog, we have been fans of Thai Cuisine ever since we moved to Virginia over 30 years ago.  However, we have only started making these dishes ourselves for about five of those years.  Before that and through a work colleague of Gregg, we were introduced to a restaurant in Arlington shortly after we moved to our present home.  It was the greatest place and we could not have chosen a better one to introduce us to Thai Cuisine.    The owners and staff were wonderful, and treated us like family every time we walked through the door.  After several years and much to everyone’s great loss, the restaurant was finally closed. 

Two years went by and we were delighted when a Thai restaurant opened up in one of the shopping complexes we used to frequent.  This became another favorite and we loved their food also, and the people who owned that one were as warm and friendly.   Once again, after being regulars for another dozen years, it also closed.  

The time seemed to be right to try and create our favorite dishes, and we began the experiment,  could we make Thai dishes that we knew and loved in our own kitchen.  They may not have been up to the expertise of the places we knew and loved, but they were darned close and we haven’t looked back.  

The recipe I am sharing today is a simple yet delicious peanut sauce.   There is no picture, but you can see photos if you click on the link above.  There are also several dishes that use this sauce.  

Described as “a quick and easy, pantry, Thai style peanut dressing that is so irresistibly delicious”, we can highly recommend this recipe if you are a fan of Thai Cuisine.  I also highly recommend you read the original recipe.  


Thai Peanut Dressing

Preparation time: 10 minutes 

Total Time: 10 minutes 

Servings: 16 (1 cup or 16 1 tablespoon servings)

A quick and easy, pantry, Thai style peanut dressing that is so irresistibly delicious!


1/4 cup peanut butter

1/2+ cup water (or coconut milk)

2 tablespoons soy sauce (or fish sauce)

2 tablespoons rice vinegar (or cider vinegar or lime juice)

2 tablespoons brown sugar (or honey or palm sugar)

1 tablespoon chili sauce (or to taste)

2 teaspoons garlic, grated

2 teaspoons ginger, grated

2 tablespoons peanuts roasted and chopped

1 teaspoon toasted sesame oil (optional)

1 tablespoon cilantro (optional)


Puree everything in a blender or food processor.

Option: Replace the chili sauce with birds eye chilies.

Note: Add enough water (or coconut milk) to get the consistency to that of a pourable dressing.

Nutrition Facts: Calories 39, Fat 2g (Saturated 0.5g, Trans 0), Cholesterol 0, Sodium 125mg, Carbs 2g (Fiber 0.4g, Sugars 1g), Protein 1g


We used this sauce in a simple vegetable stir-fry using what we had in the fridge, and mixed with Ramen noodles cooked to the package directions first.  We tweaked it a little to suit our own taste, not much. We added more chile sauce for a little extra heat, and a smidgen of water as we chose the option of coconut milk.  You can do this to your own taste, and a little at a time would be recommended.  

We are also going to try it with Jasmine Rice next time  


Thanks for looking and have a great week.


Monday, December 7, 2020

MONDAY RECIPE POST - SPICY BRAISED TOFU (OR AS IN OUR CASE, CHICKEN)

This is absolutely nothing to do with the recipe, but I thought it would be nice to start the week off with a smile.  

An obstacle challenge between cats and dogs.  Click here for those smiles.

And now on to the recipe.   

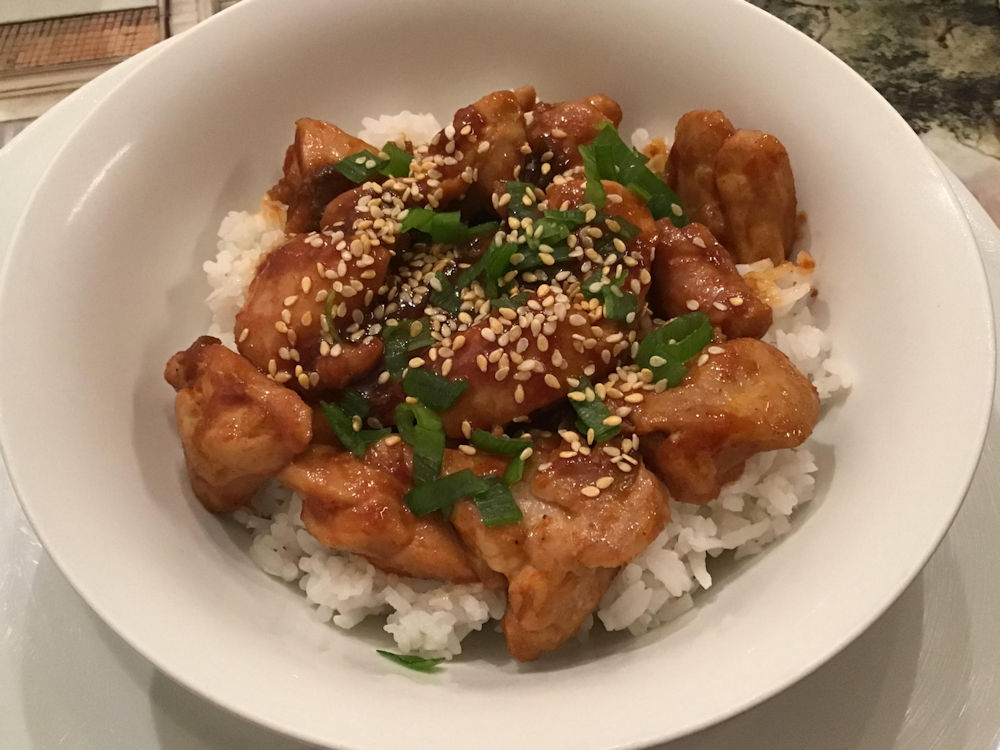
We enjoy many Asian dishes and everyone I have found lately has been excellent.  This one came from Epicurious.  We used chicken, as you can see from our photo.  We will make it again next week and use the tofu.  You can see the original recipe here.


Spicy Braised Tofu by Christina Chaey Bon 

2 servings


1 (14-oz.) block firm or extra-firm tofu, drained

3 tablespoon soy sauce

3 tablespoon mirin (sweet Japanese rice wine)

1 teaspoon toasted sesame oil

¾ teaspoon gochugaru (coarse Korean red pepper powder) or other mild red pepper flakes

1 scallion

2 tablespoon grapeseed or vegetable oil, divided, plus more for drizzling (we used olive oil)

Kosher salt

1 small garlic clove, finely chopped

1 teaspoon finely chopped peeled ginger

Toasted sesame seeds and cooked rice (for serving)


Wrap tofu in a clean kitchen towel and place on a rimmed baking sheet. Weigh down with a heavy object (I have used a couple of small, clean cutting boards).  Let sit for 10 minutes. Unwrap tofu and slice in half lengthwise, then cut crosswise into 6 sections to create 12 squares.

Whisk soy sauce, mirin, sesame oil, Gochugaru, and 3 tablespoons water in a small bowl to combine; set sauce aside.

Trim dark green top from scallion and thinly slice; set aside. Thinly slice remaining white and pale green parts of scallion. Heat 1 tablespoon grapeseed oil in a nonstick skillet over medium-high. Carefully add tofu in a single layer and lightly season with salt. Cook, undisturbed, until golden brown, about 5 minutes; turn over and cook until golden brown on other side, about 5 minutes. Transfer tofu to a plate.  Keep the same skillet (no need to wipe out).

Heat remaining 1 tablespoon grapeseed oil in that skillet over medium heat. Cook white and pale green parts of the scallion, garlic, and ginger, stirring until softened but not browned.  This takes about 1 minute.

Return tofu to skillet. Pour in reserved sauce and bring to a simmer. Reduce heat to medium-low and cook, turning tofu once or twice and occasionally spooning sauce over, until sauce is reduced by about half, about 4 minutes.

Transfer tofu to a large plate, spoon sauce over, and sprinkle with sesame seeds and reserved scallion top. Serve with rice alongside.

Gregg used four skinless, boneless chicken thighs instead of the tofu, which he cubed and cooked as if it was the tofu, just longer until they were no longer pink in the middle.  This took about 15 minutes, flipping the cubes over half-way, but you really need to check your own as this depends on your heating elements.

We used a rounded tablespoon of chili paste instead of the Gochugaru.  Ours is Gochujang and I found a description of the difference between the two.

"The name Gochugaru refers to the flakes of a moderately hot sun-dried red chili pepper that has been present in Korea since the 16th century. Gochujang is a thick, sticky paste used in dipping sauces and marinades.  So, the first big difference is consistency since Gochugaru is flaky and dry while Gochujang is a paste. 

Ours is Gochujang and the amount we use gives a nice kick of heat without being overpowering, for our tastes anyhow.  You be the judge for your own taste.  I also have a jar of red pepper flakes in the pantry.  I would use it if we didn't have the Gochujang.  We bought ours at the local Asian supermarket.  (I made this recipe at the beginning of the year before we knew what we had in store for all of us.) 

Our choice of rice was Jasmine and we followed the instructions on the packet.  One cup of rice was washed and drained and added to 1-1/2 cups of boiling water, putting the lid on and lowering the temperature to simmer for 18 minutes.

Excellent dish.  We had a few pieces of chicken left which was great as a snack when eaten cold.  I am a bit finicky eating cold leftovers but wouldn't hesitate with these.  I said it would be great for a picnic.

Gregg just told me he also added a 1-1/2 tablespoons of Teriyaki sauce.  

You can cut and paste the following if the above links don't work.

https://www.epicurious.com/recipes/food/views/spicy-braised-tofu

That's it!  Highly recommended this dish if you enjoy Asian food.
Thanks for stopping by and enjoy your day.


Monday, November 9, 2020

MONDAY RECIPE POST - THAI GREEN CURRY CHICKEN WITH BASIL

I actually saw our recipe at the McCormick recipe site here.  We found Thai basil on line, and also Thai green curry paste.  Both arrived in the same delivery yesterday, and today (10-24-20) I found this recipe by typing in 'green curry paste and chicken'.  The first site that popped up was McCormicks gluten free recipe, and it didn't take me long to realize this was what we would enjoy, even though we are not gluten intolerant.  Sweet Other Half is glad because he gave this meal a 10 out of 10.  SOH really loves Thai food and this truly was an excellent meal, restaurant-worthy he said.  High praise indeed!  With thanks to McCormick I have left their ingredients with brand names included.  You might have to use another brand if you can't get theirs in your area but from our own experience today, everything turned out perfectly.  Not getting any recognition from the company I quickly add, just giving praise where praise is due.


Thai Green Curry Chicken with Basil

1 can (13.66 ounces) Thai Kitchen® Gluten Free Unsweetened Coconut Milk 

1/3 cup vegetable or chicken stock (f you are gluten intolerant check the label to make sure it is gluten free for this and all these ingredients)

1/4 cup chopped Thai basil leaves (it is not recommended to use Italian basil to substitute Thai basil leaves.  Mint is suggested or cilantro)

2 to 3 tablespoons Thai Kitchen® Gluten Free Premium Fish Sauce 

1 to 4 tablespoons Thai Kitchen® Gluten Free Green Curry Paste 

2 tablespoons brown sugar

1 1/2 cups assorted cut-up vegetables, such as red bell pepper, zucchini, carrots and peas

3/4 pound boneless skinless chicken breasts, cut into 1-inch pieces

1 cup uncooked Jasmine rice


Cook Jasmine rice according to package directions.  Mine said to put the rice (after rinsing and draining) into 1 to 1-1/2 cups of boiling water, cover and turn heat down to a simmer.  Cook for 18 to 20 minutes.  After that time, take off the heat and keep covered for 5 minutes.  Fluff with a fork and put into a bowl, covered to keep warm.

In a medium saucepan mix coconut milk, stock, basil, fish sauce, green curry paste, and brown sugar.  Bring to boil on medium-high heat. Reduce heat to low; simmer 15 minutes.

Stir in vegetables and chicken; simmer 10 minutes longer or until chicken is cooked through.

Serve over the cooked Jasmine Rice.

Added note: if you are gluten-intolerant, check the label to make sure your stock is gluten-free.


We always seem to make a few changes.  Our choice of vegetables were red sweet pepper, half a large sliced onion, carrots, the Thai basil and out of the freezer, peas and edamame.  I daresay it will change next time depending what we have available.  

We would add enough ingredients to make more sauce as that was delicious.

SOH wanted more chicken so we used the whole 1 lb. packet.  

There is enough for two more meals tomorrow.  

In case the link above doesn't work, I have added the address below.  It's a long one but you can just cut and paste into the address line.

https://www.mccormick.com/thai-kitchen/recipes/chicken-beef-and-pork/green-curry-chicken-with-basil

Thanks for looking, enjoy your week and...


Sunday, January 26, 2020

MONDAY RECIPE POST - CRISPY PEANUT TOFU AND CAULIFLOWER 'RICE' STIR-FRY


I have been looking for meatless meals to put into our weekly meal plan.  As we are both Thai food fans, I chose this one.  

We found the meal at Minimalist Baker at this link, hosted by Dana.  I recommend reading her information and advice while making this recipe.  She also has a great food blog with many delicious recipes.  Thank you Dana for adding to our list of favorite meals.


Crispy Peanut Tofu and Cauliflower Rice Stir-Fry

The tofu is baked not fried, served over cauliflower rice with sautéed vegetables.

Preparation time: 30 minutes
Cooking time: 1 hour 30 minutes
Serves 2
Freezer: sauce only, nothing else

Ingredients:

Stir-fry:

12 ounces extra firm tofu (organic and non-GMO if possible)
1 tablespoon toasted sesame oil
1 small head cauliflower

2 cloves garlic (minced - 2 cloves yields 1 tablespoon or 6 g)

Sauce:

1-1/2 tablespoons toasted sesame oil
1/4 cup low sodium soy sauce (tamari for gluten free eaters)
1/4 cup light brown sugar (or honey if not vegan)
1/2 teaspoon chili garlic sauce
2-1/2 tablespoons peanut butter or almond butter (natural, salted)

Optional extras:

Vegetables: baby bok choy, green onion, red pepper, broccoli

Toppings: fresh lime juice, cilantro or Thai basil, sriracha

Instructions:

First step, drain tofu for 1-1/2 hours before you serve up your meal.  The instructions say that if your block of tofu is larger than 12 ounces, trim it down, that you don't need a full pound for this recipe, though truthfully we added the whole 16 ounces.

Roll tofu in a clean, absorbent towel several times, and then place something heavy on top to press.  Our blog host used a pot on top of a cutting board, and occasionally added something to the pot to add more weight.  Do this for about 15 minutes.

Near the end of draining, preheat oven to 400 degrees F. (204 C.) and cube tofu.  Place on a parchment-lined baking sheet (I used non-stick aluminum foil) and arrange in a single layer.  Bake for 25 minutes to dry/firm the tofu.  Once baked, remove from the oven and let cool.

Prepare sauce by whisking together ingredients until combined.  Taste and adjust flavor if needed.  Our blog host often adds a little more sweetener and peanut butter (we felt it was fine without the extras.)

Add cooled tofu to the sauce and stir to coat.  Marinate for at least 15 minutes to saturate the tofu and infuse the flavor.

In the meantime shred cauliflower into 'rice' by using a large grater or food processor.  You don't want it to be too fine, just somewhere close to the texture of rice.  Set aside.

Mince garlic if you haven't already done so, and prepare any vegetables you want to add to the dish (this is optional).

Heat a large skillet over medium to medium-high heat, and if adding any vegetables to your dish, cook them now in a drizzle of sesame oil and a dash of soy sauce.  Remove from pan and set aside.  Cover to keep warm.

Using a slotted spoon, put the tofu into preheated pan.   Drizzle a few spoons of sauce to coat.  Cook, stirring frequently for a few minutes until browned.  It will stick to the pan a bit, but don't worry.  Remove from the pan and set aside.  Cover to keep warm.

Rinse your pan under very hot water and scrape away any residue.  Place back on oven top.  Add a drizzle of sesame oil to the pan, then add garlic and cauliflower rice and stir.  Put cover on to steam the 'rice'.  Cook for about 5-8 minutes until slightly browned and tender, stirring occasionally.  Next add a few spoons of sauce to season and stir.

In two individual plates or bowls, divide equally the cauliflower rice, top with your vegetables and tofu.  Serve with any leftover sauce.  

Leftovers reheat well and will keep covered in the fridge for up to two days.  

This is approximately 524 calories per serving.  

What did we think?  Delicious!  Not much here that we would change.  We enjoyed it just as the recipe said.

There were leftovers for the next day and as often happens, the meal tasted even better.


Sunday, November 10, 2019

MONDAY RECIPE POST - THAI COCONUT CURRY SHRIMP


We have been fixing several shrimp dishes lately, both enjoying them and trying to put more lower caloric, healthier food into our daily meals.  This original recipe, even before David Bonhom's version, was said to be found in "Cooking Light".  I couldn't actually find it but the link takes you to many other recipes.  I am going to have fun looking through them when I have the time.

Thai Coconut Curry Shrimp
Calories: 255 per serving
Servings: 2

1 teaspoon canola oil
1/2 cup chopped onion
1/4 teaspoon red curry paste (such as Thai Kitchen) 
1 teaspoon sugar 
12 ounces large shrimp, peeled and deveined 
1/3 cup light coconut milk 
2 teaspoons fish sauce 
1/4 cup chopped green onions 
1 tablespoon chopped fresh Thai basil  

Heat oil in a large non-stick skillet over medium-high heat.  Add onion and curry paste to pan, and sauté 1 minute, stirring occasionally.  Stir in the sugar; sauté for 15 seconds.  Add shrimp and sauté for three minutes, or until shrimp are done, stirring frequently.  Stir in coconut milk and fish sauce; cook 30 seconds, or until thoroughly heated.  Remove from heat and stir in green onions and basil.  

This was a delicious meal.  Gregg added a heaping teaspoon of the red curry paste, and we both said next time a tablespoon would be good as we would have liked more heat.

He also said he would add the basil earlier, while cooking the shrimp and not last minute with the green onions, feeling it would be more flavor and also this is what we have done when making all our Thai meals.  

I have been looking online for substitutes for Thai Basil.  We are lucky that we have a large Asian Grocery store nearby so have easy access.  But if you can't find Thai Basil I would add Cilantro.  Some suggest using the Italian Basil but honestly, this would not be our choice.  That being said, go ahead and use it if it's more to your taste.  For our own personal preference, we would definitely add the Cilantro and that, of course, is not to everyone's taste either. 

For a side dish we sautéed snow peas and sliced sweet red pepper, done very simply in about a teaspoon of olive oil on medium heat for about five minutes.  They were crisp-tender.

We will definitely be making this meal again.

Thanks for looking and have a great week!


Sunday, October 6, 2019

MONDAY RECIPE POST - VEGAN SPICY THAI PEANUT RAMEN

We both enjoy Thai food and it has been a while since I shared a Thai recipe.  As soon as I saw this I knew it was for us.  Not only did it look a very flavorful dish, it was very pretty to look at and pleasing to the eye.  It could also be made to fit our own taste in the way of added vegetables.  Though it has 'spicy' in the title, I like things on the mild side as far as seasonings go, and if I can eat it and not have a problem, anyone can.  You can read my note on this at the bottom of this recipe.

I found the recipe at a food blog called Rabbits and Wolves, hosted by Lauren.  I was looking to add a meatless dish to our weekly menu.  You can see the original recipe here.  Thank you Lauren!  The broth alone has become a favorite, the whole dish was very yummy. 


Vegan Spicy Thai Peanut Ramen - Serves 6

2 teaspoons olive oil
3 cloves garlic, chopped
1 teaspoon fresh ginger, grated
1 teaspoon green curry paste
4 cups vegetable broth, divided (3 cups and 1 cup)
1 can (13 to 14 ozs) full-fat coconut milk
1/2 cup creamy peanut butter
2 tablespoons soy sauce
2 tablespoons Agave syrup (see added notes below my signature at the end of my post.  I have added some substitutions in case you can't find this Agave syrup)
Juice from 2 limes, plus extra for garnish
12 ozs. Ramen noodles (seasoning packet removed)

Suggested additions by Lauren:

Mushrooms, thinly sliced
Toasted sesame seeds, black or white
Thai Chilis
Cilantro
Peanuts, chopped
Other vegetable choices to suit your taste

Our choices were:

Firm Tofu, 16 oz. box cut into bite-sized cubes
1 container of Mushrooms, sliced
A handful of Baby Snow Peas
Sweet peppers, diced (I bought a packet of small ones, a mixture of red, yellow and orange.  Use as many as you think you would enjoy)
A handful of Peanuts, chopped
A handful of fresh Cilantro


In a large pot heat the 2 teaspoons of olive oil on medium high heat.

Add the chopped garlic and grated ginger.  Sauté for 1 to 2 minutes, reducing heat as needed (we want the garlic cooked and not burned).

Add the curry paste and stir into the garlic and ginger for about a minute more.

Add the 3 cups of vegetable broth and the coconut milk.  Stir to combine and reduce the heat to a low simmer.

In a medium-sized bowl, whisk together the peanut butter with remaining 1 cup of vegetable broth until smooth.  

Once this step is done add the mixture (peanut butter and cup of broth) to the pot.  Thoroughly combine with other ingredients.

Add the Agave, soy sauce and the juice of the 2 limes.  Simmer on low for 10 minutes, so that the flavors have a chance to develop.

Taste and adjust the seasonings if necessary (add more salt, Agave or lime juice to suit your own taste).

Right before serving add the Ramen noodles.  Simmer and cook according to package directions.  This should only take about three minutes but using a spoon, carefully take out a couple of strands and taste test.  You might want to let it cool a little bit as I don't want you to burn your lip.  We don't want the Ramen too mushy but I'm one of those people who doesn't like it too hard either.

Serve immediately.  The broth is delicious on its own but we loved it with all the extras.


Notes: 

Measure all your ingredients out first before starting, and put them within arm's reach when you are adding everything to the pot.  I know I'm preaching to the choir here but maybe there are some cooks just starting their culinary adventures.

I would suggest fixing your tofu before making the broth.  Take the tofu out of its container, put on a plate and wrap in a clean dry tea towel, or between a couple of layers of paper towel.  (This link will take you to a YouTube video showing five ways to drain tofu.)  

We pressed out as much liquid as we could.  This is so that it will crisp when sautéing in a smidgen of olive oil heated on medium-high.  Turn down heat if tofu is browning too quickly.)  

Before adding them to the frying pan put 2 tablespoons of cornflower in a bowl.  A few cubes at a time, toss tofu and shake off any excess cornflower.  Put on another plate.  Repeat until all tofu has been coated.  

Sauté on all sides until golden.  This will take a few minutes.  When done put on a clean plate and set aside.  You will be putting tofu back into the broth to reheat before serving.

We sautéed the mushrooms for a few minutes in a separate frying pan, and also set aside on a clean plate.  Added them to the broth a few minutes to reheat.

I picked the cilantro leaves off the stalks and stirred them into the broth at the last minute.  We also kept a few leaves for a garnish, along with all of the chopped peanuts. 

Section 2 extra limes lengthwise and place on a small dish to pass around at the table. It gives this meal a nice little zip squeezing extra juice over your meal.  Again, entirely up to you if you want to do that.

There are leftovers for other meals and they only get better.  We found this out the next day.

This is a note for my own benefit and not necessarily for everyone, as tastes are different.  We thought we would try an extra teaspoon of grated ginger next time, and also an extra teaspoon of green curry paste.

These sound like a lot of steps but they go fast and we gave this meal a 10 out of 10.


For fun I played with the Brushstrokes app on my iPAD and turned one of my photos into art.


Added note at 8-03 p.m. on 10-7-19

Sallie whose blog is A Full-Time Life, mentioned that she didn't have a couple of ingredients and as she would be on the road soon, didn't want to buy anything else as she is trying to use everything up before she leaves.  I think we can all relate to that. 

One of those items Sallie mentioned was Agave Syrup, and my next thought was that some of you might not have that readily available in your local supermarket either, as I have read it can be hard to find.  So, I thought I would look up substitutions.  I found the following at various websites online.

White Sugar: you can substitute white sugar to replace Agave, but it is suggested that for every quarter cup, use a 1/3 cup of sugar with a  couple of tablespoons of water.

Honey: you can also use honey but probably half as much because its sweetness is so concentrated.

Dates: can be mashed into many recipes to provide a subtle sweetness that resembles Agave.  

Corn syrup: using twice as much corn syrup as the recipe calls for of Agave.

Brown sugar: brown sugar provides a toasted, earthy sweetness that can easily replace Agave in a recipe.  Use the equivalent amount and test taste your broth at the end of the cooking time in this recipe.

Blackstrap molasses:  This thick, unsulphured variety of sweetener is not only healthier than most carbohydrate-containing sugars, but also provides a number of minerals than can boost overall health.  Use the exact same amount as called for when using the Agave.  In this recipe it calls for 2 tablespoons Agave Syrup, so you would use 2 tablespoons of Unsulphured Molasses to replace it.


This has turned into an epistle of a post, but that's the way she flies when she starts flying around the internet.


Monday, July 22, 2019

MONDAY RECIPE POST - EASY STIR-FRIED THAI GARLIC SHRIMP


This recipe comes from The Spruce Eats and the name by this recipe is Darlene Schmidt.  I would recommend looking at her photos and the original recipe here.  

Easy Stir-Fried Thai Garlic Shrimp
(2 servings)


Total: 13 minutes
Preparation time: 10 minutes
Cooking time: 3 minutes  
Yield: 12 to 15 shrimp
Calories: 94 per serving

Ingredients:

For the marinade:

1-1/2 to 2 tablespoons oyster sauce (Thai Oyster Sauce or Lee Kum Kee)
1 tablespoon soy sauce
1 tablespoon fish sauce
1 tablespoon brown sugar (this is the second time we made this recipe and we added an extra tablespoon of sugar)
4 to 6 cloves garlic, minced
2 tablespoons lime juice  (we had an abundance of lemons and used those instead of the lime juice)
1 red chili pepper, minced or 1/2 teaspoon dried crushed chili

(We replaced the fresh chili with a large spoonful of chili paste that comes in a red container. Pictured below.


We bought it from Lottes, our local Asian grocery market.)


For the Stir-Fry:

12 to 15 medium to large shrimp (the original recipe calls for them to be butterflied and that the shells can be removed or left on - we bought our shrimp, peeled and deveined them and did nothing else)

2 to 3 tablespoons of oil for stir-frying - at the moment we are trying avocado oil but used olive oil the first time

Garnish: 1 lemon cut into wedges
               1/2 cup fresh cilantro, coriander or our 
               personal favorite, Thai Basil Leaves


Instructions: 

In a bowl combine oyster sauce, soy sauce, fish sauce, brown sugar, garlic, lime juice and chili pepper.  Stir until the sugar has dissolved.  We added that extra tablespoon of sugar here.

Place the shrimp in the marinade and stir well to coat.

In a wok or frying pan, heat the oil.

Once hot, add the shrimp along with the marinade.

Stir-fry for 2 to 3 minutes or until the shrimp are plump and pink.  They will also be lightly browned from the sauce.

Avoid overcooking or the shrimp will turn rubbery.

Test the sauce for taste and adjust as needed to achieve a salty-sweet balance.  Add more sugar if its too sour, add more lime juice if it's too salty or sweet.

Darlene offers two ways to serve the shrimp:

It makes a a light entrée for two people, or an appetizer for a group, and can be plated for a nice presentation. 

For a dinner or lunch entrée, simply slide the shrimp onto a serving platter and sprinkle with your choice of Coriander, Cilantro or Thai Sweet Basil, plus an extra fresh chili if using.  Add lemon or lime wedges to the side and serve with rice or a crusty loaf of French bread.

For an appetizer: use tongs to pick shrimp out of the pan, allowing most of the sauce to drip back into the pan.  Arrange the shrimp on a serving platter with tails up and stick a toothpick into each to make eating them easier.  Pour sauce over the platter and sprinkle with fresh Coriander.  Garnish with lime wedges.

Our choice was to make the same Bok Choy dish we made last week, having but not mixing the  Jasmine Rice this time.  I also had some steamed cauliflower just because I had used it for another meal earlier and wanted to use up the rest.  


Monday, March 11, 2019

MONDAY RECIPE POST - THAI BASIL CHICKEN

Friday, March 8th, 2019 -  4.29 p.m.
It snowed today but is not supposed to be getting very deep.  However, there has been a steady fall of fluffy flakes all morning.  The ground is just beginning to get covered in a fine layer.  When I saw the birds up in the trees overlooking the deck, I knew I had to resupply their birdseed.  Yes, they have me well trained!

No new recipe today but Gregg made his favorite, Thai Basil Chicken and it was as yummy as always. I cut and paste this from my old blog (no longer open), and the size of the letters may be different as I don't have the time to type the whole thing again.  I also wanted to transfer it so that I don't have to keep looking on the old blog.  We don't make the dish that often and forget a lot of the ingredients by the time we get round to it.  You get the whole post, history and all, of how we came to enjoy eating this dish.


Years ago before we moved to Virginia (in 1990) we had never tried Thai food.  Gregg moved ahead of us to start a new civilian job after leaving the navy, and lived with his brother and family for a while.  I was waiting for our son to finish his year in school in California.  

In the meantime Gregg started his job and I remember him raving about the food at a restaurant he was taken to by a new colleague.  It was a short walk up the road from his office.  I also remember him saying that it wasn't a fancy restaurant, a hole in the wall place, but it was clean and very popular.  It also had the most amazing food.  This was his introduction to Thai food and he couldn't wait for us to join him so that we could all go there together.  

And that we did.  He was delighted that not only I but also our ten year old son enjoyed it as much as he did.  We visited often and the owners got to know us well.  We became regulars and when we walked in, there would often be a lady seated at one of the dining tables with a big bowl of basil, picking the basil leaves off the stems to be used in their meals.  The smell from the kitchen was incredible.


I am having a case of deja vu.  I may have mentioned this place before on this blog somewhere, but I will plod on.  After a few years and for one reason or another, we had not gone for a while.  It wasn't exactly around the corner from where we lived and life got busier.  We went there more infrequently but after a particularly long 'dry spell', we decided it was time to go get some of our favorite food and headed for our little hole in the wall restaurant.  We were shocked to find the place all boarded up.  It was a sad day for the three of us.  There was no notice on the door to say where they had moved, even though we subsequently tried several more restaurants in the area, thinking they may have relocated, but to no avail.  The food in these restaurants was excellent of course, but it just wasn't the same as our little hole in the wall.

The story was that the building was going to be torn down and that's why those lovely people left, but wouldn't you know it, that building is still there to this day?  I don't know what happened but there are now other restaurants in its place.  I hope they are doing well but none included our favorite Thai restaurant and we never did go back.  For a couple of years if we were in the area and driving by, we might glance in their direction to see if by some miracle they had returned, but they never did.  We still wonder about them occasionally.  They will always be a fond memory, this being the very first place we experienced Thai food.  It wasn't just the food but the people who ran it.  They were extremely kind, genuine friendly and just nice, nice people.

And so it became one of those wonderful family memories of our first few months in Virginia, when the three of us were introduced to a new taste that we had never experienced before.


It is one of the reasons we tried this Thai Basil Chicken tonight. We have been dabbling, trying several Thai recipes lately with great success.  Gregg asked me if I remembered the Thai Basil Chicken we used to get (this from that first Thai Restaurant)?  I told him I would look around for a recipe and I found this one here.  Eureka!  He announced that it is the taste he remembered and gave it a good solid 10!

Thai Basil Chicken - serves 2 to 3 people

Olive Oil (amount wasn't mentioned) but we used 1 to 2 tablespoons

2 large chicken breasts, cut into small pieces
1 onion, sliced thinly
4 garlic cloves, minced
1 red bell pepper, cut into strips
3-4 dried chilies, minced/crushed, more if you like it spicy
  (we have been replacing the dried chilies with a chili garlic paste,   1-1/2 tablespoons.)
2 cups Thai basil leaves, loosely packed

Sauce:

2-1/2 tablespoons fish sauce
1-1/2 tablespoons soy sauce
2 teaspoons ketcap manis (thick Indonesian slightly sweet soy sauce)
2 to 3 teaspoons sugar
2 to 3 teaspoons cornstarch
Pinch of black pepper

Prepare your ingredients.

Combine the ingredients for the sauce in a bowl.  Set aside.

Saute the garlic with the crushed chili in olive oil for a minute or two on medium heat, until it smells fragrant.

Add the onion and cook for 2 minutes.

Add the chicken to the hot pan and stir fry until it is almost done, about 3 to 4 minutes.

Add the bell pepper.  Stir fry for 1 minute.

Pour in the sauce.

Stir and mix well.

Cook for another minute or until the sauce thickens up a bit.

Add in the basil leaves.  Mix well.  Cook for 30 seconds until they started to wilt and become fragrant.

Remove from the heat and serve with hot rice.


What did we think of this dish?  More to the point what did Gregg think. Was it anything like the one that became his favorite all those years ago?   With a big smile he said it was 95 percent of what he had remembered.  Thai Basil Chicken was the meal he ordered every time we went to our hole in the wall.  It's a keeper!

There were two recipes I was thinking of making, the one above and another here,  It also looks an excellent meal which I suggested trying another time, but Gregg doesn't want any other than what we made tonight and that's okay with me.  I will, however, add the sliced green onions as a garnish, as suggested in the second recipe, along with the fresh Thai basil.

If you are used to handling hot peppers and depending on the kind you buy then you should have no problem, but I would highly recommend that you wear kitchen gloves when preparing. The first time I cut one up I had a bit of a reaction - to put it mildly - and found that I am super-sensitive to such things.  Gregg does all the cutting up of hot peppers now and has no problem at all, but he still wears kitchen gloves and immediately washes the cutting board and knife afterwards.  I prepare all the other veggies. 

We ended up using one fresh hot pepper because we couldn't find any dried, and removed all the seeds.  You may already know these seeds contain a good part of the heat.  I thought of leaving half of the seeds in the dish but we both decided this meal was more than hot enough for our taste and we took all the seeds out.  

The only basil we have eaten is Thai basil which we purchase at our local Asian food store.  It is hard for me to describe the difference but I found the following information at two sites, here and here. At the first site I read: "Are Thai and Sweet Basil interchangeable? When developing Thai-style recipes, we've run tests to see if Thai basil can be replaced with the much more available sweet (Italian) basil.  The answer in all cases is a resounding no; these herbs have very different flavors.  Thai basil, which can be identified by its purple stem, has a stronger flavor and aroma - we detected hints of licorice, cinnamon and mint.  If you can't find Thai basil in your supermarket, we recommend substituting mint, not sweet basil."

We served it with steamed white rice, although I am sure you can use brown.

When making the sauce we will double the amount.  It would have been nice to have extra to pour over our rice. 

Added note: Gregg says he could eat this dish at least once a week so we made it again since the first time.  We did make double the sauce and it was a good decision.  This is what it looks like in the pan.


We also added sliced green onions along with the basil for a garnish.  


We didn't have any in the house but Gregg thought a nice Tsingtao beer would have gone well with this dish.