Showing posts with label Mexican Cuisine. Show all posts

Tuesday, May 19, 2026

LAST SATURDAY WE MET UP WITH…

 one of our family whom we haven’t seen in over a year.  They were in town and called to see if we would like to meet up for lunch. We happily said yes and had a delightful time catching up. We met at this place, all looking for something informal where we could sit around talking for a few hours, without anyone kicking us out for wanting our table. We called on our expert (our son) who recommended Senor Ramon’s Taqueria in Reston (Virginia). It was the perfect place. 

Top, middle and bottom right were at the Mexican restaurant (we order at the counter and food is brought to us. It was perfect weather for sitting on their patio). Middle left was one of the Aztec designs on the wall of the restaurant. Top and bottom left is a different shopping area, the Reston Town Center which is very close just down the road. 

There are no photos of food this time and not sure what everyone ordered, but we enjoyed it. I do remember Gregg ordered tortilla chips and salsa for everyone to share. I had a sandwich (a bun loaded with roasted shredded vegetables - not too highly spiced - it came with excellent French Fries (they didn’t overload the plate and left you wanting more but I was very satisfied at the portion size.) There were also very tasty empanadas, again not too big or highly spiced, which I was happy about. We took those home and had them for supper. I don’t remember anything else, what their orders were. I guess we were too busy enjoying chatting.

  It really was a lovely time and we are looking forward to getting together at a half-way point next time, now that the weather is warming up.

That’s all for today. 
I hope your week is going well,
Thanks for stopping by.


Monday, April 1, 2024

MONDAY RECIPE POST - WHITE CHICKEN ENCHILADAS

Happy 1st Day of April! I hope you have had a great weekend, and I wish you all a very happy month of April!

This is an old recipe from my other blog, now closed. We haven't made any new dishes this week as unusual for us we have eaten out a few times when out and about. On other days we have stuck to light fair - because of all that eating out - and had salads and soup and veggie only meals, all simple throw-togethers. Today's recipe comes from Joyful Mamma's Kitchen hosted by Alexis.


White Chicken Enchiladas - original recipe found here.

10 soft taco shells
2 cups cooked, shredded chicken
2 cups shredded Monterey Jack cheese
3 tablespoons butter
3 tablespoons flour
2 cups chicken broth
1 cup sour cream
1 (4 oz.) can diced green chilies

Preheat oven to 350 degrees.  Grease a 9 x 13 inch pan.

Mix chicken and 1 cup of cheese.  Roll up in tortillas and place in pan.

In a saucepan melt butter, stir in flour and cook 1 minute.  Add broth and whisk until smooth.  Heat over medium heat until thick and bubbly.

Stir in sour cream and chilies.  Do not bring to a boil, you don't want curdled sour cream.

Pour over enchiladas and top with remaining cheese.

Bake 22 minutes and then under high broil for 3 minutes to brown the cheese.


This was very tasty.  While I took the hot dish out of the oven for it to cool a little, Gregg offered to make the salad, and you can basically see what he made in the photo above.

If you look at the original recipe at Alexis' website, there are very good tips about this dish.  I read that you can't really freeze as is, rather you can make the enchiladas without the sauce.  You can make the whole dish up to 24 hours ahead but if you want to freeze the meal, you can do so, but stop short of making the cream sauce, just freeze the enchiladas.  

You make the sauce the day you serve, first thawing the enchiladas overnight and then cook according to the original instructions. It might help to take them out of the fridge half an hour before putting in the oven.

When I fix this another time, I will halve the recipe just for the two of us, make one batch of enchiladas to serve that day and put the rest - minus sauce - in the freezer.  


Monday, October 17, 2022

MONDAY RECIPE POST - TWO RECIPES TODAY: SALSA CON QUESO BEEF ENCHILADAS AND MEXICAN RICE

Nice and crusty after I had gotten past the taking out of the oven stage.  The timer was going off in the kitchen, but I was focused doing something in the other room and didn't hear it.  I accidentally added another 15 minutes to the cooking time.  The cheese got a might crispy on the edges, and had the taste of a raclette, but the enchiladas were delicious, and it was a happy happenstance as that burnt cheese on the edges was also delicious!  Next time though, I will probably set the time on my phone and put it right next to my ear!

A bit of a longer ramble today but I went down memory lane on this one, so please feel free to skip to the recipe part.  I do these rambles for our son as I started blogging because of him, to give him an idea of what his parents used to do back in the day, so to continue...

At one time I wasn't a big fan of Mexican Cuisine.  Only because in truth, where I grew up, we were a very plain-cooking family.  Mum was the best cook and those meals she made were outstanding.  She was also a wonderful baker.  I think she was more adventurous in trying new foods, as I learned later when she visited us here in the States.  Dad was the one she catered for, however, and he was more of a meat and potato man, bless his cotton socks, and there certainly is nothing wrong with that.

There was one Chinese Restaurant and one Indian Restaurant in the nearby town.  Things have probably changed but in those days, it seemed that most people only went out for special occasions, like birthdays in our case.  Mum and Dad went once to the Chinese restaurant with me, and I went once to the Indian restaurant with friends. Both occasions the food was enjoyed very much, maybe not by my meat and potato loving Dad, but he was always a good sport.  No, we didn't go out to eat a lot, unless it was for a cup of tea and a slice of cake, or a crumpet, on a shopping trip.  

The one time I had Mexican food in the UK, was when I traveled to London, going up on the train and staying the weekend visiting with friends. I was 20-ish, if that, and they took me to a lovely restaurant in Soho. I knew nothing of ambiance back in those days, but this place was like I had stepped into Mexico, and was a posher restaurant than I had ever been to in my 20 years.  It was an adventure!  I can only remember that I had a dish, chicken I think, with chocolate sauce on the top, my friends' recommendation.  My parents on my return, looked at me a little strangely when I told them about it.  “And it wasn’t a dessert?”  I am not sure they believed me, but years later I realized it was a mole sauce which you can read about here. They decided I needed a good cup of tea and a crumpet, which there was a never ending supply of in Mum’s pantry.  As I told my parents about my weekend in London, I said to Mum, there's nothing quite like a good cup of tea and a crumpet.  My mother was reassured.  And in her eyes, tea fixes everything.  

The next time I had this cuisine was when I came to America in 1975, but it was a few years later when I ate my first Mexican meal.  We were traveling through New Mexico on a road trip and had heard about a place that was quite famous and had a great reputation, also recommended by friends.  A lovely restaurant, but nothing fancy.  It had lots of atmosphere, however, and great food.  I said to my dear other half, that I wasn't going to leave the state before I tried an authentic Mexican meal, and our route took us near the restaurant thankfully.  

It was another fun experience.  Plus, it was hot and spicy, and Gregg pointed out halfway through, that I had a single tear falling down my cheek I hadn't noticed.  I was too busy with the feeling of my mouth being on fire and, unusually, I didn't feel as though that was a big deal.  He thought it was a hoot and I loved that meal and its heat. We still talk about it occasionally, and laugh at the memory. 

Days later, we found ourselves in another Mexican restaurant, in another town, in another state, as we drove further west, where the staff were friendly and good natured, and our waiter had us laughing all through our meal.  One comment I actually guffawed.  I told him how much I liked the artwork.  (There were also large, antique framed mirrors all over the same wall.)  Our waiter quipped, “Ah yes, but the most beautiful art is reflected in the mirrors”. I automatically turned and stared into the one eye level with our table and saw myself.  And yes, I guffawed loudly.  He feigned a look of surprise but also had a twinkle in his eyes.  My dear other half told him “Oh you’re goooood!”  We both had a fun time at that place.   Great people, great atmosphere and great food!

But, getting around to today's recipes, we don't eat this cuisine very often, but I asked Gregg if he would like a Mexican meal for a change.  (He and our son get together for some father/son time and they go to son’s favorite taco place on occasion).  

I found these recipes a few days ago and they sounded so good.

Plain Chicken was the food blog where the enchiladas came from. The Mexican Rice came from The Kitchn.  If you click on their names, the links will take you right to the original recipes. I always recommend checking them out to see the tips that are given in the making, and also the photos, and other recipes.  

Neither of these meals are very hot or spicy.  One of the blogs said they couldn't say whether it was authentic, but I wouldn't have known.  Both were excellent!


Salsa Con Queso Beef Enchiladas - serves 6

1½ cups salsa

2 lbs. ground beef

1 (1-oz) package taco seasoning 

⅔ cup water

1 (15-oz) jar salsa con queso cheese dip

8 (7-8 inch) flour tortillas

2 cups shredded Cheddar or Monterey Jack cheese


Preheat oven to 350ºF. Lightly spray a 9×13-inch pan with cooking spray. Pour salsa into the bottom of the pan. Set aside.

Cook ground beef in a large skillet over medium-high heat until meat is browned, stirring until crumbled; drain fat and return to skillet. 

Add taco seasoning and water to the skillet. Simmer for 5 minutes, until liquid is absorbed.

Stir salsa con queso cheese dip into the taco meat. Remove skillet from heat.

Spread the meat mixture down the center of each tortilla. 

Roll up tortillas, place, seam side down, into the prepared pan.

Sprinkle tortillas with shredded cheese.

Bake uncovered for 20 to 25 minutes, until warm and the cheese has melted.


Notes given were:

Ground turkey or ground pork can be substituted for the beef. 

You can add veggies to the beef mixture. Onion, bell pepper, corn, black beans or black olives.

For an extra kick, add a can of Rotel diced tomatoes and green chiles to the taco meat.

A recipe link for Homemade Taco Seasoning was given, made with chili powder, garlic powder, onion powder, red pepper flakes, oregano, paprika, cumin, salt, and pepper.  

https://www.plainchicken.com/homemade-taco-seasoning/

Used was a jar of Tostitos Salsa con Queso, which the host found in the chip aisle.

Also used was La Banderita Low-Carb flour tortillas for the enchiladas. You can use any tortilla that you prefer. Flour or corn tortillas both work fine.

The host's favorite store-bought salsas are Mateo’s, Kyliot’s, Chi-Chi’s, and Trader Joe’s.

Can beef enchiladas be made in advance? Yes. Assemble the enchiladas and cover the pan with plastic wrap. Refrigerate until ready to bake.

Can beef enchiladas be frozen? Yes. Assemble the enchiladas and cool completely. Cover the pan with plastic wrap and foil. Place in the freezer for up to 3 months.  When ready to bake, thaw and bake as directed.


Restaurant-Style Mexican Rice - serves 6 to 8


1 (28-ounce) can whole peeled tomatoes

medium onion, peeled and coarsely chopped

2 cups low-sodium chicken broth

1 1/2 teaspoons kosher salt

1/2 teaspoon ground cumin

1/3 cup neutral cooking oil, such as canola or safflower (or rendered lard)

2 cups long-grain white rice

1 to 2 medium jalapeño or serrano chile peppers, seeded and minced

4 to 5 cloves 

garlic, finely chopped

1/4 cup finely chopped fresh cilantro

Juice of 2 medium limes, plus more wedges for serving


Place the tomatoes and their juices and onion in a blender or food processor and purée until smooth. 

Transfer 2 cups of the tomato mixture to a medium saucepan. (Reserve any excess tomato mixture for another use, such as Tomato Sauce.) 

Stir in the chicken broth, salt, and cumin and bring to a boil over medium heat. Meanwhile, toast the rice.

Heat the oil in a Dutch oven over medium heat until shimmering. 

Add the rice and sauté, stirring frequently, until lightly toasted and golden, about 5 minutes. 

Add the jalapeños and cook until softened, about 2 minutes, lowering the heat as needed. 

Add the garlic and cook for 30 seconds more.

Pour the boiling tomato mixture over the rice and stir to combine. 

Reduce the heat to low. 

Cover and cook until the liquid is absorbed and the rice is tender, about 15 minutes. 

Remove from the heat and gently fluff the rice with the fork. 

Cover again and set aside to steam for 10 minutes. 

Add the cilantro and lime juice and fluff again to combine. 

Taste and season with more salt as needed. Serve with lime wedges.


The following are the addresses for the above recipes.  At the bottom is a homemade version of their taco seasoning in case you would like to make your own.

https://www.plainchicken.com/salsa-con-queso-beef-enchiladas/

https://www.thekitchn.com/recipe-mexican-rice-recipes-from-the-kitchn-198867

https://www.plainchicken.com/homemade-taco-seasoning/


Two great recipes and one great meal.  Also a mixed salad is a nice addition.

I would get as much preparation done ahead of time and refrigerate where necessary, pre-chopping veggies and measuring the amounts needed.  The rice dish could be made the previous day for instance and refrigerated.  This seems the type of dish where the flavors would develop even more with the extra time.

I added a spoonful of sour cream.

I wouldn't change anything else, for us it was perfect.


Monday, July 18, 2022

MONDAY RECIPE POST - GRILLED CILANTRO-LIME CHICKEN THIGHS


Grilled Cilantro-Lime Chicken Tights 

Servings: 4

Calories per serving: 398


I found this at All Recipes at this link.  Definitely a keeper.


½ cup chopped fresh cilantro

¼ cup olive oil

2 tablespoons lime juice

2 teaspoons ground cumin (I wasn't sure on the cumin so I only added 1 teaspoon)

1 teaspoon dried Mexican oregano (regular oregano is all I have so used that.  I am curious how different in taste it would be).

Salt and ground black pepper to taste

2 lbs. boneless, skinless chicken

Lime Wedges for garnish


Whisk cilantro, oil, lime juice, cumin, oregano, salt, and pepper together in a large bowl. Add thighs and stir to combine. Cover and refrigerate for 2 hours.

Preheat an outdoor grill over medium-high heat and lightly oil the grate.

Cook thighs for 6 minutes. Flip and cook until chicken is no longer pink in the center and the juices run clear, about 6 more minutes. An instant-read thermometer inserted into the center should read at least 165 degrees F (74 degrees C). 

Serve with lime wedges if desired.


Changes made:

I roasted these in the oven on 365 degrees Fahrenheit for 30 minutes.  The last few minutes I put the broiler on to brown them a little.  I was very happy with the results.  Should have put a couple of lime wedges in these photos but I forgot.  I really did love that lime flavor, also the cilantro.  

You could use another fresh herb, as I know a lot of people find cilantro a bit soapy.  I remember years ago - going back 40 years - trying it for the first time and finding it not to our taste. Friends of ours had put it on pizza.  Neither of us enjoyed it and had always stayed away, until five years ago when I bought it by mistake and shockingly, we truly enjoyed it!  

We thought this would be an excellent picnic food as it tastes just as good when cold.  

Didn't change anything else and will look forward to it again sometime.


Monday, December 13, 2021

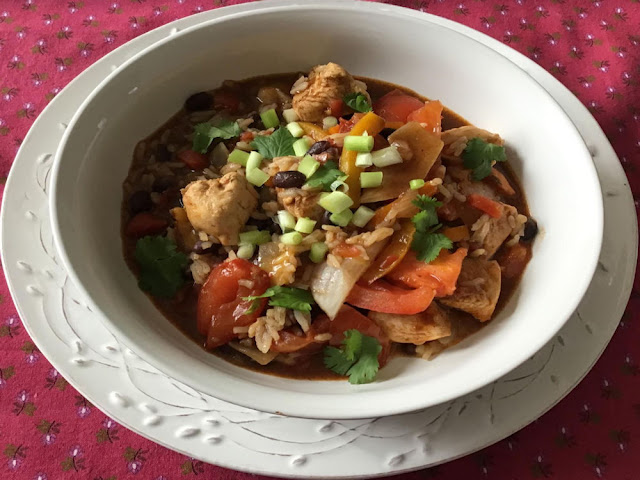
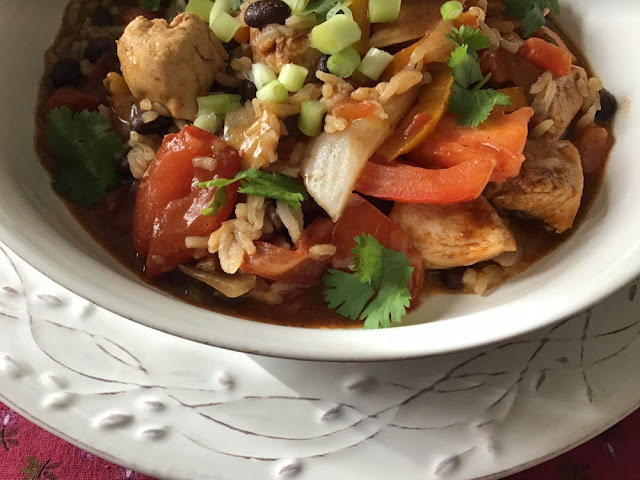
MONDAY RECIPE POST - FIESTA CHICKEN (MEXICAN CUISINE)

As I had an extra can of black beans and a packet of Taco mix in the pantry, as well as Cilantro in the fridge, and three tomatoes that needed to be used up, I searched for another Mexican dish.  We made it last Tuesday, (December 7th, 2021), and we enjoyed it very much.  It came from a blog called Cubby, which is described as being a newsletter for families at home.  The lady who posted this recipe is Kristina, and that original recipe can be found here.  You can find all kinds of good tips, along with her photos of this dish. 


Fiesta Chicken Recipe

It was said that this takes 25 minutes from start to finish.   I move a bit slower apparently, but it was still a relatively fast meal to prepare and cook.


Servings: 4

Preparation time: 5 minutes

Cooking time: 20 minutes


Ingredients: 

1 medium red bell pepper

1 medium green bell pepper

1 small yellow onion

1 pound boneless skinless chicken breasts or thighs

1/2 teaspoon kosher salt

2 tablespoons vegetable oil

1 (1-ounce) packet taco seasoning mix

1 (about 15-ounce) can black beans

1 (15-ounce) can diced tomatoes

1 1/2 cups instant brown rice

1 cup low-sodium chicken broth

1/3 cup shredded Mexican cheese blend


Suggested toppings.  I put one asterisk next to the item we used for this meal, and two asterisks for what we intend to use next time in addition.  

Sliced green onions*

Fresh cilantro*

Lime wedges**

Sliced pickled jalapeños** 

Hot sauce **

Sour cream**

or 

Mexican crema (I have never noticed this in our local supermarket, but then I didn’t know about it. I will look next time in the international aisle)

Sliced or diced avocado**


Core and seed 1 medium red pepper and 1 medium green bell pepper. Cut into 1/4-inch-wide strips. 

Dice 1 small yellow onion (about 1 cup). 

Cut 1 pound boneless, skinless chicken breasts or thighs into 1-inch pieces and season with 1/2 teaspoon kosher salt.

Heat 2 tablespoons vegetable oil in a large high-sided skillet over medium-high heat until shimmering. 

Add the chicken, onion, peppers, and 1 packet taco seasoning mix. 

Cook, stirring often, until the vegetables start to soften, 5 to 8 minutes. 

Meanwhile, rinse and drain 1 can black beans.

Add the black beans, 1 (15-ounce) can diced tomatoes and their juices, 1-1/2 cups instant brown rice, and 1 cup low-sodium chicken broth. 

Stir to combine and bring to a boil. 

Reduce the heat to low. 

Cover and simmer until the chicken is cooked through and the rice is tender, 8 to 10 minutes. 

Turn off the heat and let stand, covered, for 5 minutes more to absorb the remaining liquid.

Sprinkle with 1/3 cup shredded Mexican cheese blend and garnish with desired toppings.

If you would like to take a look at the recipe rather than clicking on the link at the beginning, here is the actual address that you can cut and paste into your browser.

https://www.cubbyathome.com/one-pan-skillet-fiesta-chicken-recipe-80009586?amp=1

This was an excellent dish which we both enjoyed very much. 

I also cut three tomatoes into dice and added them at the same time as the canned diced tomatoes.  

Unfortunately, our avocados ripened all at once a couple of days ago and I used them as avocado toast with a poached egg on top for breakfast.  It would have been nice for a topping and when I make this again, I will remember to coordinate a little better.

I used chicken breast, and will alternate with boneless chicken thighs next time.

There was a lot of broth left over and we think it is because we used already cooked rice.  This came from Trader Joe's and it is their frozen Jasmine Rice.  It was excellent but my Dear Other Half said he would like to add an additional packet next time.  We both liked the broth as it was very tasty, but it does not look like the photo at the website.  It tasted great and the next day when we had leftovers, the broth had been absorbed.  

Our son was over the next day and he we offered him a bowl for lunch.  He enjoyed it as much as we did, so this is a three-thumb’s-up meal.

Another thought, I will make cornbread next time.


Suggested notes for storage: 

You can store leftovers in an airtight container in the refrigerator for up to 4 days, or freeze for up to 2 months. Let thaw overnight in the refrigerator, and rewarm gently in the microwave or on the stovetop.  Add a splash of chicken stock or water to keep it from drying out.


Thank you for looking at my Monday Recipe Post, and enjoy your week.


Monday, November 22, 2021

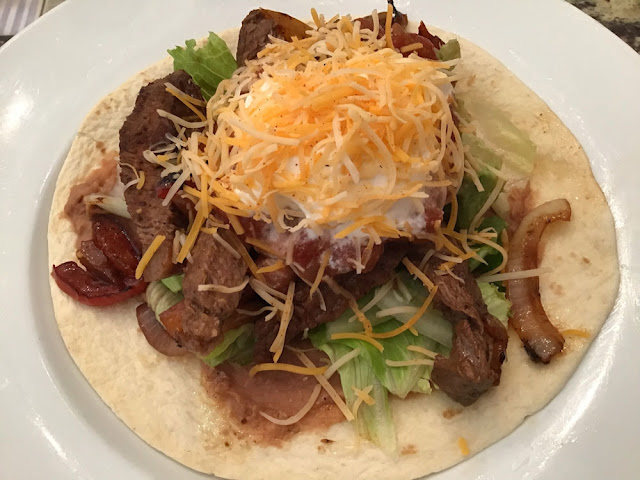
MONDAY RECIPE POST - STEAK FAJITAS

I found a great recipe at Add a Pinch hosted by Robyn.   The original can be found here.  

The beef and vegetables are marinated separately the night before, but you can marinate also up to one hour before. However, having everything prepared the night before made this dish super fast and easy to put on the table.

Robyn has many others delicious looking recipes. I am looking forward to going back soon, and I also enjoy reading her tips before each one.


Steak Fajitas 

6 Servings 


2 pounds skirt, flank, sirloin, or hanger steak sliced into ½ inch strips

1 red pepper deseeded and sliced into thin strips

1 green or yellow pepper deseeded and sliced into thin strips

1 medium onion peeled and sliced into thin strips

3 tablespoons olive oil

1 tablespoon lime juice

1/2 teaspoon chili powder

1 teaspoon ground cumin

pinch cayenne pepper

1/2 teaspoon Kosher salt

1/2 teaspoon fresh ground black pepper

2 cloves garlic minced

6-8 tortillas warmed


Here are several garnish choices you might choose, depending what you have available.  I put an asterisk next to our selection. We would enjoy any of these.  

Grated cheese (we use a Mexican blend from the supermarket)*

Sour cream*

Tomato, diced

Green onions, sliced thin

Guacamole*

Salsa*

Refried Beans*

Sliced jalapenos, the kind that have been marinated in a jar 

Crispy Lettuce*

Cilantro


Measure out all your ingredients and prepare steak and vegetables.

Prepare marinade:

In a jar with a screw top lid, add olive oil, lime juice, chili powder, ground cumin, cayenne pepper, salt, black pepper, and garlic. Shake until well combined.  (I had an old peanut butter jar that I saved just for things like this).

Place the steak into a resealable bag. 

Place the peppers and onion into a separate resealable bag. 

Pour ⅓ of the marinade over steak, ⅓ of marinade over vegetables and reserve and refrigerate the remaining marinade in the jar for using when cooking the steak fajitas. 

Seal the bags and gently squeeze the bags to distribute the marinade throughout, (being careful to check your bag is sealed tightly. I usually put these bags upright in a large bowl to prevent accidental drips.)  Refrigerate for one hour to overnight.  

Next day just before you are ready to cook, pre-heat oven to 350 deg. F.  You will be using a skillet for the meat and vegetables but will be heating tortillas in the oven. (See note below if you prefer to use a microwave.)

Start heating the skillet over medium-high heat.  

Wrap a stack of about four to six tortillas in aluminum foil and put in the pre-heated oven for 15 to 20 minutes, or until heated through.  These need to be nice and warm as they will have a direct impact on how they will hold and taste when used in your recipe.

Note: Alternatively you can place 3-4 tortillas at a time on a microwave-safe plate and cover with a slightly damp paper towel. Microwave for 30 seconds, then set aside until ready to serve. This method can sometimes make tortillas a bit gummy, but it still works if you are short on time.

Now for the steak and vegetables: 

Carefully empty the bag with the vegetables into the preheated skillet and cook until just tender crisp, about 5 minutes. 

Remove the vegetables from the skillet to a plate and add steak strips to the same skillet. 

When the steak is done (about 7-10 minutes), add vegetables back to the skillet along with the reserved marinade.

For serving, place enough steak and vegetables on the warm tortillas, and layer your chosen garnishes on the top.  Gregg had his refried beans in a separate dish on the side.  I spread a thin layer on my tortilla before adding the steak/vegetable mixture   

If the links don't work at the beginning of my post, here is the address of the original recipe:

https://addapinch.com/steak-fajitas-recipe/

Excellent dish which we will make again.  

We both thought extra sweet peppers and onion would be nice.  

Gregg didn't think there was enough marinade, so he added a couple more tablespoons of olive oil and the juice from a second lime.  

There were enough leftovers for dinner the next day, and lunch the day after that.

This is very tasty.  A fun food but a tad messy.  Extra napkins will come in useful.  

Even though this is meant to be eaten with your hands, we added a fork and spoon at each place setting.


Thanks for looking and ...


Monday, September 6, 2021

MONDAY RECIPE POST - TACOS AND WITH REFRIED BEANS

Below you will find two Taco recipes.  The first one is from the Old El Paso site, which is the one we used.  The second recipe, from Taste of Home, the tacos were baked in the oven, which we didn't do, but there was a very nice refried beans recipe which was excellent.  I included the original two recipes for you to choose which one you would like to make.  You can look at the links above if you would also like to take a look at the original recipes.


Classic Beef Tacos - 10 servings

25 Minutes Prep

25 Minutes Total

Calories: 1 Taco is approximately 260


1 lb ground beef (at least 80% lean)

2/3 cup water

1 package (1 oz)  taco seasoning mix

1 can (10 ounces) diced tomatoes and green chiles, divided (this was our own addition after we saw the recipe below this one)

1 package (4.7 oz) Old El Paso™ Stand ‘N Stuff™ taco shells (10 shells), heated as directed on package

1-1/4 cups shredded cheddar cheese (5 oz)

1-1/4 cups shredded lettuce

3/4 cup diced tomato

1 cup sour cream


In 10-inch nonstick skillet, cook beef over medium-high heat 5 to 7 minutes, stirring frequently, until thoroughly cooked; drain. 

Stir in water and taco seasoning mix; heat to boiling. Reduce heat; simmer uncovered 3 to 4 minutes, stirring frequently, until thickened.

Divide beef among heated shells; top with cheese, lettuce, tomato and sour cream.

Tips given were:

Choose crunchy lettuce for this recipe, such as iceberg or romaine.

Suggested toppings: sliced green onion, sliced jalapeño, or drizzle with your favorite hot sauce.


(The recipe above is the one we followed for the tacos, plus the addition of the canned tomatoes and chilis which we thought a good idea from the recipe below. I have highlighted in red anything to do with the refried beans that we thought were excellent.)


Taste of Home Baked Beef Tacos – makes 12 servings

"This taco recipe takes classic taco ingredients and gives them a fresh approach by baking the shells upright in refried beans and tomatoes. The bottom gets soft, and the top stays crisp and crunchy. 

Author: Patricia Stagich, Elizabeth, New Jersey"


Preparation time: 15 minutes

Baking time: 20 minutes

Calories: approximately 277


1-1/2 pounds ground beef

1 envelope taco seasoning

2 cans (10 ounces each) diced tomatoes and green chiles, divided (you use one can in beef and one can in the refried beans)

1 can (16 ounces) refried beans

2 cups shredded Mexican cheese blend, divided

1/4 cup chopped fresh cilantro

1 teaspoon hot pepper sauce, optional

12 taco shells

Chopped green onions


Preheat oven to 425°. In a large skillet, cook beef over medium heat, 6-8 minutes or until no longer pink, crumble meat; drain. Stir in taco seasoning and 1 can of undrained tomatoes; heat through.

Mix beans, 1/2 cup cheese, cilantro, remaining can of undrained tomatoes and, if desired, pepper sauce. Spread onto bottom of a greased 13x9-in. baking dish. (If you are making this separate to the recipe like I did, you can put the ingredients for the refried beans, after mixing,  into an oven proof dish, and put it in a 350 deg. oven for about 20 minutes, or until heated through.)

Stand taco shells upright on bean mixture. Fill each with 1 tablespoon cheese and about 1/3 cup beef mixture. Bake, covered, 15 minutes.

Uncover; sprinkle with remaining cheese. Bake, uncovered, 5-7 minutes or until cheese is melted and shells are lightly browned. Sprinkle with green onions.


We got to talking about memories of the great Mexican restaurants we have visited in years passed, either locally or on road trips.  Not just for their wonderful dishes, but for the special people who made our meals even more of an enjoyable experience. Talking about all these memories, we thought it would be fun to make tacos, which is a particular favorite of my Sweet Other Half.  We were not disappointed in our choices.

I went on line and found two possibles. Gregg chose the original tacos in the first recipe, and I chose the refried beans.  Together they made a wonderful meal.  I'm sure the baked tacos would have been delicious too and will cook that some other time.

There were lots of leftovers.  We made a brunch with the refried beans the next day and had a 'huevos rancheros' thing going on by putting a fried egg on top (hubby's idea and it was a good one).  The next night we had a repeat dinner.  There are still leftovers and a couple of taco shells.  I thought I would make some kind of taco soup, and break the shells with a rolling pin to sprinkle on top of the soup.

If you don’t want the extra heat from the chilies, you can use a can of plain diced tomatoes. 

Since putting this post together I am adding a few things.  I had forgotten about making the soup but Anni from "Hootin' Anni's Day Trippin'' put this idea into my head.  She mentioned having a Mexican meal in her post here, and I thought to myself, I have most of that on hand.  This was our meal a few days later, and it was excellent.  Thanks Anni!  Ours was a real throw-together meal.  I had the tortillas in the freezer, we made another batch of refried beans as I also had a can left in the pantry, and we used the same recipe as above.  We had enough deli London broil in the fridge, which was already sliced real thin, so we heated that up in a frying pan and Gregg added two heaping tablespoons of chili crisp (mentioned in other food posts and a little fusion going on there again). There was also a little left of a rotisserie chicken from the day before, that went in too.  Some chopped up tomatoes, cilantro and green onions for a garnish, along with a tablespoon or two of sour cream, and we had another great meal going.  

These were not only tasty meals but, as I mentioned before, fun ones.  We always gets a bit messy so have plenty of napkins handy just in case.

Bon Appétit!


Monday, September 14, 2020

MONDAY RECIPE POST - CARNE ASADA

This week's recipe comes from Cafe Delites and its host is Karina.  You can see the original recipe here.  There is a lot more information than I have added to mine, so it's worth a look as the original recipe has all of Karina's notes.  And thank you Karina for a delicious recipe that we will be very happy to make again (I added the tortillas).

Carne Asada


Preparation time: 2 hours
Cooking time: 8 minutes
Total time: 2 hours 8 minutes
Serves: 4 people

1/4 cup fresh squeezed lime juice (about 3 limes)
2 tablespoons olive oil
4 cloves garlic, minced
2 teaspoons ground cumin
1 teaspoon ground oregano
1 teaspoon garlic powder
1 1/2 teaspoons salt
1/2 teaspoon cracked black pepper
1 pound (500g) skirt or flank steak*

Whisk all of the ingredients together in a large shallow bowl or plastic container.

Add the meat, rotating to evenly coat, and cover with plastic wrap (or lid if using container). 

Refrigerate for 2 hours or overnight. 

Heat barbecue (or grill) on high heat. Note that lean flank steak is best cooked rare.  Skirt steak can be cooked well without losing moisture or flavor because it has more fat marbling.

Remove the flank steak from the marinade, and discard excess marinade.

Grill for 5-7 minutes per side, or until desired doneness is reached.

Transfer to a plate and allow to rest for 5-10 minutes. 

To serve, slice against the grain into thin strips.

Notes:

*Flank steak is best cooked rare or medium, while skirt steak can be cooked well.


In case you are in an area where tortillas are hard to come by, I added a recipe found at this website.  I didn't make them as they are sold at all the supermarkets around here.  Consequently no photos but check out the site if interested, also to read any tips provided.


Best Ever Homemade Flour Tortillas

Author: Chris Scheuer

Preparation time: 20 mins
Cooking time: 40 mins
Total time: 1 hour
Servings: 16
Calories: 124 kcal

3 cups all-purpose flour
1 teaspoon salt
1 teaspoon baking powder
⅓ cup extra virgin olive oil, vegetable oil or other fairly neutral flavored oil
1 cup warm water

Combine flour, salt and baking powder in the bowl of a stand mixer. Using the dough hook, mix dry ingredients until well combined.

Add oil and water with mixer running at a medium speed.

After about 1 minute, or when mixture comes together and begins to form a ball, decrease mixing speed to low.

Continue to mix for 1 minute or until dough is smooth.

Transfer dough to a lightly floured work surface. Divide into 16 equal portions. Turn each piece to coat with flour. Form each piece into a ball and flatten with the palm of your hand. Cover flattened balls of dough with a clean kitchen towel and allow to rest for at least 15 minutes (or as much as 2 hours) before proceeding.

After the rest period, heat a large pan over medium heat.

Roll each dough piece into a rough circle, about 6-7 inches in diameter, keep work surface and rolling pin lightly floured.

Don’t stack uncooked tortillas on top of each other or they will stick together.

When the pan is hot, place one dough circle into the pan and allow to cook about 1 minute or until the bottom surface has a few pale brown spots and the uncooked surface is bubbly.

If browning too fast, reduce the heat a bit.

If it’s taking longer than a minute to see a few pale golden brown spots on the underside of tortillas, increase the heat a bit.

Flip to other side and cook for 15-20 seconds. The tortillas should be nice and soft but have a few small brown spots on the surface. 

Remove from pan with tongs and stack in a covered container or zippered bag to keep the tortillas soft. 

Serve warm or allow to cool for later use.

When ready to use, place a slightly damp paper towel in the bottom of a microwave-safe container (with a cover) that will hold the stacked tortillas.

Microwave uncovered for 15-30 seconds (start with 15) or until warm, then keep covered to hold heat while serving.

Store in an airtight container or zippered bag at room temperature for 24 hours or refrigerate for up to 1 week.

To freeze, separate tortillas with parchment paper or waxed paper and place in a zippered bag before placing in the freezer.


What did we think?  

This is a fun food and something we both enjoyed putting together, also we thought it was very tasty.  Above you can see what we added to our tortilla, and folded them over to eat like a sandwich.

I bought these 8-inch flour tortillas to layer our ingredients.


We cooked the meat the day before serving.  It made for an easy, put together meal the day of, and the flavors were even better (yes we taste tested after cooking).

I also added a tablespoon of sour cream to top it off.

We didn't use the avocados as ours weren't ready.  They would be a nice addition and will remember to buy them early enough to ripen next time.  

I would like to make or buy a good salsa to add next time.

Instead of the cheddar cheese that we use in recipes, I had cotija cheese in the fridge bought for a previous recipe.  I am including information about the cheese that I found interesting.  

"Cotija cheese does not melt, so it is often used in Mexican cooking as more of a "finishing" cheese to enhance the flavor of dishes like beans, tacos, enchiladas and tostadas.

Cotija is a Mexican cheese made from cow's milk that is salty in flavor and crumbly in texture.  Named after the town of Cotija in the state of Michoacan, cotija cheese comes in two different types - fresh and aged (or añejo).

Though both types are relatively salty, the fresh version is soft while the aged version is much harder, similar to Parmesan."

Bon Appétit!