Showing posts with label Strawberries. Show all posts

Monday, August 18, 2025

MONDAY MORNING RECIPE POST - STRAWBERRY AND COCONUT POPSICLES

Eating a popsicle on a very hot day is a welcome treat and these are super easy to make. I found the recipe at "Eat.Drink.Love" hosted by Stephanie and you can see it at this link.  


Strawberry Coconut Popsicles

Makes 6 popsicles

Each popsicle is approximately 58 calories 


2 cups strawberries, hulled and sliced

2 tablespoons honey
1-1/2 cups full-fat coconut milk
1 teaspoon vanilla extract

Add strawberries and honey to a small saucepan.  Heat over medium heat and simmer until the strawberries are soft.  


Remove from heat and use a potato masher to break down the strawberries. Cool to room temperature. 


In a bowl stir together the coconut milk and vanilla extract.  Spoon some of the coconut milk into each popsicle mold, followed by a scoop of the strawberry mixture, followed by more of the coconut milk.  Continue until all molds are filled.


Freeze at least 4 hours or overnight.  


What did we think? A very tasty, frozen treat. They weren't overly sweet which suited our taste. If you want them sweeter you can always add more honey. For us it was fine as is.


I ran hot water over the outside of the mold for a few seconds to loosen them.  If they didn't come out relatively easy after the first hot water wash, I repeated the process until they popped out.  


The number of popsicles you get will depend on the size of your mold. The molds I used were like these. I also have another shape below which look like the molds here.  


If you don't want to buy the molds, you can use a small paper cup. After you have filled the cup with the mixture, slip aluminum foil over the top of each one and cut a small slit in the top just big enough to slip a wooden Popsicle stick into the hole.  This will allow it to stand up straight while freezing.  (I have even seen sturdy straws used but have never tested those or the aluminum foil method.) 

I mashed the strawberries with a fork instead of using what was suggested.


I didn't want to fiddle too much and instead of pouring the strawberry and coconut mixtures separately, I mixed everything together and poured it into the mold in one go.  They all seemed to get a nice mixture of strawberry throughout.


From my photo you can see I didn't put enough mixture in to go down all the way to the base of the handle.  No big deal but if you like things corner to corner like I do, I will add a little more next time.


We both thought these were very tasty, and refreshing on a hot day. I will be making them again.


The full address is below if you prefer to copy and paste rather than use the link at the beginning.


https://eat-drink-love.com/strawberry-coconut-popsicles/


Thanks for looking, have a great day and

Bon Appétit!


Monday, March 31, 2025

MONDAY MORNING RECIPE POST - BANANA STRAWBERRY CAKE

This recipe was a great cake and we both gave it a ten out of ten.  I have been looking around for a few new recipes to make for company, also desserts. It came from Kitchen Divas hosted by Karen and Ken. You will find the original recipe here.


BANANA STRAWBERRY CAKE 

Servings: 12

Calories: approximately 443 calories per serving


1-1/2 cups very ripe bananas, mashed and ripe

1-1/2 cups fresh strawberries

1 tablespoon lemon juice

3 cups flour 

2 teaspoons ground cinnamon

1-1/4 teaspoon baking soda

1 teaspoon baking powder  

1/2 teaspoon salt

3/4 butter at room temperature 

1 cup sugar

1 cup packed brown sugar

3 large eggs 

2 teaspoons vanilla 

1-1/2 cups buttermilk 

1/2 to 3/4 cup walnuts or pecans, chopped (optional)


Cream Cheese Buttercream Frosting:

1/2 cups buttermilk butter, room temperature 

1 package (8 ozs.) cream cheese, softened

4 cups confectioners sugar


Decorations:

1/4 to 1/2 cup walnuts or pecans, chopped 

6 to 10 large fresh strawberries, sliced or diced


Instructions:

For the cake:

Preheat oven to 325 degrees F.  Prepare your 9 x 13 inch pan with grease and flour. Set aside.

In a small bowl combine mashed bananas, cinnamon and lemon juice and set aside.

In a medium bowl combine flour, baking soda, baking powder and salt.  Set aside.

Using a handheld or stand mixer, beat the butter and sugars on high speed until smooth and creamy, a few minutes. Scrape down the sides of your bowl if necessary.

Add eggs and vanilla. Beat on medium speed until combined. Add dry ingredients, alternating with buttermilk.

Once thoroughly combined gently add in your mashed bananas and strawberries with a wooden spoon. Do not over mix. The batter will be thick and lumpy. This is okay.

Pour your batter into your prepared pan and bake for 60 minutes, or until a toothpick inserted in the center comes out clean.

Allow cake to cool in the pan for about 5 or 10 minutes before dumping on to a rack to cool completely. 


Cream Cheese Buttercream Frosting:

Cream the butter and cream cheese until smooth using your mixer.

Gradually add icing sugar and beat on low to medium speed until combined.

Once icing is well blended, spread all over your completely cooled cake. 

Decorate top of iced cake with nuts and strawberries if you would like to.


Kitchen Divas note:

You will need a 13 x 9 inch CAKE pan to make this recipe. An old, regular 13 x 9 inch pan will not be deep enough. Newer 13 x 9 inch pans are all made to be at least 2-1/4 inches deep. Make sure yours is before you start, to prevent the possibility of your cake overflowing over the sides of your pan.

Freezes beautifully but don’t add the strawberry decoration until completely thawed. Add them right before serving.


This was a 10 out of 10 and we both thought it was delicious.

I have never cooked a cake at a lower temperature than 350 degrees F. but it turned out perfect at 325 and was perfectly cooked. The tip of my knife came out clean, no uncooked batter.

It was also a very moist cake.

I didn’t want any strawberries left so I probably added an extra cup.

A few changes: I had no brown sugar (I thought I had but couldn’t find it anywhere).  I replaced it with regular sugar, so 2 cups of white sugar instead of one cup. A one time thing as have now added brown sugar to the shopping list. It will be interesting to see if it makes a difference.

I measured out 1-1/4 teaspoons of baking powder instead of just 1. I didn’t think it would make a difference. It didn’t but I am a little compulsive over exact measurements. 

Gregg thought this would be too rich for him with the icing. I left that off and if you didn’t know, you wouldn’t miss it.  

I also left off the decorations. Probably would add both for company.

A light dusting of confection sugar would look pretty, but there again, not necessary as this cake stood well on its own.

The Kitchen Divas said this is the cake you can freeze, so that is what I did with the rest of it. 

Husband was very happy as it’s been a very long time since I baked a cake.  I only bake them for special occasions, and I extended his birthday week!  

A small portion goes a long way!

I always recommend checking these websites out. So many good recipes on there, and they always give great tips for each one. There is a video showing the steps.

Their address is below.

https://kitchendivas.com/banana-strawberry-cake/


Monday, July 15, 2024

MONDAY MORNING RECIPE - STRAWBERRY, SPINACH SALAD WITH POPPY SEED HONEY-LEMON DRESSING - SERVES 4

It is a great time for salads with all the hot weather we have been having. I am also adding our 10-day forecast, occasionally, not all the time. Just a reminder for us to look back on. Here's ours starting tomorrow (I am writing this on 7-13-24). Happily we have some rain ahead. Good news for our farmers and good news for our gardens.


This recipe comes from Julia's recipes, hosted by Julia, who lives in Colorado, USA. Thank you Julia for this wonderful recipe. Great photos, great recipes if you would like to take a look, and the original recipe is at this link. She also has a lot of suggestions for other recipes to be served with it.


Strawberry Spinach Salad with Poppyseed Honey-Lemon Dressing 

Serves: 4

Calories per serving: approximately 370


Salad dressing:

¼ cup extra virgin olive oil

2 tablespoons Dijon mustard

3 tablespoon honey

3 tablespoons freshly squeezed lemon juice

2 tablespoons poppy seeds divided


Spinach Strawberry Salad

6 oz baby spinach

12 ounces strawberries cleaned, hulled, and sliced (about 3 cups)

½ cup feta cheese crumbled

½ cup pecans toasted


Make salad dressing:

Combine olive oil, Dijon mustard, lemon juice, honey, and 1 tablespoon of poppy seeds in a mason jar. Whisk well with a fork for 1 to 2 minutes until well blended. Add more (or less) honey or mustard to taste. (Denise’s note: I would also say go sparingly until you have added enough dressing to your salad for your own taste.)

Putting together:

Combine spinach, sliced strawberries, and toasted pecans (some whole some chopped) in a large serving bowl (or in 4 individual salad bowls).

Add salad dressing and toss to combine.

Top with crumbled feta cheese and sprinkle with extra poppy seeds.


Julia's Notes:

Toast the pecans on a parchment paper-lined baking sheet in a preheated oven at 350°F for 7 to 10 minutes, until they turn slightly darker (be careful not to over-toast them). Toasted pecans are crunchier and have a fresher taste.

Other nuts that complement a strawberry spinach salad are walnuts, toasted pine nuts, or salted shelled pistachios. Candied nuts are also great additions.

For a nut-free version, simply substitute sunflower seeds.

Alternative leafy greens include a spinach/arugula mix or butter lettuce.

Nutritional information can be read at the original recipe.


I am adding the full address if you prefer to copy and paste instead of clicking on any links.

https://juliasalbum.com/strawberry-spinach-salad-poppy-seeds/


Make ahead tips (Denise’s note: it was a lot of prep work and I would do all this for next time):

Toast pecans up to 2 days in advance. 

Toast them in the preheated oven at 350 F for about 7 or 10 minutes (Denise’s note: I have had trouble burning nuts, so I was cautious and took them out at a little past the 4 minute mark). Once they are cool, keep them in a ziploc bag at room temperature or in the fridge.

Make the salad dressing in advance:

You can make it up to 5 days in advance and keep it refrigerated in a mason jar. Bring it to room temperature before serving.

Assemble quartered strawberries, spinach, and crumbled feta cheese up to 5 hours in advance before serving.  

Add the nuts and the poppy seed dressing only when ready to serve. This will prevent spinach from wilting and will keep the nuts crunchy! (Denise’s note: I had added the dressing already for our meal. When we ate the two remaining meals the next day, it resembled a wilted lettuce salad, though we still enjoyed it. However, I wouldn’t make quite as much next time, and only enough for just two people to eat on the day of making.)

Storage Tips:

It's best to serve strawberry spinach salad right away, so it is recommended making just enough so that you have no leftovers. (See my note above.)

If you do have leftovers, the salad can be refrigerated for 2 days. It's best to refrigerate the salad and the dressing separately. 


What did we think? It was delicious and we enjoyed not only the ingredients but the salad dressing. You can play around with it if you think it is too sweet. We thought it was excellent, except I thought maybe to go easier on the poppy seeds as they seemed to be overboard on those. My advice for us next time is to use them sparingly until we have enough for them not to look too much. The following is a photo of what we thought was too much. That being said, it did not detract from the deliciousness.


Thanks for stopping by and as always, 

I hope your day is a great one. 

Bon Appétit!


Monday, November 7, 2022

MONDAY RECIPE POST POSTED ON TUESDAY - STRAWBERRY HAND PIES

This is one I originally made in 2014, and I have not done it for quite a while.  They were made for company and were very well received.  

These days I find myself looking to the freezer more and more, to make things less of a fuss when preparing meals.  Sometimes you enjoy being in the kitchen, other times you want to take things easier, especially if time is short or if you are having company and you would like to spend more time with them when cooking meals.

You can find the original recipe here.  I am always thankful to the many food blogs I come across, and I would like to thank Michelle who created A Latte Food, and for sharing this delicious recipe, as well as many others.


Strawberry Hand Pies - makes 12 hand pies

Ingredients:

For the dough - makes one 9-inch pie crust:

1/2 cup butter, softened
4 ounces cream cheese, softened
1 cup flour

For the filling:

1 cup chopped strawberries
1/4 cup sugar
1 teaspoon vanilla
Zest of half a lemon
2 tablespoons of cornstarch
1 beaten egg (for egg-wash)
Extra sugar for sprinkling

Choice of toppings:

Whipping cream
Ice-Cream
Powdered sugar


With a mixer cream butter and cream cheese together until light and fluffy.

Add in flour and mix just until dough comes together.  Place the dough in plastic wrap and chill for 30 to 60 minutes.

Preheat oven to 350 degrees.  Place parchment paper on a pan and set aside.

On a floured or powdered sugar surface, knead the dough a couple of times until it is a nice round ball.  Then roll the dough into a circle with a rolling pin, about a 1/4 inch thick.

Using a 3-inch biscuit cutter, cut out as many dough rounds as possible (about 5 to 6).  Place the dough rounds on sheet pan.

Form the dough back into a ball and roll out again.

Cut out 5 to 6 more rounds.  The recipe should yield 12 dough rounds, so keep repeating this step until you have 12 rounds (because of the cream cheese in the dough it will not get tough or overworked like traditional pie dough).

In a small bowl gently combine chopped strawberries, sugar, vanilla, lemon zest and cornstarch.

Fill each pie round with 1 to 2 tablespoons of filling.

Take one side of the dough and pull it over the filling.  

Use a fork to crimp the edges together and poke an air hole at the top of the pie.  Do this for all of the pies.

Brush each pie with egg wash.  Sprinkle with white sugar.

Bake for 30 to 35 minutes or until the pies are golden brown.

Sprinkle with powdered sugar, top with ice cream or whipped cream and enjoy!


What did we think of this recipe?  It was another one that we enjoyed very much.  
  
As always when I make something for the first time I find myself changing a few things out of necessity.  

I changed the lemon to lime zest.  I had no lemons and wanted to use the limes I had left over.  

When mixing up the strawberry filling, I thought I had cornstarch tucked in the back of the pantry but couldn't find it, so I used 2 tablespoons of flour instead.

I didn't have a form but used a fork to press the edges together.

What I like about this hand pie, apart from the fact that it was delicious, is that it is great for portion control.  A lovely dessert without feeling that you went overboard.  

These would be easy to freeze.  Let baked pies cool, then wrap and freeze.  Thaw out overnight in fridge.  Preheat oven to 350 deg.F, place on a parchment-lined baking sheet and bake for 30 minutes or until heated through?  Be careful of filling and cool before you eat.  Best to check timing and adjust for your own oven.  Ours tends to run on the colder side, and I usually add on extra time if needed.

We wanted something light and ate a very a simple main meal beforehand; sliced roast chicken with steamed broccoli and a baked potato.  This Strawberry Hand Pie made for a lovely ending to the meal.


Monday, July 6, 2020

MONDAY RECIPE POST - MIXED BERRY CROSTATA

This Monday's recipe comes from Saving Room for Dessert, hosted by Tricia.  You can find it hereThank you Tricia for not only a delicious but very pretty dessert.  Always encourage you to read the original recipe just in case I have missed anything out.  Also there are great recipes to enjoy.
Mixed Berry Crostata

Preparation time: 30 minutes
Cooking time: 45 minutes
Total time: 1 hour 15 minutes


Ingredients

For the pastry dough:

2 cups all-purpose flour
12 tablespoons unsalted butter, cold and cut into cubes
1/2 teaspoon salt
1/2 cup powdered sugar
1 large egg yolk
2 tablespoons ice water


For the filling:

4 cups mixed berries, (blackberries, blueberries and raspberries)
1 tablespoon cornstarch
1/3 cup granulated sugar
Juice of 1/2 lemon (I also used the zest)
1 tablespoon cold unsalted butter, cut into small pieces
Egg wash
Coarse sugar for topping


Instructions

To prepare the pastry dough:

Combine the flour, salt and powdered sugar in the bowl of a food processor.

Add the butter and pulse until it forms a coarse meal.

Add the egg yolk and ice water and pulse just until the dough comes together.

Gather the dough together and divide into two equal size pieces.

Form each piece into a disc and place on a piece of plastic wrap.  

Wrap tightly and refrigerate for 1 hour or overnight. If chilled overnight allow the dough to rest at room temperature for 15-20 minutes before rolling out.


To assemble the crostata:

Preheat oven to 375 Fahrenheit.

Place the berries in a large mixing bowl.

In a small bowl or measuring cup, whisk together the cornstarch and sugar and pour over the berries.

Add the lemon juice and toss to combine (if you are using lemon zest add this also).

Divide the dough in half. On a lightly floured, clean work surface, roll each half into a 10-inch round. 

You can freeze the extra round.  As there was just  the two of us we didn't make the extra crostata.  We adjusted the filling ingredients accordingly.

(I found a page here to refresh on freezing dough and it said:

"Pie dough is a great keeper in the freezer.  As long as it is tightly wrapped in heavy-duty aluminum foil or freezer-weight plastic wrap and sealed in a freezer bag, it should keep up to 6 months.  Pie dough freezes so well, in fact, you'd be wise to make some extra to keep around for whenever inspiration strikes. For extra convenience you can freeze pie crusts in the pan.  This allows you to roll-out the dough ahead of time, and best of all, the crusts need no thawing prior to baking.  A little extra cooking time is the only adjustment necessary.")

Back to our recipe. Transfer the disc to a parchment-lined baking sheet.

Repeat with the remaining dough if you are using and forget about freezing the extra disc of pastry.

Mound half the berry mixture in the center of a dough round leaving a 2-inch border.

Fold the edges of the dough up, overlapping as needed, covering part of the fruit.

Scatter half the diced butter on top of the fruit.

Brush the dough edges with a lightly beaten egg and sprinkle with coarse sugar.

Bake the crostatas until crust is golden brown and the fruit is bubbling, about 45–50 minutes. Let cool before serving.

Recipe Notes

Do not make the dough rounds any larger than 10 to 11 inches. The dough will be too thin and not hold together well.
My crostata did not come out as pretty as those in Tricia's photos, but it tasted delicious.  It is the first time I have made anything like this that wasn't in a pie dish and I need practice.  I found a  YouTube video here.  It is very close to Tricia's recipe and it is good to have those pointers.  

I not only juiced the lemon but I also used its zest.  

I bought ready-made puff pastry, the kind that is frozen and comes in two sheets to the box.  

I only needed one sheet and when thawed I placed it on a flour-dusted board.  As they are oblong shapes I used a dinner plate roughly the size needed, and used it as a template to cut out the round shape.  I rolled this out a bit but had to be careful as I didn't want to get it too thin as it will break.  I've used these puff pastry sheets before and have always been pleased with them.  

I used fresh blackberries and strawberries for the filling.  

There are a few slices left for the next couple of days.  

I think that's about all I can think of on the changes I made.

Did anyone ever go blackberry picking?  I would love to hear your story.  On Sunday drives in the countryside when I was very young, my family and I would often find a pretty place to stop and have a picnic.  This was in the 1950's/60's.  Mum sometimes packed sandwiches, but mostly always included cold sausages, hardboiled eggs, and carried a knife for thick slices of fresh bread with butter and cheese, probably a few other things I can't remember, and pop.  On the way home Dad would find a farmers gate to tuck the car into, read his newspaper while Mum, my sister and I walked along the lane and searched the hedgerows looking for wild blackberries.  These quiet country lanes which barely fit one car width, rarely had any traffic and we were quite safe but you know, always aware with eyes and ears.  Sometimes we would collect enough to make a pie and sometimes just enough to fill a small bowl topped with cream for that night's dessert.  Another nice memory from childhood.

Writing this on the 4th of July, I am listening to the sound of fireworks and firecrackers as we enter the twilight hour.  We opened our patio door, stepped outside for a while and watched at least two families, and listened to the giggles of small children. The heat had gone out of the day and it felt very pleasant.  I would gladly sit outside if it were not for the humidity and worst of all the mosquitoes. We are not very fond of each other.  (How on earth did they get on Noah's ark?)  Well, I should say they are fond of me but I definitely don't return the feeling.  The first time they arrive they always take me by surprise and I start swatting.  It isn't long before I have a dozen or so bites. The next day I am itching like crazy, tormented by the fact that I can't scratch while reaching for the magic ointment to calm the fire.  Occasionally one gets inside the house and I wake up with my feet or elbows on fire.  They leave hubs completely alone.  Noah, for crying out loud?

Enough of the jest, we spent our day quietly just the two of us, the first time in many years on Independence Day.  The introvert in us is okay with that and we both enjoyed it, though we obviously thought of our family and friends.  God willing, as my dear old Dad used to say, there is always next year.  He was also introverted but always optimistic.


Monday, March 4, 2019

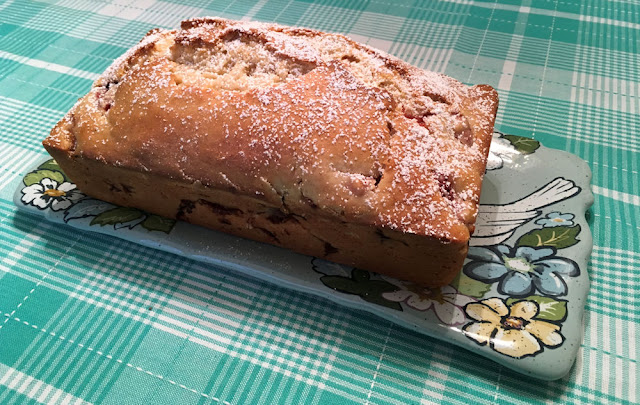
MONDAY RECIPE POST - FRESH STRAWBERRY BREAD


I made this on Monday, February 11th, 2019.  I had strawberries left in the fridge and needed to use them up.  The recipe came from Lemon Tree Dwelling and its host is Cathy.  You can see her recipe here.  I recommend going to her blog for the photos alone, and you will see lots of delicious recipes.  Thank you for this one Cathy, it was delicious.

Fresh Strawberry Bread - makes 1 loaf

Preparation time: 10 minutes
Cooking time: 1 hour
Total time: 1 hour and 10 minutes

2-1/2 cups all-purpose flour
1 cup sugar
1 teaspoon salt
3 tablespoons vegetable oil
1 cup milk
1 egg
1 teaspoon vanilla
1-1/2 cups fresh sliced strawberries

Combine all ingredients in a large mixing bowl; fold in fresh strawberries.

Pour into a greased loaf pan.

Bake at 350 degrees for 55-65 minutes, or until the top is golden brown and completely set.

Cool slightly then loosen sides of loaf from pan.  Remove to a wire rack to cool completely.  

We enjoyed this very much, it was yummy. A few observations:

I had to bake the bread longer than the time above.  When tested after 60 minutes, it was uncooked in the middle and was still pale on the top.  I added 15 extra minutes.  (My oven always seems to need more cooking time for most recipes.  You might want to check cooking time with your own to prevent over-cooking.)

My batter seemed too stiff and dry. I added splashes of milk until I felt it was the right consistency, and similar to other quick breads I have made.  

I wish I had thought to add 1/2 cup chopped walnuts.  We missed those nuts we usually put in these breads.  

It came out of the pan without a problem after loosening the edges, as suggested in Cathy's recipe.  

It was a very easy recipe.  Best of all it tasted great.

The long serving plate was a gift from my daughter-in-law last year.  

It actually comes with a dip bowl but I only needed the plate this time.  The bowl has two pieces, one for the dip which fits into a container that has an opening for a tea light, to keep whatever you have above nice and warm.  This would go great for my spinach and artichoke dip recipe.

She buys the cutest gifts for birthdays and Christmas, always so thoughtfully given.  I love the little bird among the flowers, and now for the owl.  

Knowing how much I love birds, last Christmas one of her gifts to me was a ball of birdseed on a string in the shape of an owl.  You can see it in the photo above as it peaks through the cellophane wrapper.  I haven't put it outside yet because I have been enjoying it and didn't want to see it disappear too quickly.  Soon the birds will get their feast.  Very cute, and with thanks to my sweet daughter-in-law, not only for her thoughtful gifts but also for the fact that she brings a lot of happiness to our family.


Monday, April 30, 2018

MONDAY RECIPE POST - STRAWBERRY POUND CAKE


Strawberry Pound Cake 
Serves 12 
Calories per slice: 330
Preparation time: 20 minutes
Cooking time: 1 hour


The original recipe can be found here at allrecipes.

1 cup butter
1-1/2 cups white sugar
2 eggs
1 teaspoon of vanilla extract
1 teaspoon ground almonds
2 cups all-purpose flour
1/3 cup milk
1 cup strawberries, quartered
1/4 cup water


Preheat oven to 350 degrees F (175 degrees C).

Grease two loaf pans or 1 square baking dish.

Beat butter and sugar with an electric mixer in a large bowl until light and fluffy.  The mixture should be noticeably lighter in color.

Add eggs one at a time, allowing each egg to blend into the butter mixture before adding the next.

Beat in vanilla extract and ground almonds with the last egg.


Pour flour alternately with milk, mixing until just incorporated.


Fold in strawberries and water; mixing just enough to evenly combine.


Pour the batter into prepared pans.


Bake in the preheated oven until a toothpick inserted into the center comes out clean, about 1 hour.


Carefully run a paring knife between the cake and the edge of the pans, and allow cake to cool completely before removing from the pans.
Slice, serve and enjoy.  It was very yummy.


What did we think of this dish.  It's a keeper.  One thing I was surprised at is that there is no baking powder or baking soda added to the ingredients.  When I have made others they have always been part of the list and at first I thought that might have been left out by mistake.  However, as I am a corner-to-corner kind of a girl I followed the recipe and kept my fingers crossed.  While the poundcake didn't rise as much, the texture was still moist and tasted great. 

I would recommend reading the comments people have made at the allrecipes website.  Some have said that they would put all the batter in one loaf pan and cook it longer, maybe 10 minutes more but you would have to check depending on your own oven temperature.  Mine was done after 50 minutes.  I like the loaf shape but it would be fun to try a square pan next time, or a round one, whatever you have on hand.  Adjust the cooking times accordingly.

I skimped on the strawberries as I didn't have quite enough for a whole cup.  I thought I might even add more than a cup next time, maybe a cup-and-a-half.  
I think you could add any fruit to this.  I would definitely try blueberries, or raspberries for this recipe.


As I didn't have any strawberries left over to decorate the top of the cake, I used blueberries in place of them.


I had a few whole almonds left in a packet, and ground them using a blender.  You can also leave a few larger crumbles.  I would also add a tablespoon instead of a teaspoon, just because I love the taste of almonds.

When removing the cake from the pans one of them stuck a little, even though I had loosened the sides as directed. I eased a spatula under the cake, which helped a lot.  Maybe I didn't grease the pan enough.

To serve I sprinkled icing sugar over the top of the cake.  I also have English Custard in the pantry.  Pouring it over the slices would make a nice dessert, though I liked it as is, sliced and popped on my plate.


A big thank you to my daughter-in-law for being my inspiration.  She is an excellent baker and sent over a packet of muffins the other day, which were delicious.  She has also done a lot of baking to give to family and friends.  This reminded me that I hadn't done any baking for quite a while and as I had strawberries in the fridge, there you go.  I made this Strawberry Pound Cake that I had in my collection, and have been wanting to try for a while.  


Well, apart from trying to expand this piece of cake by blowing it up with a bicycle pump, the only alternative was to find a pretty plate!  I just had a slice with a cup of tea and take my word for it, it was yummy.  Next time I will be putting all of the batter into a square baking pan.  It is just too tasty not to make again and both Gregg and I gave it a thumb's up.