Showing posts with label Bread. Show all posts

Monday, January 26, 2026

MONDAY MORNING RECIPE POST - CORNED BEEF AND CABBAGE PLUS IRISH SODA BREAD

I hope everyone has gotten through the snow and ice storms without anything untoward happening. I am writing this on Sunday (the 25th) and as I type, sleety snow is falling and has been falling since last night. We have had about eight inches so far, but snow will fall for the rest of the day, so it remains to be seen what we will end up with. I won't be going anywhere for a while, not even for a walk in the snow as I know there will be a layer of ice to contend with. I have learned from experience, that we do not mix and I don't want any more falls or sprained ankles or knees as in years' past. So, safety first and please take good care of yourselves and stay safe out there if you have to be somewhere.


Now for this week's recipe. We still have some time to go before Saint Patrick's Day, but as I didn't make anything new this week, I decided to get this out early. You can find the original recipe here.  Lynne is the host of Cook and Be Merry. Unfortunately, her blog has been closed since August 11th, 2016, but her recipes can still be viewed. Thank you Lynne for leaving us your delicious recipes to browse through.


Corned Beef and Cabbage  -  serves 4

1 3 pound corned-beef brisket, in plastic pouch with brine and spices
1 onion
3 whole cloves
2 Turkish bay leaves
1 chili de arbol
4 carrots
5 small rutabagas
1 large russet potato
1 medium green cabbage.

Preheat oven to 325 degrees F.

Place corned beef, brine and spices in a large Dutch oven or deep pot and put enough water in the pot so that 4 inches of water is over the top of the meat.  Bring to a boil, skimming the surface to get rid of any froth.  

Cut an onion in half lengthwise, peel and stick cloves into each half.

When the water comes to a boil, continue skimming to remove as much debris as possible.  Add the onion, bay leaves and chile de arbol to the pot.  Cover pot tightly with aluminum foil and tight fitting lid. 

Place covered pot in oven and braise for about 3 hours, or until a fork easily pierces the meat.  Carefully remove the foil taking care not to bend over the pot as steam will escape in a rush and you don't want to burn your face.  

A half hour before the meat is done, peel the carrots and cut in half lengthwise.  Peel the rutabagas and potatoes into 1-inch cubes. 

Remove the tough outer leaves of cabbage and cut head in half, top to bottom, through the core.  Cut each half into 3 wedges, through the core.

With large tongs, remove brisket to a platter, covered with foil to keep warm.

Bring the broth to a boil and then place cabbage, carrots, rutabaga and potatoes in pot.  Add enough water to cover above the vegetables by an inch.  Place cover on pot and leave about a 1/2 inch opening for steam to escape.  (Again, please remember not to bend over pot when you remove the cover later.)  Bring to a boil and then turn down to a simmer.  Cook vegetables for about 15 minutes or until very tender.  Test and remove to platter if one is done before the others.

Remove vegetables to a warmed platter.  Place brisket back in the broth to reheat, then remove to a cutting board to slice into 1/4 to 1/2 inch thick slices.  Place slices on a platter with the vegetables for serving.

Pour broth through your finest sieve into saucepan to remove all particles.  Pour enough broth over beef and vegetables to suit your taste.  Serve in flat soup bowls, passing extra broth at the table.


Irish Soda Bread - makes 1 loaf

This recipe also comes from Lynne's blog and you can see it here. I actual have it on my blog already as I made it again back in 2022. 

4 cups all purpose flour
2 tablespoons sugar
1 teaspoon Kosher salt
1 teaspoon baking soda
4 tablespoons cold salted butter, in thin slices
1 cup raisins
1 egg, lightly beaten
2 cups buttermilk

Preheat oven to 425 degrees F.  Line a baking sheet with parchment paper and lightly coat with cooking spray.

In large mixing bowl whisk together the flour, sugar, salt and baking soda.

Using a pastry cutter or two knives, cut butter into flour mixture until it resembles course meal.  Stir in raisins.

Make a well in flour mixture and pour in beaten egg and buttermilk.  Mix with a wooden spoon until all flour is incorporated into the buttermilk.

Liberally dust work surface with flour.  Transfer dough to surface and sprinkle with flour.  With flour dusted hands, form the dough into into a ball that is relatively smooth.

Place baking sheet next to the dough work surface and place dough ball on sheet.  Dough is very soft so use hands to scoop up and surround ball to transfer to the sheet.

Using a serrated knife, score top of dough with an x-shape, half an inch deep. 

Bake about 40 minutes or until bread is golden and bottom sounds hollow when tapped with a knife.

Transfer bread to rack to let cool briefly.  Serve bread warm or at room temperature, with lots of lovely butter.  To stay in with the Irish theme I use Kerrigold (an Irish butter) because I grew up on it and love its taste, but obviously any butter of choice would do.

There will be left-overs and I am thinking it would a) make great toast or b) great French toast.


What did we think of these recipes?  

First I'll talk about the Corned Beef and Cabbage.  Gregg gave this dish a 10 out of 10, so thank you Lynne.

I couldn't find the chili de arbol. I saw the jalapenos in the store and that's what I used.  I deseeded it because I wasn't sure how hot it would actually be and I aired on the side of caution.  As it turned out it wasn't that hot, and next time I will probably try leaving half the seeds in, or maybe a quarter, or maybe an eighth.  I think you get the picture.

I also did not know where to find Turkish Bay leaves and used the. regular Italian.

Irish Soda Bread, a great accompaniment to the above.  I had never made this before either, and was surprised at how soft the dough was. You really do need to flour your hands really well, and also have that board next to the prepared pan to transfer it, as Lynne mentioned in her recipe. I had to finagle the dough mixture a bit as mine turned out real sticky. I think it was because when I cut in the butter, I couldn't get it to look like coarse meal, so I added three extra tablespoons of butter.  I don't think I needed that at all.  However, after adding a little more flour it was fine, and I was delighted when it turned out looking just like it should.  

We have leftovers, which is always a plus.

I have left the addresses for both recipes in full below, for you to copy and paste in case you prefer not using the links above.

https://cookandbemerry.com/corned-beef-and-cabbage-for-st-patricks-day/

https://cookandbemerry.com/irish-soda-bread-for-st-patricks-day/

Thanks for the visit and I hope your day is a great one, snow and ice aside.


.

Monday, November 10, 2025

MONDAY MORNING RECIPE POST - NO-KNEAD ARTISAN BREAD - SERVES 4

I found my recipe from ‘The Recipes of Home’ hosted by Lauren. I don’t bake bread very often but this was delicious. The original recipe can be found here. I am happy to say it was a 10 out of 10 and thank you Lauren for this no-need recipe. 


Easy Dutch Oven No Knead Bread - serves 4


3 cups all-purpose flour

2 tsp active dry yeast

1 ½ tsp sea salt

1 ½ cups warm water (around 105°F)


In a large mixing bowl, combine the flour, active dry yeast, and sea salt. Stir the dry ingredients together, then slowly add the warm water.

Use a wooden spoon or silicone spatula to mix everything together until it forms a rough, sticky dough ball. Don’t worry if it is shaggy as this is exactly how it should look.

Transfer the dough to a clean, lightly greased bowl.

Cover it loosely with plastic wrap, then place a moistened kitchen towel over the top.

Let the dough rise at room temperature in a draft-free area for 18 to 24 hours.

By the end of this slow rise, the dough should have doubled in size and be filled with small air bubbles—this is the secret to its chewy, airy texture.

About 30 minutes before you’re ready to bake, preheat your oven to 450°F (230°C).

Place your Dutch oven (with the lid on) into the oven while it preheats. This ensures the pot is piping hot, which gives the bread its beautiful crust.

This is a photo of a Dutch Oven similar to the one I have had for many years.

Flour your countertop generously and gently turn out the dough onto the surface.

With floured hands, shape the dough into a loose ball.

Don’t over-handle it—this dough loves to be treated gently.

Carefully remove the hot Dutch oven from the oven (use oven mitts as it is obviously extremely hot).

Gently place the dough into the pot.

Cover with the lid and bake for 30 minutes.

Then, remove the lid and bake for an additional 10 to 15 minutes, or until the top is a deep golden brown and the crust sounds hollow when tapped.


I have added several of Lauren’s tips for success:

Water temperature matters:

Ensure the water is warm, not hot. Around 105°F is perfect to activate the yeast without killing it.

Use parchment paper for easy transfer:

Place the dough on a sheet of parchment paper before lowering it into the Dutch oven. This prevents sticking and makes cleanup easier. (Denise’s note: Mine slightly overlapped and it was easier to take the bread out to put on the cooling rack, using great care to prevent burning fingers. I have oven mitts that look like a thick pair of gloves.)

No Dutch Oven? You can use a heavy oven-safe pot with a lid, though a true cast iron Dutch oven gives the best results.

Store: once cooled, wrap the bread in a clean kitchen towel or store in a paper bag. Avoid plastic wrap, which can soften the crust.

Best enjoyed within 2 to 3 days.

Reheat: to revive the crust, place slices in a 350°F oven for 5–7 minutes or toast in a skillet.


More notes from Lauren:

Baking bread at home doesn’t have to be intimidating. With this Easy Dutch Oven No Knead Bread, you get the satisfaction of homemade artisan bread without the effort of kneading or fancy equipment. It’s rustic, hearty, and soul-warming—the kind of loaf you’ll want to make again and again.

Serve it with a pat of butter, a bowl of soup, or just on its own. However you slice it, this bread is a timeless classic that brings comfort to your table all year round.

Bake crusty, no-knead bread in a Dutch oven! Just 4 ingredients for a simple, hearty artisan loaf.

My notes: I was delighted that it turned out but have to admit, after only four hours rising time. It had doubled in size and I decided to go ahead and bake it. I will follow the recipe exactly next time (let rise for the 18 hours). I am curious if that will make such a big difference as the result of this loaf was great.

One night we cut 2 slices to use for cheese toast. We found one slice cut into two pieces was enough for each of us as each slice is quite large. To those we  added a mixture of grated Gruyere and Mozzarella. It was what we had left from other recipes and thought it would be a good idea to see what this bread would be like toasted. It didn't disappoint. Very yummy! Sometimes we have cheese toast with tomato soup for supper. That seems to be a combination that many of us enjoy.


I served it with the ground beef stew which I shared on last Monday’s recipe post at this link. They went very well together. Coming back into the house after stepping outside, we were greeted with this most amazing aroma.


Full address for the bread recipe is below, for those who prefer to copy and paste instead of using the link above.

https://recipesofhome.com/easy-dutch-oven-no-knead-bread/#google_vignette


Thanks for stopping by and have a great day everyone.


Monday, October 20, 2025

MONDAY MORNING RECIPE POST - GARLIC PARMESAN FOCACCIA BREAD

We have kept bread off the shopping list for the last month but as the weather turned chilly and we had done well at cutting carbs, we thought this would be a great treat. It was!

Today I visited 4Recipe hosted by Zee. The actual recipe can be found at this link. It is the first focaccia bread I have ever made, and I was very pleased how it turned out. 


Garlic Parmesan Focaccia Bread - 8 servings

Approximately 230 calories per serving.


This savory Garlic Parmesan Focaccia Bread features a fluffy, golden crust topped with fresh garlic, parmesan cheese, and aromatic herbs. Perfect as an appetizer, side dish, or snack for any Italian-inspired meal (or non-Italian because we served it with Cheesy Vegetable Chowder and Corn Chowder.


3 1/2 cups all-purpose flour

1 packet (2 1/4 tsp) active dry yeast

1 1/4 cups warm water

1/4 cup extra-virgin olive oil, plus more for drizzling

2 teaspoons salt

1 teaspoon sugar

4 cloves garlic, minced

1/2 cup grated parmesan cheese

2 tablespoons chopped fresh rosemary (optional)


In a large bowl, dissolve the sugar in warm water. Sprinkle yeast over the water and let stand until foamy, between 5 and 10 minutes.

Add flour, salt, and 1/4 cup olive oil to the yeast mixture. Mix until a dough forms, then knead on a floured surface for 8-10 minutes until smooth and elastic.

Place the dough in a well-oiled bowl, turn over so that the top is now oiled as well as the bottom. Cover and let rise in a warm place for about 1 hour or until doubled in size.

Preheat oven to 425°F (220°C). 

Punch down the dough and transfer it to a greased baking sheet. Press it out to a 9×13-inch rectangle.

Drizzle the dough with olive oil, sprinkle with minced garlic, parmesan cheese, and rosemary. Dimple the dough with your fingers.

Bake for 20-25 minutes or until golden brown. Let cool slightly before slicing and serving.


I added several notes from Zee but I always recommend visiting his food blog to see all the other wonderful recipes, and to read more about this one.

"If it turns out too dense, it probably just needed more rising time. Check to see if your yeast is fresh.

The dough relaxes more if you leave it in the fridge overnight. I didn’t believe this for the longest time; apparently, bakers know things.

If you forget the salt, well, it’s still edible. But best to sprinkle some on top when it comes out of the oven. Learned that one the hard way.

Officially, focaccia keeps in an airtight container for 2-3 days, but honestly, in my place it never lasts more than a day! If you do end up with leftovers, wrap them in foil, and pop ’em in a warm oven to revive. 

I love serving this bread with pasta and a big green salad. But it also makes a great snack dunked in soup or sliced for sandwiches. My family just tears off big chunks with a splash of oil and balsamic.

Lessons Learned (Aka: Don’t Be Like Me):

I once rushed the rise—big mistake. Ended up with a focaccia slab you could use as a doorstop. Now, I give it time or just park it in the fridge overnight. Honestly makes a difference.

Leaving the dough uncovered dries it out fast. I used to do this and wondered why I got that sad skin on top.

I always forget this, but oil the pan generously; otherwise, you’ll need a jackhammer to get the bread out.

“Can I freeze this?” Probably, but to be honest, I tried once and it was just okay. Better fresh or next day.

“Is it okay if my dough looks really sticky?” Actually, sticky is good. Just don’t over-flour it. If it’s super runny, toss in a bit more flour, no panic.

“Do I have to use all that garlic?” Well no, but why wouldn’t you? (Kidding; adjust to your taste!)

“Why isn’t my focaccia fluffy?” It probably needed a warmer spot to rise, or just a bit more patience. Bread’s funny that way. Still tastes alright though."

What did we think? For a first attempt I was very happy. I made our all-time favorite soup for the first time this chilly season, Cheesy Cheddar Chowder, and repeating this link. It made a great dipping bread. 

I thought kneading the dough for ten minutes would be a real pain, but it was interestingly very therapeutic. 

I skimped on the Parmesan cheese but next time I will definitely not and may use more. The taste of it, plus the garlic and the rosemary, was a real plus. Next time I definitely will not skimp.

The following night I sliced, toasted and popped a poached egg on the top. If you like poached eggs, or even a fried one, this was a very tasty option. It made a nice, light supper with a small green salad.


Just out of curiosity, what is your favorite meal. I am always looking for new ideas if you would care to share.


Below is the full address in case you prefer copying and pasting instead of using the link above.

https://4recipe.com/garlic-parmesan-focaccia-bread/

Thanks for looking everyone, 
have a great day and 
Bon Appétit.


Friday, October 18, 2024

ODDS AND BODS 10/16/24

I am starting off with a poem today, and you know how much I love my poems. Often they are oldies but goodies, and sometimes ones I have shared before.

 How about this then? Could you live here? Take a short holiday? It’s really cute!  I would probably want a small garden though.


May I a small house and
large garden have, and
a few friends and many 
books, both true, both wise,
and both delightful too.

~Abraham Cowley(1618-1667)~


I thought these pumpkins were beautiful.


One more!


As we are coming up to Halloween at the end of this month, the witches are getting ready to fly.  They are…


A thought for anyone who has ...


friends or relatives in a retirement home. You may have done this already, but I thought what a sweet idea.


Now for some food pictures. I am in awe of these cake decorating designers.


Back to reality!


I grew up with fluffy dumplings and those are what I prefer to make, but these sound good… 


and these.


Talking about this as I was the other day, here is a recipe. 


One last recipe.


And now fun with food. 


Onto other things. 


I found this photo on Pinterest, along with a link to the lantern below. How pretty is this picture? Those nests are amazingly tiny. The lanterns are on Amazon and not that I am touting the company, but I just love this lantern. The advertisement says Hummingbird Solar Lantern - Outdoor - Waterproof, etc., etc. Will I buy it? If it was sold locally in the bird shop I used to go to, probably. I enjoyed visiting this family-owned shop, used to go there quite a lot back in the day. Sadly they closed. 


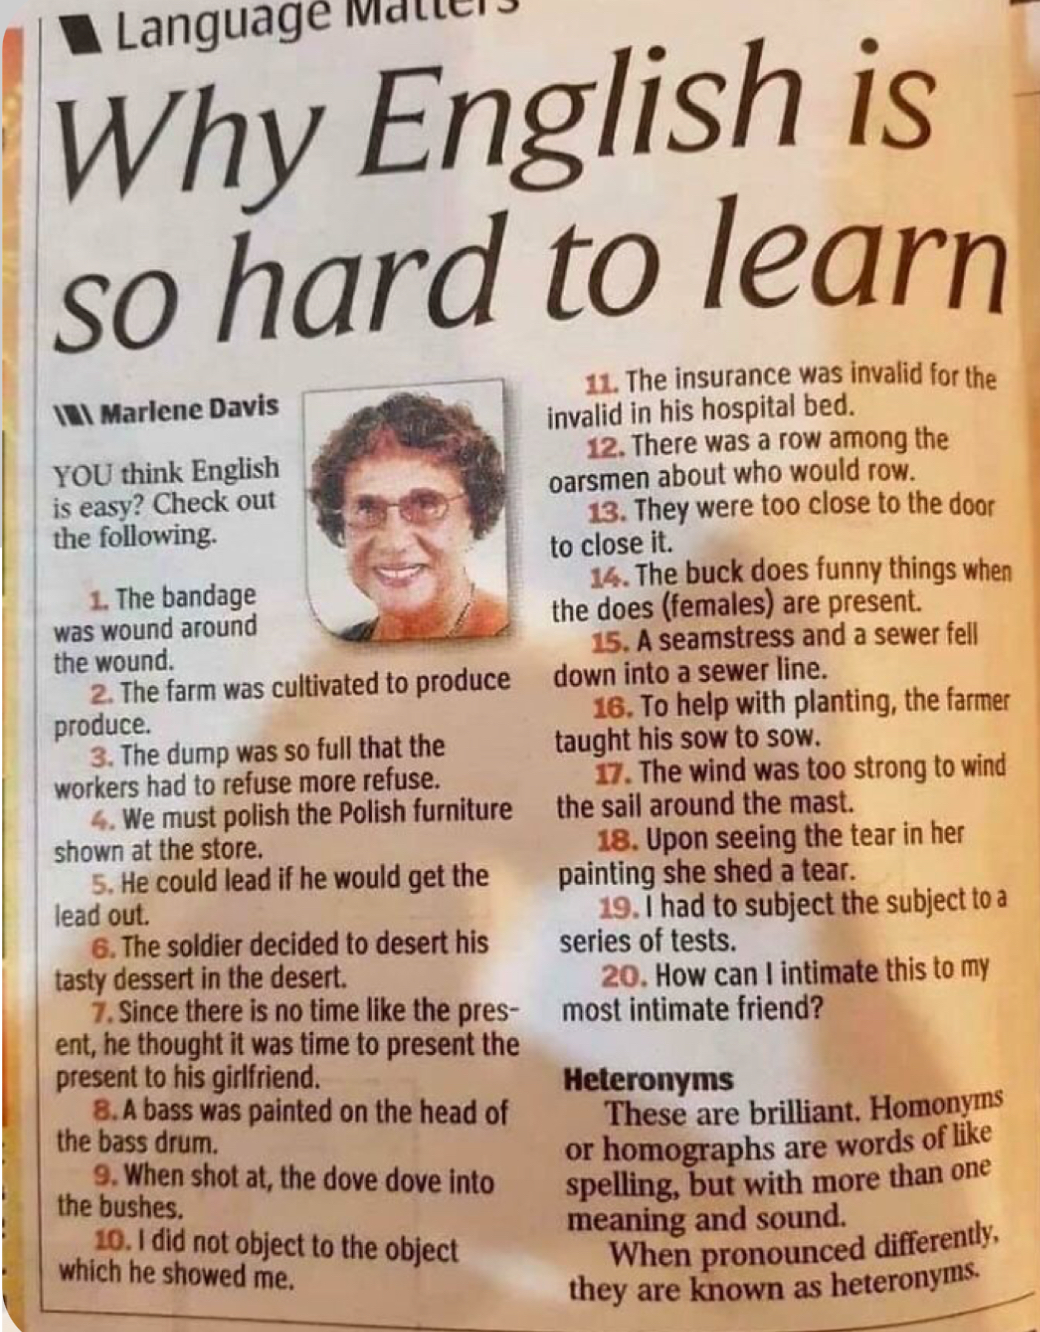
This is interesting. Don't forget to enlarge for better reading or seeing any of my pictures in greater detail.


I once had a friend who was learning English and she told me it was very hard. Years ago I took a class with six months of Mandarin Chinese and thoroughly enjoyed it, but it was as my friend said of English, very hard. We had to leave the area before the course was over. I never did get back to it, much to my chagrin. Looking after a baby/toddler obviously took precedence and I gave him all my time. Being a navy wife also had its responsibilities and I wouldn't have either any other way. Learning a language is great mental gymnastics for anyone. Gregg is trying his hand at French. He is French on his Mother's side. I always liked the idea of learning Spanish but I can't roll my "r's". I try and pick up a few words here and there, and find it fun to learn, but my memory isn't very good. Still, I even enjoy my snail's pace and am hoping something will sink in.


Wise words!


Did you know…


Very naughty of me but this is a gotcha moment! The above story is false, darn it! A good tale though. Just goes to show however, that we can't believe everything we read. Check, check and fact check again! We need lots of patience to wade through all those pork pies! And here we go again, off on another tangent.

What do I mean by 'pork pies'? Well, funny you should ask. Yes, I know you didn't but...

Apart from the literal meaning of actual pies filled with pork, 'pork pies' is a Cockney rhyming slang for 'lies'. With rhyming slang the actual portion that rhymes is often dropped in order to further confuse the outsider, so it becomes 'porkies'. So, someone 'telling porkies' is a liar, liar, pants on fire sort of a person.  If you want to know about Cockney rhyming slang, you can go here. My Dad always told me, and this was as far back as I can remember, that a Cockney was born within the sound of Bow Bells, which you can read about here

Oh my goodness, you never know where these posts are going. I definitely miss my walks around the gardens and yet I am having fun with all these things that I find.


Wise words seen outside a local church.

“Tweet others as you 
would like to be tweeted.”


Now for more poetry.


Love to read my poems. An oldie but goodie. It’s a bit sad when I deep think it. I welcome all opinions on any of these poems I share, or anything else for that matter.


Profound!


Hmmm…who could this be? 


He agrees!


Have a great day everyone 
and thanks for once again sticking through to the end of this epilog. Certainly no worries if you didn't. I am falling asleep too.


Monday, October 7, 2024

MONDAY MORNING RECIPE POST - CHEESE AND LEEK AND HERB BREAD

Every now and again I browse through Instagram for recipes. I was looking for something light. This doesn't exactly fit that category. However, it did fit perfectly with the cheesy vegetable corn chowder we made to go with it, an old favorite you can find here. It was a perfect pairing. If you would like to look at this lady’s video, it's a short one and you can find it here. I tried my best with equivalent measurements as the original came in grams. I have added the ounces and cups at the bottom of the recipe. However, scales these days have both measurements and it makes life easy when trying recipes from overseas, as I found out today. 


Cheese and Leek 'Herb Bread'

Feeds 4 to 6

500g self-raising flour 
1 teaspoon baking powder
1 teaspoon dried parsley
2 leeks, finely chopped
110g butter 
175g grated cheddar cheese 
200ml water 
A little milk for brushing over the top
Salt and pepper, measurements aren't given

Heat the oven to 200C (or 400 deg. F). 

Place the finely chopped leek in a pan with a drizzle of oil. Fry for five minutes until soft.

Place the flour in a large mixing bowl. Stir in the baking powder, dried parsley (you can use oregano or mixed herbs if you prefer) and salt and pepper.

Add the butter and quickly mix in. I cut it into small pieces first.

Mix in the grated cheddar and leeks until thoroughly blended.

Add the water. Use your hands to mix it together until you have a smooth-ish dough.  Place the dough on a large greased or lined baking tray (I used parchment paper on my tray). Press dough down until you have a thick circle roughly 20cm across (that works out to almost 8 inches). Brush the top of the loaf with a little milk. 
Bake in the oven for 30 minutes until cooked through. If the top is cooking too quickly, just cover it with foil for the last few minutes of baking.

Leave to cool before cutting into wedges but when it is still a little warm. 

Serve and enjoy!

U.S. Measurements:
4 cups of self-rising flour
1 teaspoon baking powder
1 teaspoon dried parsley
2 leeks, finely chopped
1 stick butter
7/8 of a cup of grated cheddar cheese or 6 ozs
5/6 cup or 6-3/4 fl. ozs. water
A little milk for brushing over the top.
Salt and Pepper (no measurement given for these - I barely used a sprinkle)

I was very pleased with how this turned out and we both gave it a ten out of ten.  The video host Amy said it looks like a really big scone when done. This is what I thought. I have cooked scones in a round like this, but cut into sections before baking, spreading about two inches away from each other. 

Those scones I mentioned I put sliced green onions in them, and bits of ham along with the cheese. They look almost identical to these. You can take a look at that recipe here.

You can use other favorite herbs if you prefer.

I have cut the rest into small slices and put them in a freezer proof container for several other meals. If they are anything like the scones, they will be great when thawed out and reheated.

This would also be a great breakfast on the go.

Added note: Almost forgot, these leeks have a lot of grit/dirt between the leaves. I rinsed through them as best I could. When they were chopped, I gave them three or four rinses, changing the water each time. Then I blotted them well and let them dry out before sautéing in the frying pan. 

Thanks for looking and 
I hope your day is a great one.